How Do You Put in Curlers: A Complete Guide with Proven Tips
How do you put in curlers so your hair looks great all day? Start by dividing clean, dry or slightly damp hair into small sections. Wrap each section tightly around the curler.
Secure them close to your scalp. Make sure you don’t pinch your skin.
Make sure your hair is smooth before rolling to avoid lumps or tangles. Keep curlers in for your hair type. For hot rollers, wait 10 to 30 minutes.
Use foam rollers overnight for best results. The right timing helps curls last without damage.
Keep your head steady while rolling to avoid uneven curls or creases. Use curlers that fit your hair length and texture for best results. This way, you’ll get consistent curls that hold well and look natural.
Key Takeaways
- Divide your hair into small, manageable sections before rolling.
- Smooth hair strands to prevent tangling or bumps on curls.
- Use hot rollers on dry hair and foam rollers on damp hair.
- Secure curlers close to the scalp but avoid tight pulling.
- Leave curlers in 10, 30 minutes for hot rollers, overnight for foam.
- Choose curlers suitable for your hair length and curl style.
How to Put in Curlers Step-by-Step

Divide your hair into sections first. Wrap each strand around the curler carefully. Secure the curlers tight to keep hair in place.
Sectioning evenly helps curls look uniform. Wrapping from ends to roots protects hair and shapes the curl well.
Preparing Your Hair for Curling
Use clean, detangled hair that’s slightly damp. Avoid damp hair with hot rollers or Velcro rollers. Start styling once hair is ready.
Foam rollers, flexi rods, and perm rods work best on damp hair for longer-lasting curls. Hot rollers need completely dry hair and take 10 to 30 minutes to set.
Gather tools like a wide-tooth comb, hair clips, your chosen curlers, and a light styling product. A leave-in conditioner or curl-improving mousse can help hold the curl and keep hair smooth. Avoid heavy products that weigh down curls or make hair sticky.
Sectioning Hair for Even Curls
Divide your hair into sections based on curler size. Larger curlers require bigger sections; smaller curlers use smaller strips. Aim for about 1- to 2-inch wide strips to avoid uneven curls or bumps.
Start by parting hair down the middle or on your preferred side. Clip the top sections away first to focus on bottom layers. Work from the bottom row of hair upward.
Move from the front toward the back. This helps curls look even and neat.
Rolling and Securing Techniques
Start wrapping at the ends of each section. Roll the hair up tightly toward your scalp. This method keeps ends healthy and curls neat.
Secure hot rollers by snapping the clips or clamps provided. For foam rollers, bend the flexible ends to hold the hair.
Flexi rods twist around to lock; perm rods often snap or have band fasteners. Make sure each curler feels snug but not tight to avoid discomfort or damage.
Follow these steps for smooth curling:
- Comb hair to remove knots and tangles.
- Part hair into manageable sections.
- Apply a light styling product if desired.
- Wrap hair strand around the curler from ends to roots.
- Secure the curler firmly with clips, bands, or by bending.
- Repeat until all hair is rolled.
- Wait the recommended time or allow hair to fully dry.
- Remove curlers gently when dry to avoid breakage.
Choosing the Right Type of Curlers for Your Hair
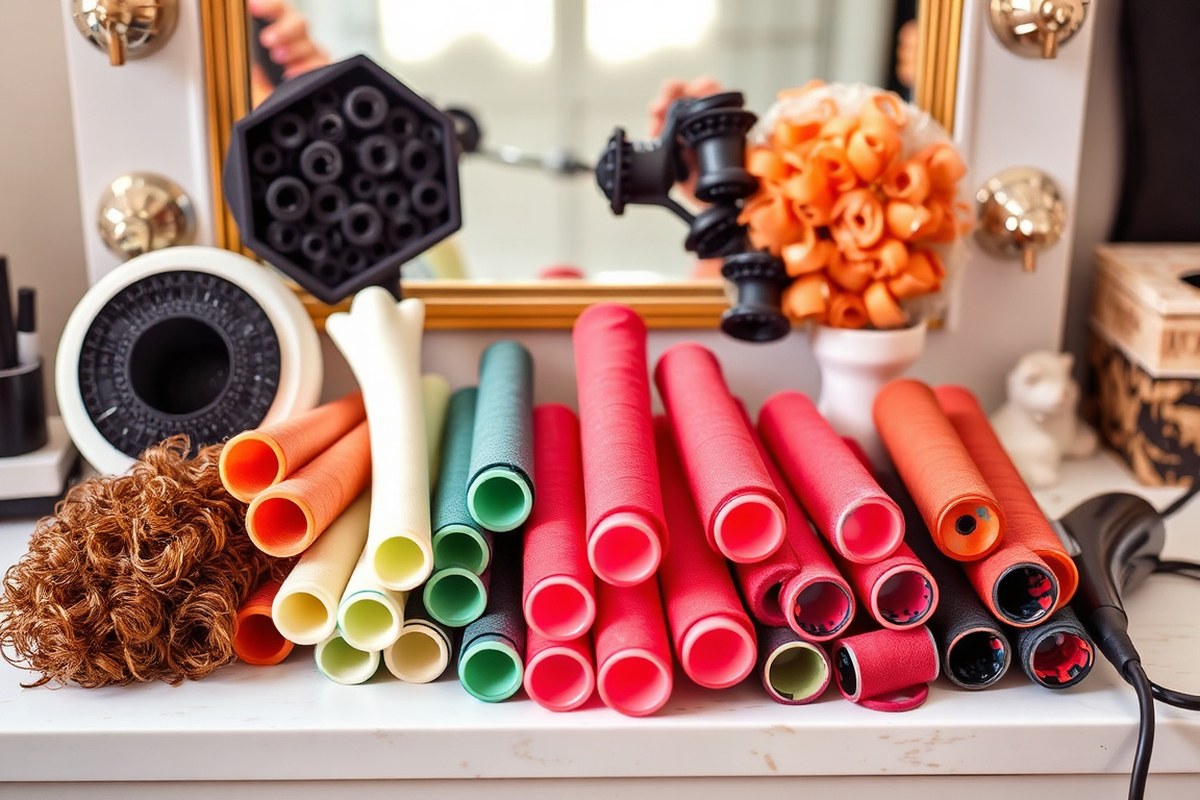
Choosing the right curlers depends on your hair type and style goals. Hot rollers work well on all hair textures and add lasting curls with heat. Foam, velcro, and flexi rods work best on damp hair.
They help create soft curls without using heat. These tools add body to your hair gently.
Self-grip or Velcro rollers add volume at the roots. These curlers suit straight or blown-out hair well. They may not hold tight curls on very curly hair.
Natural hair might lose curl quickly with them. Foam rollers are gentle and good for sensitive scalps, especially on fine hair. Flexi rods and perm rods fit well on short or natural hair, offering versatile curls.
| Curler Type | Best Hair Type | Use | Pros | Cons |
|---|---|---|---|---|
| Hot Rollers | All hair types | Dry hair, with heat protectant | Quick, long-lasting curls | Can cause heat damage |
| Foam Rollers | Fine or sensitive scalp | Damp hair, overnight | Gentle, comfortable | Longer wait time |
| Velcro Rollers | Straight or blown-out hair | Dry hair, no clips needed | Adds volume well | May tangle on curly hair |
| Flexi Rods | Short and natural hair | Damp hair, can bend to shape | Versatile, soft curls | Takes hours to dry |
| Perm Rods | Short to medium natural hair | Damp hair, with clips | Tight, defined curls | Needs careful setting |
Heat rollers need dry hair so curls set quickly. Apply heat protectant to stop damage. Foam and flexi rods are gentle on delicate hair.
Use them on damp hair for best results. They need longer drying time to avoid damage.
Velcro rollers work best on straight hair, where they add volume. Curlers with large diameters suit shoulder-length hair or longer.
Use high-quality curlers that don’t snag to avoid breakage and frizz.
Short hair works well with smaller curlers like flexi rods or perm rods. Natural hair benefits by stretching its texture with curlers instead of heat.
Switching roller size or direction can change your curl type. Testing a few options helps you find the best for your hair and style.
When and How Long to Leave Curlers In
How long you leave curlers depends on the type used. It also matters what kind of curls you want. Different settings need different times.
Most curlers need 20 to 60 minutes to set, while some can stay overnight. Sleeping with curlers is possible but should be done right to avoid damage.
Timing for Different Curler Types
Foam and sponge curlers usually need at least 20 to 30 minutes in damp hair. Plastic or velcro curlers work faster but still benefit from 30 to 60 minutes. Heated curlers set curls in about 10 to 20 minutes.
Do not leave them on too long. This helps avoid hair damage.
Longer time helps curls hold better, especially on dry hair. Shorter time gives looser waves but reduces curl definition.
Keep your hair slightly damp for foam curlers. Dry hair takes longer or curls may not hold well.
Overnight Curling Tips
You can sleep with soft foam or sponge curlers to save styling time. Use larger curlers for gentle waves, or smaller ones for defined curls. Wrap your hair firmly but not too tight to avoid headaches and breakage.
Cover your head with a silk or satin scarf to reduce friction overnight. Avoid sleeping with heated or stiff plastic curlers to protect scalp and hair health. Try to limit overnight curling to a few times a week to prevent stress on hair.
How Timing Affects Curl Definition
Longer curling time generally leads to sharper, longer-lasting curls. To get natural waves, check curlers after 20 to 30 minutes.
Remove them early if curls look ready. Leaving curlers too long on weak or fine hair may cause hair to weaken or break.
Damp hair may lose curls quickly if curlers are not left in long enough. Dry hair often needs extra time or heat to hold curls. Use a light styling mousse before curling to help curls stay defined during longer sets.
Protecting Hair Health During Curling
Keep curlers loose enough to avoid pulling on roots or scalp pain. Tight curling or sleeping with curlers every night increases hair damage risk. Give your hair days off from curling to stay strong and shiny.
Use conditioning or heat protectant products to reduce dryness. Avoid reusing the same curlers without cleaning, which can spread oils and dirt. After curling, gently unroll without yanking to protect your hair strands.
Preparing Hair Before Putting in Curlers
Start by shampooing your hair to remove oil and buildup. Use a gentle shampoo suited for your hair type. Rinse well and follow with a conditioner to add moisture and smoothness.
Don’t apply conditioner to your scalp. Focus on the mid-lengths and ends instead. This helps avoid weighing down your roots, which makes curls tougher to hold.
After washing, dry your hair until it’s damp, not dripping wet or fully dry. Damp hair bends easily and holds curl better without frizz.
Thick, coarse, or curly hair can benefit from blow drying straight first. This helps curls form evenly and makes them last longer.
Before putting in curlers, use a heat protectant spray if you will blow dry. Skip heat styling and try a curl-improving mousse or setting lotion.
They help hold curls without heat damage. Apply these products evenly from root to tip to boost curl hold and definition.
Skip heavy oils or creams before curling, as they weigh hair down and reduce volume. Save those for after you remove the curlers to tame frizz and add shine. Light hairsprays can also help keep curls set after styling.
Blow drying after rolling in curlers depends on curler type and hair texture. Foam or sponge curlers work best on damp hair that air dries. Use a blow dryer with plastic or heated curlers to dry hair faster.
This speeds up the drying time. It also helps curls set quicker.
Use low to medium heat when blow drying with curlers. This prevents damage and helps curls form nicely. High heat risks damage and can loosen curls.
Dry hair for 15 to 30 minutes with curlers. Stop when hair feels dry but not brittle. Check by touch to avoid over-drying.
People with fine or oily hair should limit product use and avoid overheating. Those with thick or dry hair benefit from extra conditioning and gentle heat drying. Adjust steps based on your hair’s thickness and curl pattern to get the best look.
How to Remove Curlers Without Causing Damage
Removing curlers the right way helps keep your hair strong and smooth. Let your curls cool completely before starting. This cool-down step helps your curls set and lowers breakage risk.
Gently undo the curlers to stop tangles and pulling. Use your fingers to loosen the curls as you remove each curler. Avoid rushing to save time because quick pulling can damage fragile strands.
- Start at the bottom sections and work up to the top of your head.
- Gently unwind each curler without yanking or pulling your hair.
- Use your fingers to release any knots around the curler as you go.
- Comb through your curls with a wide-tooth comb, starting at the ends.
- Separate and shape your curls by softly running fingers through them.
- Apply a lightweight serum or curl cream to reduce frizz and add shine.
- Let your curls air dry or use a diffuser on low heat to keep curls intact.
Wide-tooth combs reduce breakage. They don’t pull hair like brushes can. Comb slowly from the ends upward to avoid extra tangling.
Never remove curlers while your hair is still warm, as this can cause breakage and frizz.
To keep your curls longer, separate them gently after removing curlers. Avoid brushing too much or using harsh products that weigh curls down. A light mist of hairspray with no alcohol can keep curls fresh for hours.
Styling and Maintaining Curls After Removing Curlers
After you take out the curlers, don’t rush to brush your hair. Use your fingers or a wide-tooth comb to gently separate the curls. This keeps your curls defined and prevents frizz from rough handling.
To add volume at the roots, lift sections of hair near the scalp with your fingers. You can also flip your head upside down and lightly shake your curls. This boosts bounce without ruining the curl shape.
Apply a light finishing spray or curl cream to lock the style in place. Spritz evenly but avoid soaking your hair, which can weigh curls down. Look for products designed to hold curls without stiffness.
For best results, start with dry hair before brushing or spraying. Heat softens bonds temporarily, so letting hair cool in curlers helps curls hold better. This process takes about 10 to 15 minutes of cooling time, depending on your hair thickness.
Your curls might lose shape during the day. Spray a little water or curl refresher spray.
Lightly mist your hair and scrunch with your hands to revive bounce. Don’t overdo it, since excess moisture breaks down the curl faster.
Want volume at the roots with tight curls? Roll small sections near the scalp. Do this after removing big curlers.
Use small velcro rollers or your fingers wrapped with bobby pins while hair sets. This can take 10 minutes but adds durable lift.
At night, protect your curls by loosely tying hair in a silk scarf or bonnet. This reduces friction and keeps curls intact. Sleeping on a cotton pillowcase can cause frizz and flatten curls faster.
Common Mistakes When Using Curlers and How to Fix Them
Many people section their hair unevenly when using curlers, causing curls to look messy or uneven. Use sections that match your roller size for smooth results. For example, a 1½-inch roller needs a 1½-inch-wide section of hair.
Another mistake is leaving curlers in too long. Not leaving them long enough also affects curl bounce. Both change how your curls look and feel.
Timing depends on your hair type and curlers. But a general range is 10 to 30 minutes. You can set a timer to keep track.
- Match hair section width to roller size
- Roll hair smoothly without twisting or tangling
- Secure curlers firmly but not too tight
- Set a timer for 10-30 minutes depending on hair type
- Avoid using too much product to prevent stiffness
- Use smaller sections for shorter hair
- Handle hair gently when removing curlers
Short hair needs smaller sections and smaller curlers to hold shape well. For longer hair, use bigger rollers and larger sections. This creates natural waves instead of tight curls.
Bigger sections suit your hair length better. Adjust the roller size before sectioning.
Rolling hair too tight can cause pain or damage. This risk is higher near your scalp area. Be gentle when using curlers close to your scalp.
Roll loosely at the roots to prevent pulling. Also, avoid overlapping sections because it leads to uneven curls and frizz.
Waiting too long to set hair before rolling is a common slip-up. Hair should be slightly damp but not wet to help curls form better. Use a spray bottle to keep hair moist during the process if it dries early.
Advanced Curler Techniques for Different Hair Types
Using curlers right depends on your hair type. Different textures and fibers need specific choices of curlers and techniques. This helps your curls last longer and cause less damage.
Curling Fine and Straight Hair
Fine hair loses curl quickly. So opt for hot rollers to add body and bounce.
Set them on medium heat, around 250°F, and leave rollers in for 15 to 20 minutes. Use a light mousse before rolling but avoid heavy products that weigh hair down.
Roll small to medium sections tightly for better hold. After removing curlers, gently separate curls with fingers instead of a brush to keep volume.
Do not wet your hair while curlers are in. This can ruin the curl formation.
Hot rollers must not stay in fine hair longer than 30 minutes. Leaving them too long can cause heat damage. Always watch your time when using hot rollers.
Techniques for Coarse and Natural Hair
Coarse and natural hair needs moisture retention to avoid frizz. Use foam or velcro rollers as they don’t require heat, which can dry out hair. Apply a leave-in conditioner or curl cream to damp hair before rolling to keep strands hydrated.
Roll sections tightly but without pulling too hard, to protect hair roots. Let hair air dry or use the low heat setting on a hooded dryer. Avoid hot rollers unless your coarse hair is well-moisturized, as excessive heat dries hair out.
Use products with hydrating ingredients for natural hair before using curlers to reduce frizz.
Using Curlers on Synthetic or Extension Hair
Synthetic hair can melt with heat, so avoid hot rollers. Use foam or velcro curlers on dry synthetic strands to create curls safely.
Some heat-friendly synthetic fibers allow low heat. But check the package or with the manufacturer first.
Use gentle styling sprays made for synthetic hair to keep curls intact. Avoid heavy oils or products that weigh down synthetic fibers. Use heat only on your natural hair when curling extensions.
Do this unless your extensions can resist heat. Check the label on your extensions first.
Always check the label before applying heat to synthetic hair or extensions to prevent damage.
Step-by-Step Action Plan for Perfect Curls
Follow these steps to get the curls you want using curlers. This will help you avoid common mistakes while saving time.
- Before you start: Wash and towel-dry your hair until it’s damp. Use a heat protectant or styling mousse to hold curls better.
- Right after: Choose curlers that match your hair type and desired curl size. Wrap small sections of hair smoothly and snap curlers firmly in place.
- Within 10 minutes: Check all curlers are secure and hair is evenly wrapped. This helps curls set evenly without gaps or frizz.
- After 1 hour: Leave curlers in for at least one hour or overnight for tighter curls. The longer you wait, the better the curl sets.
- Removing curlers: Gently unwind each curler without pulling hair. Smooth curls with fingers or wide-tooth comb to prevent breakage.
- Styling curls: Apply a light serum or hairspray for shine and hold. Avoid heavy products that weigh curls down or make hair greasy.
- Next day: Refresh curls by misting hair with water or curl conditioner spray. Re-style gently if curls lose shape.
Frequently Asked Questions
How Do You Section Your Hair When Putting in Curlers?
Section your hair into manageable parts before curling. Start from one side, working in rows from top to bottom for the best results.
Can You Put Curlers in Dirty or Oily Hair?
It’s best to curl clean hair for longer-lasting curls. Dirt or oil can weigh hair down and prevent curls from holding.
What Is the Best Direction to Roll Hair Onto the Curlers?
Roll hair towards your face or away depending on desired curl shape. Rolling both ways can create a more natural look with lots of volume.
How Tight Should You Roll Your Hair on the Curlers?
Roll hair snugly but not tight to avoid scalp pain. Hair should be secure enough to hold shape but comfortable enough for you.
Should You Use a Setting Spray Before or After Putting in Curlers?
Use setting spray after curlers are in place to lock curls better. Spraying hair too wet can make curls limp, so spray lightly after rolling.
Do You Need to Brush Your Hair After Taking Curlers Out?
Lightly finger-comb or use a wide-tooth comb for natural curls. Brushing can cause frizz or break curl patterns if done too much.
Final Thoughts
Putting in curlers right takes practice but delivers great results. Start with clean, damp hair and be gentle when removing curlers. Try this today to get soft, lasting curls you’ll love.