How to Use Thinner Scissors: A Complete Guide for Smooth, Natural Results
Learning how to use thinning scissors correctly gives your haircut a smooth, natural look. Hold the scissors at a 30 to 45-degree angle and point the blades away from the hair shaft. Close the scissors slowly to remove small amounts without harsh lines or spots.
Start about 2 to 3 inches from the scalp near the hair’s mid-shaft. Work on clean, dry hair to clearly see how much you’re thinning. Avoid over-thinning or too much tension to keep volume and prevent gaps.
Use light, quick snips instead of long cuts. Brush the hair out after a few snips to check for uneven thinning or patchy spots. This helps you blend better and keep a natural finish.
Keep your hands steady and don’t rush. Taking your time helps you control the scissors and improve your skills with practice.
Key Takeaways
- Hold thinning scissors at a 30, 45° angle to the hair shaft for best results.
- Place scissors 2, 3 inches from the scalp to avoid cutting too close.
- Use dry, detangled hair so you can see how much hair you’re removing.
- Close the scissors once per section to gently remove thin lines of hair.
- Chunk removal shears work best for thick, curly hair by cutting larger sections.
- Choose scissors with 27 to 30 teeth based on how much hair you want to thin.
How to Hold and Use Thinning Scissors Correctly

Holding thinning scissors the right way gives you better control and safety. You want a steady grip without squeezing too hard. Proper finger placement helps you make smooth, precise cuts without pulling the hair.
Hold the scissors 2 to 3 inches away from your scalp. Position them near the middle of the hair shaft. This helps thin the hair evenly.
Hold the blades at a 30 to 45-degree angle to the hair. This angle helps remove bulk gradually and blend layers smoothly.
- Insert your thumb fully into the bottom ring of the scissors.
- Place your ring finger or middle finger in the top ring depending on comfort.
- Rest your pinky gently on the finger rest (tang) for stability.
- Keep your index finger free to lightly support and guide the scissors’ movement.
- Hold the scissors so the blades angle downward, sliding them gently through the hair.
- Open and close the scissors using the muscles in your thumb, not your whole hand.
- Position the scissors no closer than 1.5 to 2.5 centimeters from the scalp, depending on hair thickness.
- Make small, careful snips while moving the scissors down the section to thin evenly.
Holding your hand like this reduces hand fatigue during use. Applying a 30 to 45-degree angle lets you catch just some hair between the teeth.
So you avoid cutting too much at once. Too shallow an angle can leave hair uneven.
Use your index finger to guide the direction, which prevents unnecessary tension or jerky movements. This is important when blending thick hair or texturizing around the edges. Avoid squeezing the scissors tight; you want smooth, controlled cuts for a natural look.
Types of Thinning Scissors and How to Choose Them
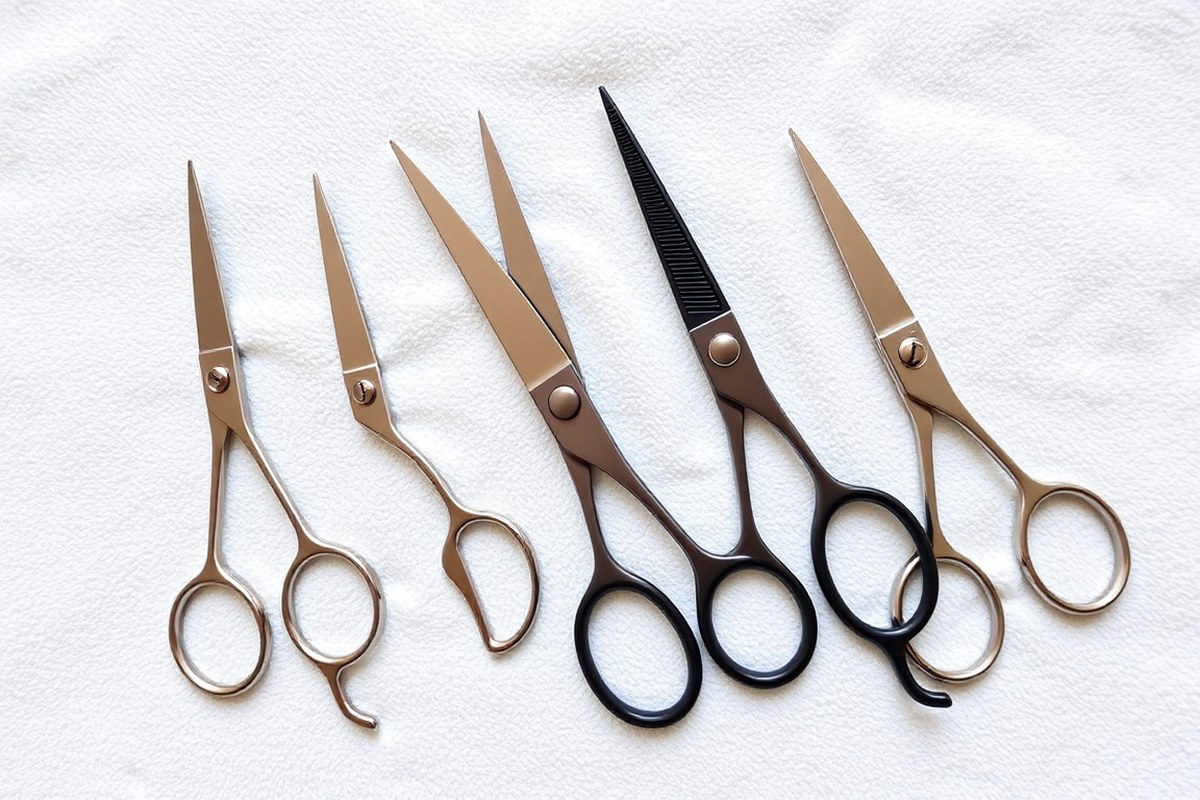
Thinning scissors vary in teeth count, blade shape, and hair use. These differences help you pick the best pair for your cutting tasks. Each type works better on certain textures or styles.
Knowing this helps you pick the right tool for your haircut needs. Knowing these differences helps you thin or texturize hair smoothly without causing damage or awkward cuts.
High Teeth Count Shears (25-40 Teeth)
Shears with 25 to 40 teeth are common for general thinning and blending. Their fine tooth spacing removes less hair at a time, about 10 to 20%. So they create subtle, natural effects.
They work well on fine or normal hair. These scissors blend sections without taking away much volume.
More teeth mean a gentler thinning effect, making these ideal for fine or baby-fine hair. For example, scissors with 35 teeth like the Vampire 35 are great for delicate thinning. Using these shears frequently on thin hair can keep the look soft without making it limp.
Chunking Shears with Fewer Teeth (Below 20)
Chunking shears usually have fewer than 20 teeth, spaced wide apart. They cut larger chunks of hair, removing 40% to 80% with each snip. This makes them perfect for thick, curly, or very dense hair that needs quick weight removal.
You should pick these if your hair feels heavy or unmanageable. Less teeth and wider gaps let you thin thick hair fast. That sharp weight removal can help your curls hold their shape without looking bulky.
Use them lightly on fine hair. Overuse can cause gaps or uneven spots in the cut.
| Type | Teeth Count | Thinning Rate | Best For |
|---|---|---|---|
| High Teeth Count Shears | 25-40 | 10-20% | Fine, normal hair blending |
| Chunking Shears | Below 20 | 40-80% | Thick, curly, dense hair |
| Fine Thinners | 35 or more | Low thinning | Very fine hair |
Use the table above to decide your thinning scissors based on hair type and thinning amount. Picking scissors with the wrong teeth number can cause issues. Too few teeth give heavy thinning, too many cause uneven cuts.
Specialty Factors: Left-Handed and Japanese Steel Options
Left-handed thinning scissors are made with reverse blade designs for better control and comfort. Using right-handed scissors with your left hand often strains your wrist and gives inaccurate cuts. So, always select scissors for your dominant hand.
Japanese steel scissors offer precise cutting edges with longer-lasting sharpness. These high-quality tools often cost more but give cleaner, smoother cuts.
Good steel scissors can last longer and need less sharpening. This saves money and effort over time.
Always keep the teeth-side blade facing upwards for the cleanest thinning effect.
Step-by-Step Guide for Using Thinning Scissors at Home
Start thinning hair only when it’s dry and clean. Work on small sections to avoid uneven results. Hold the scissors correctly and focus on mid-lengths and ends, not hair roots.
Preparing and Sectioning the Hair
Dry hair reveals its natural fall and volume. So split hair when it’s completely dry.
Damp hair can make you cut too much because it looks longer. Use a comb to part hair into small, manageable sections about one inch wide.
Separate the hair into top, sides, and back with clips. Don’t grab more than one section at a time. This small size keeps your thinning precise and stops you from over-cutting any area.
The Thinning Cut: Where and How to Cut
Place the hair between the scissor blades about 1 to 2.5 cm (half to one inch) away from the scalp. Avoid cutting too close, which causes uneven thin spots near the roots. Hold the scissors at a 45-degree angle to the hair for natural texture.
Make one clean cut per section without closing the scissors twice in the same spot. The scissors cut only some strands because of their teeth. This method keeps volume but removes bulk gradually.
Work mainly in the middle third of the hair shaft. Thinning scissors take out thick strands but leave others alone. This softens hard cuts and helps blend layers smoothly.
Finishing and Styling After Thinning
After thinning, comb through your hair to spot uneven areas. Some parts may look bulkier.
Thin those with small extra snips but avoid overworking one spot. You want a smooth flow without patchy thinning.
Style as usual, and check your work in natural light. Textured hair has a soft finish and loses heavy, chunky shapes. Re-thin carefully every few weeks to maintain a balanced look.
- Make sure the hair is dry and detangled.
- Section hair into small parts (~1 inch wide) using clips.
- Hold the thinning scissors at a 45-degree angle.
- Place scissors about 1, 2.5 cm from the scalp in the mid-shaft area.
- Close scissors once to cut the section; avoid double cuts in one spot.
- Move to the next section and repeat until done.
- Comb hair to find thick spots for gentle, additional thinning.
- Style hair and check the blend in natural light.
Best Practices for Thinning Different Hair Types
Thick hair can be hard to manage because of the bulk and density. You use thinning scissors to reduce that bulk line by line. For thick hair, use scissors with many teeth.
They take smaller amounts of hair each cut. This stops you from cutting too much at once.
Curly hair has another challenge: the curls hide texture changes. Straighten the hair lightly before thinning to see the lengths and avoid uneven spots. When you cut, work slowly with light snips to keep the curl pattern smooth.
Fine or thin hair reacts differently to thinning scissors. Avoid them when hair is very thin.
Thinning can cause visible gaps and uneven lines that peel away from a neat style. Instead, focus on light texturizing with a few gentle cuts, not heavy thinning.
- Use scissors with more teeth for thick or coarse hair.
- Straighten curly hair before thinning for better control.
- Never thin very fine or thin hair heavily to avoid lines.
- Cut hair dry for most controlled, visible effects.
- Start thinning in less visible spots to test results.
- Use quick, gentle snips to prevent uneven cuts on curls.
- For men’s hair, thin around bulk areas like the crown only.
Men’s haircuts typically require less thinning. Most men’s styles rely on clear lines and shape.
Use thinning scissors sparingly on men, focusing on reducing bulk in thick spots. Avoid over-thinning middle areas to keep shape and volume.
When and How Often Should You Use Thinning Scissors?
Thinning hair too often can cause dryness and breakage. It’s safe to thin your hair every 4 to 6 weeks, depending on your hair’s condition. Over-thinning may lead to frizzy, damaged-looking hair, especially with long hair.
Look for these signs to know when to thin hair or stop:
- Hair feels thick and heavy, hard to style
- Hair looks puffy or bulky in some areas
- No visible unevenness or thin patches after thinning
- Hair starts to look frizzy or dry after thinning
- Hair breaks or pulls when using scissors
- The scissors catch or snag your hair while thinning
A typical thinning session usually lasts 10 to 15 minutes. Work in sections and slide thinning scissors through hair gently. Remove small bits of bulk little by little.
Don’t cut too much at once. Take breaks between sections to check your progress and prevent over-thinning.
Only thin small sections at a time to avoid cutting too much hair.
For healthy thinning, use sharp thinning scissors with around 25% thinning rate. Avoid thinning close to the scalp, especially on delicate hair, to prevent damage. Thinning less frequently may help if your hair is brittle or chemically treated.
Common Mistakes to Avoid with Thinning Scissors
Using thinning scissors unevenly often causes patchy spots in hair. This happens when you cut one spot for too long. It also occurs if you use the wrong cutting angle.
Both can cause uneven thinning. To avoid this, move the scissors smoothly and vary the spots you thin. Also, start with less hair removed to see how it looks before doing more.
You remove too much hair when cutting wet hair. Holding too much hair between blades also causes this. Both make thinning scissors less precise.
Wet hair shrinks as it dries, making your cut shorter than expected. Using thinning scissors on dry hair helps you control how much hair you take off. Be gentle with thick or curly hair to maintain texture without damage.
Cutting too close to the scalp can harm hair texture. Using scissors with many teeth can also cause bad texture. These mistakes change how hair feels.
Scissors with around 24 teeth are common and work well for light thinning. Cut small sections at a time for better control.
Check how your hair looks and feels often. This helps avoid cutting too much by mistake.
- Work on dry hair to better see how much hair is removed
- Keep scissors moving, don’t cut many times in one place
- Start with less hair taken, then trim more if needed
- Use scissors with about 24 teeth for most hair types
- Cut small sections, check texture after each pass
- Avoid thinning too close to scalp to prevent rough texture
Beginner users should thin less to avoid mistakes that are hard to fix. Using quality scissors between 5.5 and 7 inches gives better control.
Taking your time and checking results regularly helps keep the hair looking natural and balanced. Changes in hair texture mean it’s time to stop or adjust how you hold the scissors.
How to Blend and Texturize Hair Using Thinning Scissors
Thinning scissors help you blend harsh lines and add texture without cutting too much length. Use them to soften the edges between layers and create natural movement. Choose between sliding cuts or quick snips depending on the finish you want.
Blending Layers to Soften Lines
Use thinning scissors to smooth out sharp transitions between layers. The scissors cut some but not all hair strands, making the blend look natural. This technique works well after you finish cutting with regular scissors.
Start by holding a section where two lengths meet. Open the thinning scissors and insert them about 1/2 inch away from the scalp. Close gently to remove small amounts of hair and blend the hard line.
- Comb the section of hair with harsh lines.
- Open thinning scissors and position them near the joining point of layers.
- Close scissors once while keeping them steady to remove bulk.
- Move scissors along the line, repeating short snips as needed.
- Comb again to check the blend against the rest of the hair.
- Adjust with tiny cuts until the layers flow naturally.
Texturizing Techniques for Natural Movement
Texturizing creates soft layers and adds flow without much length loss. Thinning shears remove hair bulk selectively, leaving varied strand lengths for a dynamic look. This is ideal for thick or blunt hair that feels heavy or stiff.
Focus on mid-lengths and ends to add softness and motion. Cut in small sections, avoiding the roots to keep volume near the scalp. Use fewer cuts on fine or thin hair to prevent making it look sparse.
Using Sliding Cuts for a Softer Finish
Sliding the thinning scissors along the hair gives a gradual, textured effect. Close the scissors in a smooth motion.
Move down 1 to 2 centimeters along the hair shaft as you cut. This technique is great around ends or layered edges for a soft touch.
Reserve single snips for blending harsh lines or removing bulk quickly. Sliding cuts create less noticeable cuts and blend better with natural hair flow. Use sliding when you want a softer, less choppy texture in the hair.
Caring for and Maintaining Thinning Scissors
Wipe your thinning scissors with a soft cloth after every use. This removes hair and product buildup that can dull the blades. Avoid water or harsh chemicals on the metal.
They can damage it. This also can loosen the pivot screw.
Sharpen scissors when they pull hair instead of cutting. This usually happens every 6 to 12 months. It depends on how much you use them.
Use a professional sharpening service instead of doing it yourself. Proper sharpening restores the blade’s smoothness, making your cuts precise again.
Keep thinning scissors in a dry case or pouch. This protects the blades from moisture. It also stops knocks from damaging them.
Always keep them closed to avoid accidental damage or injury. Avoid tossing them in a drawer where they can bump against other tools.
- Clean scissors with a soft, dry cloth after each use
- Check for smooth cutting; sharpen every 6-12 months if dull
- Use a professional sharpening service, not home tools
- Store scissors in a dry, padded case when not in use
- Keep scissors closed and away from moisture or dust
- Handle scissors gently; don’t drop or twist them
Avoid using scissors on wet hair often since it causes rust and dulls blades faster.
Handle your thinning scissors gently to avoid bending the blades or misaligning the pivot. Lightly oil the screw once a month. This keeps the tension smooth.
Avoid using too much oil. Taking care of your scissors keeps them sharp for years.
It’s better than often replacing worn tools. Proper care keeps them safe too.
Step-by-Step Action Plan to Start Using Thinning Scissors
Follow these steps to begin thinning hair safely and effectively at home or in the salon.
- Before you start: Clean and dry your hair completely. This ensures accurate cutting and smooth results.
- First session: Hold the thinning scissors correctly, with your thumb and ring finger in the holes. Check if the scissors open and close smoothly.
- First 10 minutes: Start thinning small sections near the ends of the hair. Stop if you see too much hair being removed or uneven texture.
- After 15 minutes: Comb the hair through to check how much volume is lost. You should see softer, lighter ends rather than chunky gaps.
- After 1 week: Observe how the hair sits and feels. If there is heavy frizz or thin patches, use less pressure or fewer cuts next time.
- After 3 weeks: Trim again to maintain blended texture and reduce bulk without going overboard.
- Ongoing: Clean and oil the scissors regularly. This keeps them sharp and safe for your hair.
Frequently Asked Questions
What Hair Length Works Best for Thinning Scissors?
Thinning scissors work best on medium to long hair. Short hair can become too thin or choppy when using them, so be cautious.
Can Thinning Scissors Damage Your Hair?
Using thinning scissors incorrectly can cause damage or split ends. Make sure to use sharp, quality scissors and avoid over-thinning the same section.
Are Thinning Scissors Good for Curly Hair?
Yes, but use them sparingly on curls to avoid frizz. Thinning scissors help reduce bulk without ruining curl shape when used carefully.
How Many Teeth Should Thinning Scissors Have?
Most thinning scissors have between 15 to 30 teeth. More teeth remove less hair with each cut, giving a softer thinning effect.
Can Beginners Use Thinning Scissors Safely?
Beginners can use thinning scissors with practice and care. Start with small sections and go slow to avoid taking off too much hair.
Is It Better to Buy Professional or Cheaper Thinning Scissors?
Professional scissors cost more but last longer and cut cleaner. Cheap scissors can pull or snag hair and break teeth faster.
Key Points to Remember
Using thinning scissors is a simple way to soften thick or bulky hair. Careful practice helps you avoid over-thinning or uneven cuts. Start small, check your work often, and enjoy better blending and texture.