How to Use Bobby Pins: 12 Proven Ways to Secure and Style Hair Easily
Figuring out how to use bobby pins right can fix most hair hold problems. Start by sliding the pin in with the wavy side down against your scalp. This grip helps keep pins from slipping, especially on fine or smooth hair.
Make sure to insert pins at a slight angle and push them firmly into place. This way, they anchor better and hold heavier hair in place without dropping out. Using the right technique is more effective than just piling on extra pins.
It’s also smart to match bobby pin colors with your hair to keep them less visible. Dark hair usually needs black or brown pins.
Lighter hair looks better with gold or beige ones. Proper pin choice and direction can turn a weak hold into a lasting style.
Key Takeaways
- Insert bobby pins with the wavy side down for stronger grip.
- Push pins in at a slight angle for better hold.
- Choose bobby pin colors that closely match your hair shade.
- Use sturdier pins for thick or heavy hair types.
- Don’t overload one spot; spread pins evenly across your style.
- Angle pins diagonally to secure styles better than straight inserts.
1. How to Insert Bobby Pins for Maximum Hold
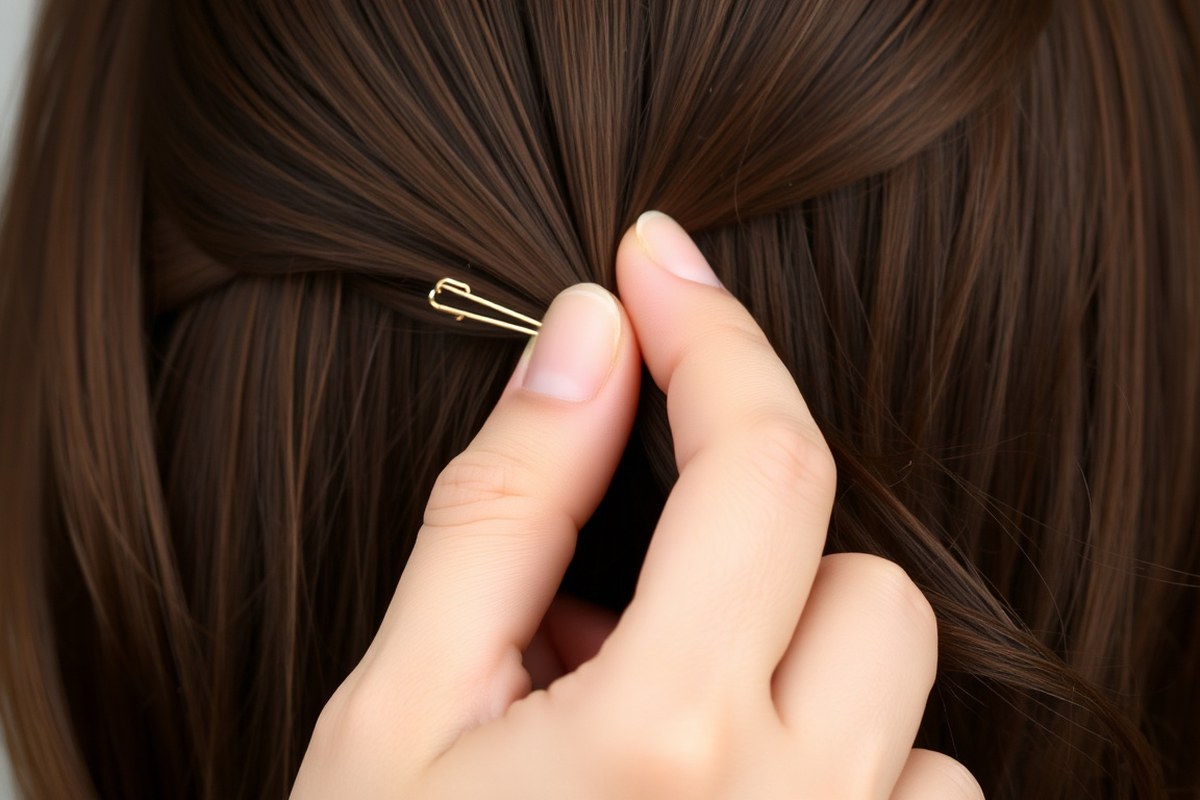
Bobby pins hold your hair best when placed correctly. The ridged side should face your scalp to grip hair securely. The smooth side should face outward for less slipping and better comfort.
Inserting bobby pins at a slight angle helps them lock better. Aim to slide them in from the front toward the back of your head. This angle keeps the pin tighter against your hair and scalp.
Using small sections of hair for bobby pins also improves hold. Large bunches tend to slip out. Combine this with crisscrossing pins for styles that need extra strength.
- Separate a small section of hair where you want to place the bobby pin. Smaller sections grip stronger than large ones.
- Hold the bobby pin with ridges facing your scalp. Make sure the smooth side points outward. This helps grip your hair better. This creates friction that locks hair in place.
- Insert the bobby pin at a 45-degree angle, sliding it from front to back. This angle helps the pin stay tight with the hair.
- Push the pin firmly into your hair, but don’t force it too hard or cause discomfort.
- Place a second bobby pin over the first in an ‘X’ shape. This gives extra hold. It’s perfect for buns and updos.
- Tuck any loose or short hairs behind the pins. Then, adjust the pins so they sit flat and close. This keeps the style neat.
- Use hairspray to finish your style if you want extra hold. It helps especially for bobby pin styles worn all day. Spray lightly.
Curved bobby pins work wonders for side-swept looks. They contour smoothly to your scalp, offering solid grip. For messy buns, fanning out the pins adds extra security.
Don’t insert bobby pins straight down or with ridges facing outward. That leads to slipping and less hold. The right angle and ridge positioning help your style last longer.
It also makes it feel more comfortable on your scalp. Try adjusting these to suit your hair type.
2. Choosing the Right Bobby Pins for Your Hair Type

Bobby pins come in several types and materials. Picking the right one depends on your hair’s thickness and texture. You want pins that hold well and last long without damaging your hair.
Standard vs Jumbo and Spiral Bobby Pins
Standard bobby pins are about 1.5 inches long and work well for fine or medium hair. Jumbo pins, usually around 2.5 inches, suit thick or coarse hair better. Spiral pins, or “spin pins,” wrap around hair sections.
They hold curly or thick hair firmly. This gives a better grip than regular pins.
Jumbo pins hold more hair at once and offer extra strength. Spiral pins claim to serve the work of 20 tools by securing large sections without slip. Standard pins are easier to hide in simple styles but may slip out on thick hair.
Grip Strength by Material
Most bobby pins are steel with a painted finish. Some have a rubber or silicone coating for extra grip. Coated pins hold better on slippery hair but wear out faster and can peel.
Metal pins bend but keep tension well for thick hair. Plastic pins break easier but won’t snag fine strands. Texturizing both the hair and pins with spray before use improves grip a lot.
Spray your bobby pins with texture spray for extra hold on slippery hair.
Matching Pins to Hair Texture
Fine hair needs smaller, light-hold pins or standard pins with added grip from hairspray. Thick hair benefits from jumbo or spiral pins that can manage more volume.
Straight hair holds pins well if you add some texture spray or salt spray first. Curly hair works best with spiral pins to lock the curls in place without flattening them. Below is a quick guide to choose pins for your hair type and texture:
| Hair Type | Recommended Pin Type | Material | Why |
|---|---|---|---|
| Fine | Standard | Coated or uncoated steel | Add grip with sprays for hold |
| Thick | Jumbo or Spiral | Steel (sturdy, uncoated best) | Can hold more hair firmly |
| Straight | Standard or Jumbo | Coated or uncoated steel | Texture sprays prevent slipping |
| Curly | Spiral | Steel spiral design | Locks curls, maintains volume |
Choosing the right bobby pin matches your hair’s texture and volume. You avoid pin slippage and get styles that last longer. Be careful not to force larger pins in thin hair to avoid damage or discomfort.
3. Using Bobby Pins to Create Classic and Trending Hairstyles
Bobby pins are perfect for making classic styles like buns and half-up looks. They also let you try trendy ideas such as exposed pin designs. Using the right techniques helps each style stay secure and look great.
Securing a Sleek Low Bun
A low bun needs strong hold to stay smooth all day. Using criss-crossed bobby pins adds a firm grip and keeps stray hairs neat. You usually need three to six pins, depending on hair thickness.
Start by gathering your hair low at the nape. Twist it into a bun and hold it in place before pinning.
- Gather hair at the nape in a smooth ponytail.
- Twist hair tightly into a coil around the base.
- Hold the bun close to your head with one hand.
- Insert bobby pins at the bun’s base, crossing two for grip.
- Add more pins around the bun, crossing pairs as needed.
- Smooth flyaways with a light hairspray if wanted.
Creating a Half-Up Half-Down Style
Half-up styles need fewer pins, usually two or three on each side. Pins secure the top section while still showing loose hair below. Use the flat side down and wavy side up for better hold.
For a polished look, pull just the top crown hair. Keep the rest down for a soft frame around your face.
- Section off hair from the temples to the crown.
- Gather this top section at the back of your head.
- Hold the hair and place bobby pins horizontally under the section.
- Use two to three pins on each side, flat side down.
- Leave the rest of your hair loose for contrast.
- Apply a small amount of hairspray to keep it in place.
Exposed Bobby Pin Designs for Trendy Looks
Exposed bobby pins have become a stylish statement. Placing pins in patterns like triangles or lines adds a modern edge. Use coloured, metallic, or embellished pins for extra flair, wearing the wavy side facing up.
These pins don’t have to hide; instead, they become part of your style. Try using five or more pins arranged creatively for a bold effect.
- Choose your bobby pins, metallic or colorful ones stand out well.
- Decide on your design, like parallel lines or a triangle shape.
- Section off a front or side part of your hair.
- Slide each pin in place with the wavy side up and visible.
- Press pins gently to make sure they’re secure.
- Arrange several pins grouped close for a geometric look.
Adding Volume with Bobby Pins
Bobby pins can lift limp ponytails or create extra volume at roots. Slide a few pins under your ponytail base vertically to prop it up. Using hidden pins works best to keep volume natural without showing the tools.
For thicker hair, use five or six pins for stronger support. For thinner hair, fewer pins will keep the look light.
- Gather your hair into a ponytail at the desired height.
- Hold the ponytail base and lift slightly for volume.
- Insert bobby pins vertically underneath the ponytail base.
- Use three to six pins depending on hair thickness.
- Smooth loose hairs over pins to hide them.
- Set with hairspray to keep volume throughout the day.
4. How to Use Bobby Pins to Control Bangs and Baby Hairs
Bobby pins can tame bangs and baby hairs quickly. Start with dry hair.
Lightly mist bangs with hairspray or dry shampoo. This adds grip, helping pins hold shorter strands better without slipping.
Begin by brushing your bangs flat against your forehead or to the side. Gently slide a bobby pin over stubborn baby hairs. Use pins where bangs want to fall out.
Use the wavy side down for a stronger hold. Place pins close to the hairline. This creates a neat look.
For slipping bangs, insert two pins crossed in an “X” shape. This method secures the hair firmly without needing to pinch the hair too tight, reducing breakage. You’ll find it especially helpful on fine or slippery hair textures.
Hide pins behind your ears or under top layers for a natural finish. Apply a tiny bit of styling gel first. This sculpts baby hairs without heavy product.
Then pin hair in place. Light hold hair oils can also smooth edges when placed very sparingly.
Avoid putting bobby pins in wet hair since wet strands stretch and can get damaged. Pins work best on dry or slightly damp hair that’s been prepped with a texture product. Otherwise, pins may slide right out or cause dents that last until the next wash.
For thick or layered bangs, use multiple pins along the hairline. This spreads out the hold evenly. Start near the temple.
Angle pins diagonally to the front. Space pins about half an inch apart. This resembles a subtle “V” pattern that holds shape without pulling too hard.
Shorter strands can be tricky because they often slip out quickly. Dust pins with dry shampoo before use to prevent sliding. This roughens the pin surface a little, adding grip.
Another trick is to choose pins with a matte finish rather than shiny metal. Matte pins hold better on fine or straight hairs.
5. Adding Volume and Texture Using Bobby Pins
Lifted hair sections start by teasing small strands close to the scalp. Use a fine-tooth comb to backcomb about 1 to 2 inches of hair. Place a bobby pin horizontally under the teased hair piece.
This helps hold the lift. It keeps the hair from falling flat.
For extra support, add a second pin at a slight angle, crossing the first pin. This crisscross method adds a firm hold while giving the hair volume. You can repeat this on several sections to build natural texture without sticky or heavy products.
Insert bobby pins at the roots near your crown. This adds instant lift to your hair. It’s a helpful styling trick.
Slide pins with the wavy side down for better grip. Lift the hair slightly upward.
Secure it with a bobby pin just above the elastic spot. This works well for half-up hairstyles.
To add volume along the sides, tuck small sections backward and pin them loosely. This pushes hair up and out, creating delicate texture that looks more full. Avoid flattening the pins too tightly so your hair maintains movement and avoids discomfort.
When using teased sections, make a triangle of pins rather than lining them up. Place two pins crossing near the base and add a third pin to complete the shape. This evenly spreads tension and holds the lift longer through a full day.
Fine hair benefits most from bobby pins coated with a rubberized tip for extra hold. Thick hair needs sturdy metal pins that are longer than usual to keep strands from slipping. Many stray hairs may need several pins for one lifted area.
Use clean, rust-free bobby pins to avoid damaging hair or causing breakage over time.
6. Tips to Prevent Bobby Pins from Slipping Out
Bobby pins often slip because the hair section is too thick or smooth. Heavy or fine hair can make pins slide out, especially if you use the wrong size.
Another mistake is pushing pins in the wrong direction. The pins should grip the hair tightly, but not cause pain.
To fix slipping, divide your hair into smaller sections before pinning. Use pins with ridged sides facing down. This grip style helps catch strands better.
For fine or slippery hair, lightly tease the area where you’ll place the pin. This gives the pin more texture to hold on to.
- Separate hair into small, even sections for pinning
- Insert pins with ridged side down and smooth side up
- For fine hair, tease lightly at the pin placement spot
- Avoid pushing pins straight in; angle them to lock hair
- Use 3 to 6 pins for stubborn or heavy hairstyles
- Opt for matte finish pins on slippery hair to add friction
Hair type matters a lot when trying to keep pins in place. Thick, textured hair usually grips pins easily. Fine hair is slicker, so pins can slide unless you add extra hold.
In curly hair, pins might catch too much and break strands if you’re not careful. Adjust your technique to your hair’s feel and weight.
If you feel discomfort or pins pulling on your scalp, loosen them slightly. Pins set too tight often cause pain and damage.
You want a secure hold without squeezing hard. Trying these steps usually stops pins from popping out during the day.
7. Creative Ways to Use Bobby Pins as Hair Accessories
You can wear bobby pins as visible accessories to add a pop of color or sparkle. Colorful, painted, or embellished pins work well for this. Place bobby pins where they stand out.
Try above the ear or beside a ponytail. They look great and keep hair back neatly.
Start with plain bobby pins to decorate. Use acrylic paint or nail polish. Add stripes, dots, or patterns you like.
Let them dry for at least 30 minutes before using. Glue tiny beads, rhinestones, or small charms on top for extra bling. Clear craft glue or a hot glue gun works well here.
Matching bobby pins with your outfit colors creates a pulled-together look. Try pairing pastel pins with soft makeup or metallic pins with evening wear. Layer two or three bobby pins for style.
Try a fan shape or crisscross pattern. They add flair and hold hair well. It looks like jewelry but also keeps your hair neat.
Trendy designs include pins decorated with pearls, tiny flowers, or geometric shapes. Matte black or blonde bobby pins come in big packs. Brands like Fromm Style Artistry sell packs of 150 or more.
These are good for styling lots of hair. Choose smaller, tighter bobby pins for fine hair. They hold better and stop pins from slipping.
To style visible bobby pins, gather hair from one side. Twist or comb it flat against your head. Then place one or two decorated pins horizontally to keep it in place.
This works well for casual or dressy occasions. Using multiple pins in an intentional pattern prevents pins from looking random or messy.
Costs vary but plain pins often come in large packs for under $10. Adding your own designs costs little beyond your crafting supplies. Watch out for heavy embellishments that weigh pins down and pull hair.
Switch to smaller bobby pins if they slide or snag. You can also paint a thin clear nail polish layer inside the pin for extra grip.
8. Safe Use of Bobby Pins Without Damaging Hair
Placing bobby pins too tightly can cause pain and hair breakage. To avoid this, slide the pins gently. Place them close to your scalp.
Do not squeeze your hair with the pin. Always put the ridged side of the pin facing down.
Point it toward your scalp. This helps hold hair better with less pulling.
Removing bobby pins incorrectly often leads to hair damage or scalp irritation. Hold the pin by top and foot firmly.
Push it up and out from the foot end. This method minimizes tugging and keeps your hair intact.
Sometimes pins dig into your scalp, causing discomfort. Make sure you don’t insert pins too deep or at sharp angles.
Gently adjust the pin’s position if you feel pain. Move it until it’s comfortable.
- Insert bobby pins ridges down, flat side up
- Avoid placing pins too close together or too tight
- Remove pins by pushing up and out from the foot
- Use pins matching your hair type to reduce pulling
- Don’t reuse bent or rusted pins; they snag hair
- Use a gentle hair detangler spray before removing pins
Repeatedly using old, rusty pins can snag and break hair strands. A new set of bobby pins costs only a few dollars.
They help protect your hair health better. Remember to keep pins clean because dirt can irritate the scalp and cause itching over time.
Always remove bobby pins slowly, never pull them straight out quickly.
9. Using Multiple Bobby Pins for Stronger Hairstyles
To make heavy or complex updos stay put, use multiple bobby pins. Criss-crossing or layering pins adds stronger hold by distributing pressure evenly. This keeps styles like full buns or twists secure without slipping.
Basic Criss-Cross Method for Extra Hold
The criss-cross technique creates an X shape using two pins. Pins “hold hands,” locking the hair tightly in place. It suits messy buns, twists, or securing loose strands.
Start by inserting one pin with its ridged side down. Then place a second pin over the first one, crossing at the center. This crossing action doubles grip strength and reduces slipping.
- Gather the hair section to secure.
- Slide in the first bobby pin with ridged side down.
- Place the second bobby pin over the first, crossing it in an X shape.
- Press both pins gently to ensure they lock together.
- Adjust pins so the ends are hidden or styled as you like.
Layering Pins for Bulky Hairstyles
Big buns or thick updos need several pins layered for strong hold. Layering means stacking pins close, not just side-by-side. This adds depth and strength to resist gravity and movement.
Start by inserting a row of pins around the bun’s base. Then add another row slightly overlapping the first set. This technique spreads the force across more pins and hair.
- Create your bun or updo, keeping it tight.
- Insert the first row of pins evenly spaced around the base.
- Add a second row of pins, spacing them to overlap the first.
- Tuck any loose ends beneath the pins for a smooth look.
- Check security by gently shaking or moving your head.
Spacing Pins Evenly for Balance
Even spacing of pins helps balance the hold and avoids pressure spots. Too many pins clustered in one spot can cause slipping or discomfort. Spread pins evenly to cover the hairstyle’s surface.
For a full bun, expect to use 6 to 8 pins depending on hair thickness. Thicker hair needs more pins spread around the bun for stability. Thin hair may do well with fewer pins but spaced carefully.
10. Repurposing Bobby Pins for Practical Uses Beyond Hair
Bobby pins aren’t just for hair. You can use them to solve small everyday problems without spending money on special tools. They work well because they’re small, strong, and easy to bend.
One simple trick is using bobby pins as zipper pulls. When your zipper tab breaks off, clip a bobby pin through the hole.
It gives you a new grip that won’t slip. For safety, pick pins without sharp edges and clean them before use.
Painters and nail art fans use bobby pins for small dots. They also make lines with nail polish. These are simple and neat designs you can create fast.
Dip the rounded end in polish and press on the nail. This has no extra cost if you already own the pins.
It helps create quick and simple designs. You don’t need any special tools.
- Keep wires untangled by clipping them closed with bobby pins.
- Create temporary bookmarks by sliding pins on book pages.
- Hold a dress or shirt strap in place if it slips.
- Bundle cables behind your desk to stay organized.
- Use painted bobby pins as quick decorative clips for bags or clothes.
- Pin name tags or small papers to fabric when sewing or crafting.
- Make quick jewelry like necklaces by linking pins together carefully.
These pins are cheap and easy to find. Keep a small container handy for backup uses around the house. Clean and check pins before reuse on skin or clothes.
This helps avoid rust or dirt stains. Keep your pins in good shape.
Do not use very old or rusty pins. Bent or weak pins break easily. They can also scratch your skin.
Stick to metal bobby pins, not plastic ones, for practical tasks. They last longer and hold better on non-hair objects.
11. How to Maintain and Extend Bobby Pin Lifespan
Store bobby pins in a dry place to avoid rust. Use small containers or magnetic strips to keep them neat. This prevents pins from bending or getting lost.
Bobby pins lose grip when their ridges wear down or if they bend out of shape. Rough handling or dropping them often causes damage. Hair products like oils and sprays can also reduce their hold.
Replace bobby pins every few months if you use them daily. Pins that feel loose, are bent, or have rust spots should be tossed out. Fresh pins hold hair much better and protect your strands.
- Keep bobby pins away from moisture and humidity
- Check pins regularly for bending or missing teeth
- Clean pins by wiping with a soft cloth after use
- Avoid twisting pins too much to prevent breakage
- Store pins in a labeled small container or box
- Replace pins that no longer hold hair well or are rusty
Some pins bend after a few uses, making them hard to slide in hair. Bent pins may snag hair and cause breakage over time. Avoid this by gently straightening pins with your fingers only.
Keep pins away from sticky hair products like gels or thick sprays. These cause build-up on the metal, reducing grip. Clean pins by wiping them with rubbing alcohol or warm water and soap.
Don’t try to fix rusty pins with sandpaper. Replace them to avoid damaging your hair.
12. How Hair Texture Affects Bobby Pin Use and Techniques
Straight hair usually holds well with standard metal bobby pins. Smooth strands let pins slide in easily. But pins can slip if your hair is very fine.
Choose pins with a slight grip coating or textured finish to keep them in place longer. For thick straight hair, use wider pins that can hold more hair without bending.
Wavy hair benefits from pins that have a tighter grip. The gentle bends help pins catch better. But you may need to insert pins more firmly.
Try crossing two pins in an X shape to secure looser waves. Avoid using too many pins or they may create unwanted bumps where your waves fall.
Curly hair needs pins designed for extra hold, like coated or larger pins. The curls create natural texture that helps pins stay put.
Insert pins at the roots, angling them so they grab multiple strands tightly. Use pins with a strong grip to avoid slipping in fine or loose curls.
Coarse hair often has trouble with thin, standard pins bending or sliding out. Use heavy-duty pins made for thick or coarse textures.
Insert pins perpendicular to the hair shaft for a firmer hold. You might also need to use more pins spaced evenly to avoid sections slipping free.
Hair porosity affects how pins hold because porous hair absorbs moisture, making it softer or frizzier. Dry, damaged hair may let pins slip more.
So lightly adding a texturizing spray first helps. Avoid using too much product, which can make hair sticky and damage the pins.
Adjusting pin techniques depends greatly on your hair type. Straight hair often needs pins slid in smoothly along strands.
Wavy to curly hair holds better when pins snag some texture by angling or twisting slightly. For coarse hair, pushing pins firmly and crossing them keeps hair bundled securely.
Applying pins works best on dry hair. Wet hair may cause pins to slide as it dries and shrinks. Take your time to test a small section before doing a full style.
Try two pins on each bun side first. See how strong the hold feels. Adjust pins if needed for better grip.
Quality bobby pins cost $3 to $10. Packs have 50 to 100 pins. Price depends on brand and material used.
Coated pins usually last longer and hold well in textured hair. Pins for coarse hair tend to cost more. Choose based on your hair type.
Step-by-Step Action Plan for Mastering Bobby Pin Use
Follow these steps to improve your bobby pin skills quickly. Each step helps you build confidence and get great results.
- Day 1: Choose bobby pins that match your hair type for the best grip. Check that they slide in easily but hold tight.
- Day 2: Practice inserting bobby pins with the wavy side down and close to your scalp. Your pins should feel secure without pulling.
- Day 3: Try controlling bangs or baby hairs with short bobby pins. Your hairs should stay neatly in place all day.
- Week 1: Use multiple bobby pins to test stronger hold on styles like updos. Your hairstyle should stay put during activity.
- Week 2: Experiment with bobby pins to add volume by cross-clipping sections. You will notice a lift without flattening your hair.
- Week 3: Try creative bobby pin designs as accessories. Look for styles that add flair without discomfort.
- Week 4: Keep older bobby pins clean and replace bent ones to avoid damage. Your pins should feel smooth and hold well.
Frequently Asked Questions
How Do I Fix a Bobby Pin That Won’t Stay in My Hair?
Try sliding a small bit of hairspray on the pin’s teeth. It adds grip, helping pins hold better in fine or silky hair.
Can I Use Bobby Pins on Wet Hair Safely?
Yes, but hair takes longer to air dry with pins in. Avoid using pins on soaking wet hair to prevent breakage.
What’s the Best Way to Remove Bobby Pins Without Pulling Hair?
Gently push the pin inward, then slide it out smoothly. Don’t pull straight out as this can tug and damage hair strands.
How Do I Make Bobby Pins Less Visible in Dark Hair?
Use pins colored close to your hair shade and place them flat. Keeping the wavy side down helps pins blend better.
Can You Use Bobby Pins to Secure Wigs or Hairpieces?
Yes, bobby pins help anchor wigs if inserted carefully through wig and natural hair. Use sturdy pins and check regularly to avoid slippage.
Are There Any Styles That Bobby Pins Can’t Hold Well?
Very sleek, high ponytails on slippery hair may outmatch pins. For durable hold, combine pins with elastic bands or hair spray.
Wrapping Up
Bobby pins are simple tools that do a lot when used right. You can control, style, and accessorize your hair easily. Start with the basics today and see how much they can improve your look.