How to Straighten Hair with Dyson Airwrap: A Complete Guide for Salon-Quality Results
How to straighten hair with Dyson Airwrap works best when your hair is mostly dry. Start by drying your hair to about 80% before using the Airwrap attachments. This avoids damage and helps the tool shape your hair more smoothly.
You want to choose the right smoothing brush attachment based on your hair type. The firm smoothing brush suits thick or curly hair.
The soft smoothing brush is great for fine or straight hair. These brushes help gently straighten without harsh heat.
Begin the process on damp, not wet hair to maintain moisture and reduce frizz. Work in small sections with the Airwrap. Move slowly.
This gives you better control and longer-lasting straight hair. This method keeps hair healthier than high-heat flat irons.
Key Takeaways
- Dry your hair to about 80% before straightening to protect it and improve styling.
- Use the firm smoothing brush for thick or curly hair for better straightening control.
- The soft smoothing brush works best on fine or naturally straight hair to avoid damage.
- Work in small sections to ensure every part gets properly straightened without overheating.
- Keep some moisture in your hair; this helps reduce frizz and maintain shine.
- Move the Airwrap slowly and steadily for the best, smooth finish without heat damage.
How to Straighten Hair with Dyson Airwrap Step-by-Step

Your hair should be mostly dry before you start straightening with the Dyson Airwrap. Dyson recommends styling from damp hair for the best finish. Completely dry roots help your style last longer and feel smoother.
Using the right attachment is key. The smoothing or firm smoothing brushes suit most hair types for a sleek look. You’ll use airflow and Coanda effect technology to straighten, reducing heat damage compared to flat irons.
- Dry your hair to about 80-90% with the pre-styler or blow dryer attachment. This step gets your hair damp but not wet, making straightening more effective.
- Section your hair into manageable parts. Use clips to keep hair separated. Smaller sections mean straighter results.
- Attach the firm smoothing brush for thick or curly hair. Use the soft smoothing brush for fine or straight hair. Choose based on hair texture to avoid snagging or frizz.
- Turn on the Dyson Airwrap and set it to medium airflow and medium heat. The machine uses airflow to align hair smoothly without extreme heat.
- Slowly brush each section from roots to ends, moving the tool in a downward motion. Repeat until the section feels smooth, usually about 20-40 seconds per segment.
- Check if your roots are dry and straight. Use the flyaway smoother or blow dryer attachment on roots if needed. Dry roots prevent limpness and help maintain volume.
- After finishing all sections, switch to the cool shot button to set the style. Cool air locks in the straight shape and reduces flyaways.
- Apply a light serum or finishing spray if desired. This adds shine and controls any remaining frizz without weighing hair down.
Choosing the Best Attachment for Your Hair Type and Length
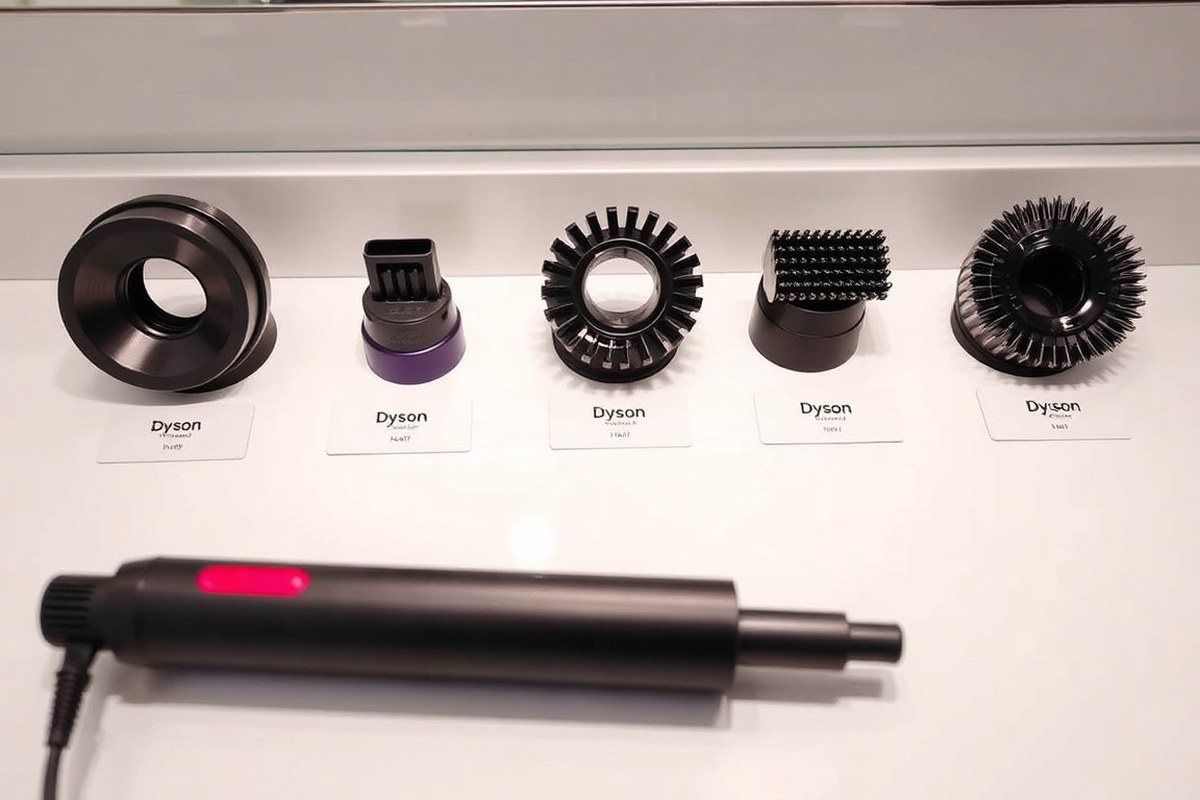
Choosing the right Airwrap attachment depends on your hair’s thickness, texture, and length. Different tools handle specific needs better, giving you smoother results. Matching the tool to your hair type saves styling time and reduces damage.
Firm Smoothing Brush for Thick or Coarse Hair
The firm smoothing brush works well for thick, coarse, or curly hair. Its stiff bristles hold hair tightly, creating tension that straightens hair as you dry. This attachment helps manage frizz and reduces curl bounce for a sleeker look.
Use medium to high heat with this brush. But avoid long sessions to prevent dryness.
It’s most effective on shoulder-length hair or longer. Shorter hair might be harder to control with this firm brush.
- Best for thick, coarse, or curly hair textures
- Works well on medium to long hair
- Creates tension for smoother, straighter results
- Uses stiffer bristles to grip hair
- Pair with heat-protectant spray for less damage
Use firm brush strokes from roots to ends to keep hair straight.
Soft Smoothing Brush for Fine or Fragile Hair
The soft smoothing brush is gentle on fine or fragile hair. Its flexible bristles reduce breakage and prevent pulling. This attachment smooths flyaways and adds shine without over-drying delicate strands.
This brush suits fine or thin hair on short to medium lengths best. It’s ideal when you want a straight look without stressing fragile hair. Lower heat settings work well to keep hair healthy.
- Designed for fine, fragile, or thin hair
- Works best on short to medium length hair
- Soft bristles reduce hair breakage
- Smooths flyaways and boosts shine
- Use gentle heat for best results
Avoid too much heat and rubbing with the soft brush to prevent hair stress.
Coanda Smoothing Dryer for Flyaways and Finishing
The Coanda smoothing dryer attachment targets flyaways and frizz after drying or brushing. It uses airflow to smooth hair strands without direct heat from a brush’s bristles. This tool works on all hair types and lengths as a finishing step.
It’s perfect for topping up second-day hair or adding shine after your main styling. Use it on low heat and aim airflow at flyaways around your crown or edges. The dryer also helps hide dryness and adds a polished look.
- Great for all hair types and lengths
- Targets flyaways and frizz gently
- Uses Coanda airflow technology, not bristles
- Works well as a finishing tool
- Can smooth roots and crown area
Use the Coanda dryer last to seal in your style and smooth stray hairs.
Preparing Hair and Products for Optimal Straightening
Start by drying your hair to about 80% damp before straightening with the Dyson Airwrap. Using the right products and tools helps reduce frizz, protect your hair, and get smoother results. Prepping your hair makes it more receptive to heat and styles better.
Detangling with a Wide Tooth Comb or Wet Brush
Remove knots gently before styling to avoid breakage and uneven straightening. A wide tooth comb works great for this. A Wet Brush also works well.
Both cause less pulling on your hair. Brushing also spreads product evenly through your hair strands.
Try this checklist before you start drying:
- Use a wide tooth comb or Wet Brush to detangle.
- Work from the ends toward the roots to avoid snagging.
- Detangle when hair is damp, not soaking wet.
- Apply any leave-in treatments or serums before combing through.
- Section hair for easier handling if thick or long.
Detangled hair lays flat and shines better. Tangled hair leads to frizz and uneven heat distribution.
Using Heat Protectant Sprays or Creams
Spray or cream heat protectants shield your hair from damage caused by styling temperatures. For the Dyson Airwrap, use protectants when your hair is damp before you start drying. Tresemme’s heat protectant spray works well when applied in small sections.
Spray evenly but avoid soaking. Keep tension on your hair while drying the sections. Heat protectants also help to smooth the cuticle and keep frizz at bay during styling.
Applying Lightweight Serums or Smoothing Oils
Lightweight serums or oils add shine and tame flyaways without weighing your hair down. Products like Kérastase Gloss Absolu Glaze Drops or Virtue Healing Oil work well for this. The Dyson Chitosan Post-Style Serum is a good choice.
It’s made for Airwrap users. You might find it better for your hair.
Apply only a small amount to the lengths and ends after heat protecting and before drying. Heavy oils can make fine hair look greasy or limp. Serums keep your hair smooth through multiple washes, reducing frizz and static.
Time Expectations and Tips for Faster Straightening
Straightening hair with the Dyson Airwrap usually takes between 15 and 45 minutes. Your hair’s length, thickness, and wetness level affect exactly how long it will take. Thicker or longer hair tends to need more time to dry and style fully.
The Airwrap dries and shapes at the same time, which cuts down styling time. Start with damp, towel-dried hair. This helps the tool work less.
It won’t have to dry your hair as much. Using medium heat and airflow settings speeds up the process while protecting your hair from damage.
Divide your hair into sections. Work on one section at a time. This speeds up your routine.
Hold each section on the barrel for 8 to 12 seconds. This lets the Coanda effect work well. Don’t rush this step.
Too short won’t straighten well. Too long could cause frizz or set unwanted bends.
For fine or shorter hair, focus on smaller sections to get smooth results faster. For thick or curly hair, use slightly bigger sections but be patient. It may take up to 45 minutes when your hair is very dense or long.
Using the Dyson Airwrap’s personalized settings can make styling quicker and more effective. You can program heat, airflow, and cool-down times based on your hair type and style goals. These settings help save time while keeping your hair healthy.
Trying to rush with too high heat or fewer sections risks uneven straightening or extra frizz. Spend a bit more time breaking hair into neat clumps. Don’t overload a section before rolling it.
Overloading causes clumps that take longer to style. Work with smaller sections for best results.
Taking short breaks between sections can help hair cool down naturally and lock in the style. Using a good heat protectant product also supports faster smoothing by reducing flyaways. Each pass with the Airwrap should bring you closer to sleek hair.
Take your time for a smooth finish. Avoid rushing the process.
Why Dyson Airwrap Causes Less Heat Damage Than Flat Irons
The Dyson Airwrap lowers heat damage risk compared to flat irons by using intelligent heat control. It measures airflow temperature over 40 times each second. This stops the tool from overheating and burning your hair.
Flat irons rely on direct, high heat. They can reach 400°F or more, which dries out hair and causes breakage.
The Airwrap stays below damaging temperatures by combining heat and airflow. This gentle styling protects fragile and coloured hair better.
The key to the Airwrap’s design is the Coanda effect. This is where airflow naturally pulls your hair toward the barrel without clamping it.
It shapes hair softly with air instead of harsh heat pressure. You can gently wave the Airwrap to help loose strands wrap perfectly.
Here’s a quick look at how the Dyson Airwrap compares to traditional flat irons:
| Feature | Dyson Airwrap | Traditional Flat Iron |
|---|---|---|
| Maximum Heat | Below 300°F with smart control | Up to 450°F or higher |
| Heat Measurement | 40+ times per second | None (fixed setting) |
| Styling Mechanism | Airflow + Coanda effect | Direct ceramic or metal plates |
| Risk of Damage | Low, avoids extreme heat | Higher, prone to scorching and breakage |
| Best For | Fragile, coloured, or fine hair | Thick or very curly hair |
Small hair sections work best for the Airwrap. This helps airflow and heat reach every strand evenly.
Large sections make it harder to style and can cause uneven drying. You might need to wave the tool gently back and forth to encourage hair wrapping.
Use small sections to ensure the Airwrap styles hair smoothly and avoids uneven drying.
The Airwrap uses smart heat control to protect your hair. It also has airflow technology for gentle styling. This makes it safer for delicate hair than flat irons.
It cuts down drying time and hair damage by working with your hair’s natural shape. This keeps your hair healthier over time with less breakage and frizz.
Common Mistakes When Straightening with Dyson Airwrap (and How to Fix Them)
Frizzy hair after straightening often means your hair wasn’t fully dry. The Airwrap works best on damp hair, not wet.
Use the pre-styling dryer attachment longer or raise the heat a little. Avoid the highest setting unless your hair is very thick.
Using the wrong attachment or heat can cause uneven results. For straight hair, choose the firm smoothing brush or the classic smoothing brush. They help you straighten without leaving kinks.
Higher heat settings can damage fine hair. So pick a lower one to protect your strands.
Uneven or incomplete straightening happens when you rush or don’t section hair properly. Divide hair into small, manageable sections before styling.
Move the Airwrap slowly through each section to prevent missed spots. Also, finishing with the cold setting locks in the style.
- Ensure hair is damp, not wet, before starting
- Use the smoothing brush attachments for sleek results
- Avoid the highest heat setting for thin or medium hair
- Section hair evenly into small strands
- Move the tool slowly to straighten each part fully
- Switch to cold air while hair is wrapped to set style
If your hair feels dry but still frizzy, you might be missing the cold shot. Holding the cold setting while the Airwrap is still wrapped helps lock the smoothness.
Straightening too quickly without this can cause flyaways and less shine. Patience and the right technique avoid those problems.
Techniques for Straightening Different Hair Types and Lengths
Straightening with the Dyson Airwrap changes depending on hair length and type. Short hair needs smaller sections, while long hair requires more time and larger sections.
Curly or coarse hair needs heat and airflow carefully balanced. Fine hair benefits from gentle airflow and minimal heat to avoid damage.
Sectioning Strategies by Hair Length
Short hair takes less time per section but needs precision. Use small clips to hold hair away, focusing on tiny pieces for the Airwrap. For medium and long hair, divide it into four or more sections for better control.
Long hair benefits from starting at the nape and working upward. Holding bigger sections reduces styling time but takes care not to miss strands. Clip sections on top while working on the bottom ones first.
- Comb hair thoroughly to remove tangles.
- Divide short hair into four small sections using clips.
- For medium or long hair, divide it into at least four sections. Clip the top parts out of the way to work better.
- Start straightening from the bottom back sections moving upwards.
- Use small sections you can handle easily. For short hair, make them 1 to 2 inches wide. For longer hair, make the sections 2 to 3 inches wide.
- Release clips as you finish each section and move on.
Adjusting Heat and Airflow for Hair Texture
Curly and coarse hair needs heat settings on medium or high, combined with steady airflow. This combination loosens curls without extra passes. Fine or thin hair requires low heat and gentle airflow to avoid breakage.
Drag the Airwrap slowly through curls to let heat and airflow shape the hair. Fast movements may leave curls unchanged or frizz. It helps to use the firm smoothing brush attachment on thick curly hair for better control.
Post-Straightening Styling Tips per Hair Type
Curly and coarse hair benefits from a lightweight serum to tame frizz and hold the style. Avoid heavy oils as they can weigh hair down. Use a wide-tooth comb to gently set the style without causing damage.
Fine or thin hair looks best with a light mist of heat protectant spray after straightening. Use fingertips to smooth hair instead of a brush, which might break delicate strands. Short and medium hair often holds style longer with a cool blast from the Airwrap’s airflow.
Finishing and Maintaining Your Straightened Style for Longer Wear
Use the Dyson Airwrap’s cool shot to lock in your style after straightening. Hold the attachment close for about 15 seconds until your hair feels dry to the touch. This helps seal the cuticle, reducing frizz and making your hair shinier.
Spray a light mist of flexible hairspray to keep your hair in place without stiffness. Products like Oribe’s Free Style Hairspray add hold without making hair crispy. Apply from about 8 to 10 inches away to avoid clumping or heaviness.
Serums or smoothing oils work well to tame flyaways and add sleek shine. Use a small amount, about a dime-sized drop, warmed between your palms first. Focus on the ends and avoid the roots to keep your hair from looking oily.
For a natural look, apply a texture spray such as Hair by Sam McKnight Cool Girl Texture Mist. It adds light hold and softens overly smooth hair. Use a small amount, then run your fingers through to distribute it evenly.
Your straightened style will lose its look over time. Focus on spots with waves or frizz to freshen it up. Touch up those areas to restore smoothness quickly.
Use the Airwrap barrel or smoothing brush briefly on these areas. Hold each section wrapped for 10 to 15 seconds until dry. So you don’t expose hair to unnecessary heat.
This retouch technique avoids restyling your whole head and saves time. Keep your hands moving smoothly to prevent bumps or uneven straightening. Finish with a quick cool shot to reset the style and smooth the surface.
Don’t overload hair with product. Too much serum or spray will weigh hair down and reduce shine.
Step-by-Step Action Plan for Straightening Hair with the Dyson Airwrap
Follow this plan to get smooth, straight hair using your Dyson Airwrap. Each step has a clear goal to check your progress.
- Before you start: Wash and towel-dry your hair until damp, not dripping. Your hair should feel slightly moist to the touch.
- Right after drying: Apply a heat protectant spray evenly. Make sure your hair feels coated but not heavy or sticky.
- First pass with the Airwrap: Attach the firm smoothing brush. Work on small sections, moving slowly from roots to ends. Hair should look smoother and less frizzy.
- Repeat after sections dry: Take new sections and repeat brushing. Hair should feel warmer but not hot, with each stroke straightening more.
- Final smooth: Use the cool shot button on your Airwrap to set the style. Your hair will feel cooler and stay in place longer.
- After finishing: Apply a light serum or anti-frizz spray to lock in shine. Hair should look shiny and soft without feeling greasy.
- Daily care: Brush your hair gently each morning to maintain the shape. Avoid moisture exposure to keep your style fresh.
Frequently Asked Questions
How to Straighten Hair with Dyson Airwrap?
Start with damp hair, use the smoothing brush attachment, and slowly glide it down each section. This technique uses less heat, protecting hair while giving a sleek finish.
Does Dyson Airwrap Straight Hair?
Yes, it straightens hair gently but won’t be as quick as a flat iron. It’s best for soft, smooth styles with less heat damage.
How Do I Turn on My Dyson Corrale Straightener?
Press and hold the power button until the display lights up. Wait a few seconds for it to heat before styling your hair.
How to Use Dyson Airwrap for Beginners?
Begin with clean, damp hair and try the smoothing brush to get a feel. Move slowly and work in sections for best results.
What Are the Disadvantages of Using the Dyson Airwrap?
It takes longer than traditional straighteners and costs more. Some hair types might need extra effort to get very straight styles.
Can I Use Dyson Airwrap on Dry Hair?
Yes, but it works best on damp hair for longer-lasting straightness. Dry hair may need additional passes or touch-ups.
The Bottom Line
You can get sleek, straight hair using the Dyson Airwrap with gentle, careful steps. Try the quick-start plan to see the difference today. Your hair will thank you for less heat damage and better shine.