How to Oil Clippers: Simple Steps for Long-Lasting Performance
Knowing how to oil clippers is key to keeping them sharp and running smooth. A quick oil drop every few minutes of use cools the blades and stops friction damage. Start by unplugging the clippers and brushing out stuck hairs for the oil to reach properly.
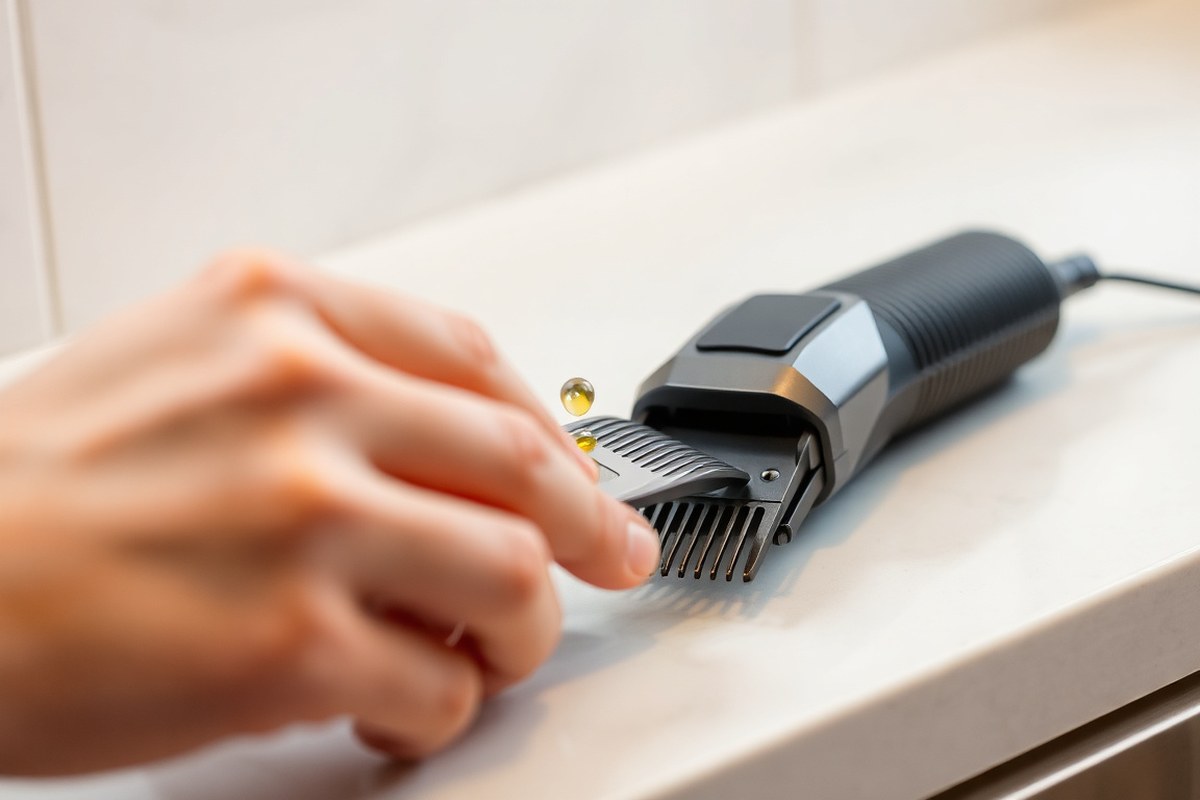
Add 3 to 4 drops of oil along the clipper’s blades and rails. Turn the clippers on for about 10 to 15 seconds to spread the oil around. Regular oiling helps avoid wear and keeps the motor from burning out.
Listen for a high-pitched whine or feel heat after just 30 seconds of use. These signs mean you need to oil your clippers immediately before continuing. Oiling takes only about 30 seconds but extends your blades’ life significantly.
Key Takeaways
- Oil clippers every 5 minutes during use to keep blades cool and sharp.
- Place 3 to 4 drops of clipper oil on the teeth and guide rails of the blade.
- Brush out hair debris before oiling to ensure proper lubrication.
- Turn the clippers on for 10-15 seconds after oiling to spread the oil.
- Oil immediately if blades make a high-pitched whine or feel hot.
- Avoid using WD-40 or olive oil; use clipper-specific oil instead.
How to Oil Hair Clippers Properly: Step-by-Step Guide
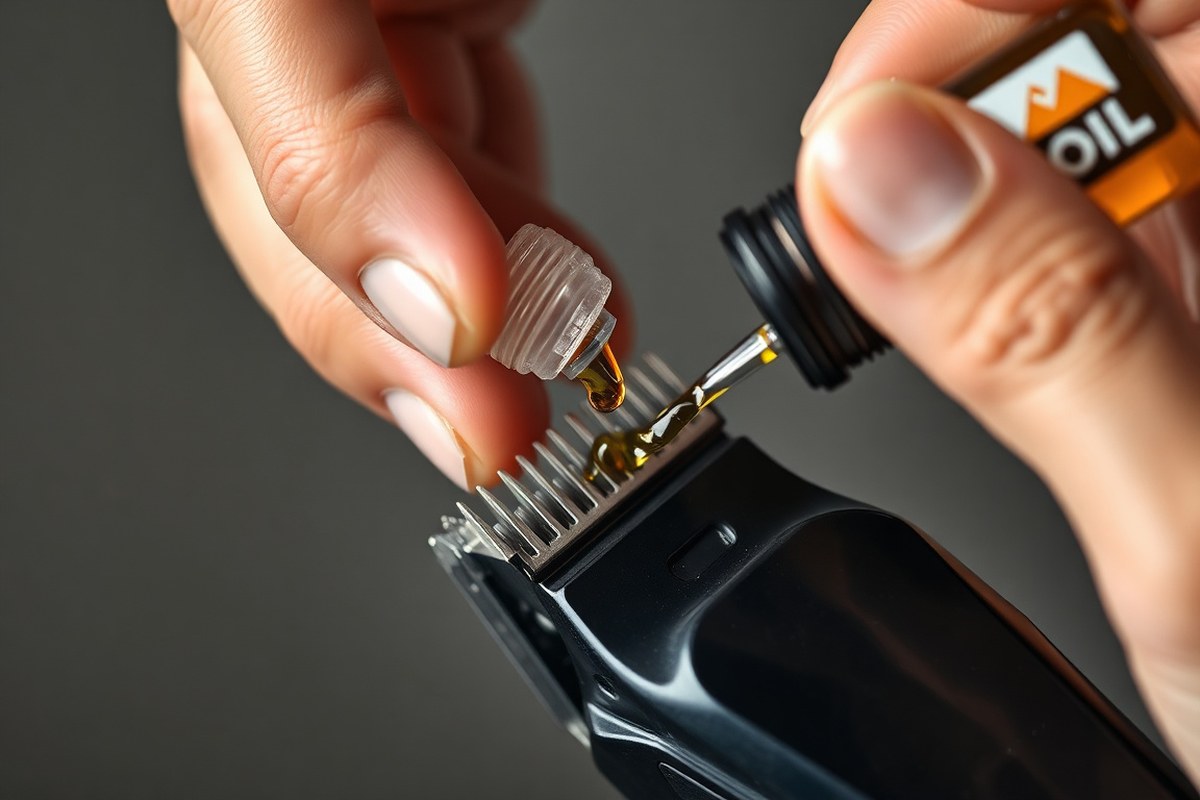
You need to clean hair clippers well before oiling them. Put a few drops of oil on the right blade spots. Then run the clipper briefly to spread oil.
Finally, wipe away extra oil with a cloth. Use 3 to 4 drops on the blade teeth and one drop on each guide rail. Doing this after every cut keeps your blades sharp and running smoothly.
Preparing Clippers Before Oiling
Always unplug your clippers before oiling to avoid accidents. Use a small brush or soft cloth to remove all hair clippings around the blades. This clears the space so oil can reach the moving parts properly.
Cleaning the blade avoids buildup that could clog or slow your clipper. Make sure the blades are dry before applying oil. This prevents trapping moisture that could cause rust.
Applying the Right Amount of Oil
Put 3 to 4 drops of oil on the blade teeth. Add one drop on each guide rail if your blades adjust. This keeps moving parts working smoothly.
Only a few drops are enough, adding too much oil can attract dust and hair. Using the right amount protects the motor and blade without making a mess.
Medium or heavy-duty clippers can use extra oil inside blade holes. Add a drop inside these holes for better internal lubrication.
Spreading Oil and Finishing
Turn the clipper on and hold it so the blades face downward. Run it for 10 to 15 seconds to distribute oil evenly across the blade surfaces. This helps the oil reach all cutting edges and moving parts.
Switch off the clipper once you’ve applied the oil. Use a dry cloth or paper towel to remove any leftover oil.
This step keeps the blades free from dirt and stops oil buildup that attracts dust or hair. Wiping also helps stop oily residue from getting on your skin during use.
Follow these steps to oil your clippers correctly:
- Unplug the clipper from the power source for safety.
- Brush out all hair clippings from the blades using a soft brush.
- Make sure the blades are clean and dry before applying oil.
- Place 3 to 4 drops of clipper oil evenly along the blade teeth.
- Add one drop of oil on each side or guide rail.
- Turn the clipper on and run it with the blades tilted down for 10, 15 seconds.
- Switch off the clipper and wipe away excess oil with a clean cloth.
What Types of Oil Can You Use on Clippers?

You should use purpose-made clipper oil to keep your hair clippers working well. This oil is specially made to reduce friction and stop blades from overheating. It keeps blades sharp and helps your clippers last longer.
Some people try using household oils like WD-40, olive oil, or baby oil. But these can cause problems. WD-40 and cooking oils can gum up the blades, attract hair, or damage the motor.
Baby oil and other thick oils can leave sticky residues on blades. This residue slows down cutting. It may also void your clipper’s warranty.
Manufacturers usually recommend light blade oil made just for clippers, such as Wahl Clipper Oil. This oil is affordable and simple to apply regularly. This oil works on most clipper and trimmer brands.
It’s a solid all-around choice. It keeps your tools running smooth and cool.
| Oil Type | Use on Clippers? | Pros | Cons |
|---|---|---|---|
| Purpose-Made Clipper Oil | Yes | Lightweight, reduces friction, safe for blades and motor | Needs frequent application (every 5 minutes during use) |
| WD-40 | No | Easy to find, cleans metal | Damages motor, gums blades, voids warranty |
| Olive Oil / Cooking Oil | No | Inexpensive, natural | Sticky, attracts hair, clogs blades |
| Baby Oil | No | Light scent | Too thick, sticky residue, risks damage |
| Sewing Machine Oil | No | Lightweight lubricant | Not designed for clippers, can gum up blades |
Apply clipper oil every five minutes during a cut. This keeps blades running cool and clear of hair debris. After your haircut session, oil the blades again.
Do this before you store your clippers. It helps protect blades from rust.
Some people skip oiling because their clippers seem fine at first. Not oiling causes blades to heat up and pull hair. That usually signals hair stuck between the blades, which oil can fix quickly.
Never substitute household oils for clipper oil to avoid damage and lost warranties.
When and How Often Should You Oil Your Hair Clippers?
Cutting your hair once a week calls for oiling your clippers after every use. This keeps the blades running smoothly and prevents pulling or uneven lines.
Clean your clippers each time, then always add oil afterward. Oil helps restore lubrication and keeps the blades running smooth.
Use clippers about once a month or less? Oil them before each use. This stops rust and keeps blades moving easily.
This prevents rust spots and gritty sounds that happen when blades dry out. Regular oiling also helps your clipper last longer by reducing wear and tear.
Professional barbers oil clippers before and after every client. They also oil often during long sessions. Usually every 10 to 15 minutes.
This frequent oiling stops the blades from overheating and keeps them cutting smoothly through many heads. Trimming multiple people in a row?
Follow this plan to avoid damage. Take breaks to clean and oil clipper blades.
- Oil before using clippers if you don’t cut often, like monthly or less.
- After every use, clean the blades and apply a few drops of oil.
- For weekly cutters, oil your clippers at least once a week after use.
- In a busy session, stop every 10 to 15 minutes to oil the blades.
- Watch for signs like high-pitched whines or pulling to oil immediately.
Oiling your clippers creates less friction and heat, making trimming easier. Add just a few drops of oil to the moving parts.
Usually two or three drops are enough on the blade. Let the oil spread evenly by turning the clippers on for a few seconds after application.
Regular oiling costs little time and money. But skipping it leads to dull blades and rough cuts. Good clipping feels smooth and quiet, not sticky or scratchy.
If your clippers stay cool and cut sharp, your oiling works. This shows you oil enough and keep them in good shape.
Signs Your Clippers Need Immediate Oiling
Heat building up quickly during use is a clear sign your clippers need oil right away. When clipper blades get hot in 30 seconds, friction causes it.
The blades work too hard and heat up. This friction happens when metal parts rub without a smooth layer of oil between them.
You might also hear a sharp, high-pitched whine. That noise comes from the blades grinding without enough lubrication.
The sound means the motor and blades strain against each other, which can cause damage fast. A dragging feeling or pulling on hair while cutting also points to dry or dull blades.
Hair trapped between the blade teeth is another clue to oil immediately. Oil helps repel and wash out debris. Without regular oil, packed hair increases friction and wears the blades prematurely.
Skipping oiling lets friction wear down your blades. Over time, your clipper won’t cut as smoothly and needs replacing sooner.
- Blades feel hot after 30 seconds of cutting
- High-pitched metal grinding or whining noise
- Hair pulls or drags instead of clean cuts
- Visible hair or debris stuck between blade teeth
- Blades appear dull or scratched
Oiling your clippers adds a thin layer of lubrication. This cools the blades and stops metal rubbing. This simple step reduces noise, heat, and wear.
Put a few drops of clipper oil on blades before use. Do this again after you finish using them. You’ll notice smoother running and longer-lasting blades.
Trying to cut with dry blades risks overheating the motor. Overheated parts can break down quickly or burn out. Proper lubrication lasts longer and saves money by delaying blade replacement.
Avoid cheap alternatives like WD-40 or general oils, which dry up fast and harm blades. Stick with blade oil designed for clipper parts only.
How to Oil Different Types of Clippers and Trimmers
Standard Detachable Blade Clippers
After brushing off hair, put 3 or 4 drops of oil on the blade. Place the drops on the blade’s top edges carefully.
Add oil along the blade guide rails where it slides into the clipper. Running the clipper briefly spreads the oil evenly across the cutting surface.
Take the blade off sometimes to oil where it locks in. This lets you oil hard-to-reach spots properly.
This keeps the blades sliding smoothly and reduces heat build-up. Avoid over-oiling as excess can attract dirt and affect performance.
Use a brush to remove trapped hairs before oiling to keep blades clean.
Adjustable Blade Clippers
Oil these clippers like regular ones. Add drops on blades and rails equally.
Then add a small drop of oil on the blade adjustment lever. This prevents stiffness and keeps the slide mechanism working well.
Because the lever moves the blade up and down, lubrication here stops squeaks and dragging. Make sure to run the clipper after oiling to distribute oil throughout moving parts. Remove any extra oil to avoid slippery handles during use.
Giving the lever a light oiling can extend the life of adjustable blade clippers.
Trimmers and Detail Clippers
These smaller tools need gentler oiling with fewer drops focused on the cutting edges. Place one or two drops on each side of the blade and the blade’s base. Spread it by running the trimmer briefly at low speed.
Trimmers have more delicate, finer teeth that clog easily without proper lubrication. This kind of oiling keeps the blades sharp without causing damage. Avoid heavy oiling since it can slow down the motor and make trimming messy.
For detail tools, precise oiling prevents pulling and keeps edges crisp.
Common Oiling Mistakes to Avoid for Longevity
Over-oiling is a common mistake that can cause oil to drip inside the clipper. This clogs the motor and attracts dirt, which wears out the blades faster. Use a few drops on the blade edges and sides only.
Make them slick but not dripping wet. Just enough oil keeps the blades moving well.
Using the wrong lubricant can harm your clipper’s motor or blades. Avoid household oils like WD-40 or cooking oil. They are too thick and can gum up parts.
This will harm clipper performance. Use white mineral oil or clipper-specific oil only.
These are made for high-speed blades. They keep your clipper running smoothly.
- Don’t skip oiling after cleaning; a dry blade will wear quickly and heat up
- Oil the teeth while the clipper is off, then start it to spread the oil evenly
- Avoid applying oil to the clipper’s motor or electrical parts
- Don’t use too much oil, just 2 to 3 drops on the blades is enough
- Choose white mineral oil or products labeled for clipper blades only
People often forget to oil right after deep cleaning. Cleaning removes old oil, leaving the blades dry and prone to friction damage. Always apply a few drops immediately after cleaning so the blades can glide without grinding.
Oil the clipper first while it’s off. Then turn it on to spread the oil fast. This helps the blades stay lubricated.
Running oil on an already hot blade can burn it or cause uneven lubrication. Wait for the clipper to cool slightly, then add oil for the best protection.
Tools and Supplies Needed for Cleaning and Oiling Clippers
To keep your hair clippers working well, you need a few tools for cleaning and oiling. A small cleaning brush or old toothbrush helps remove hair and dirt from the blades. Using clipper-specific oil is best because it lubricates without damaging the metal parts.
Avoid baby oil. It’s not meant for metal blades and can gum up the mechanism.
A soft towel or tissue is handy for wiping away excess oil and grime. You also need a disinfectant like 70%-90% isopropyl alcohol to clean the blades and kill bacteria.
Alcohol dries fast and won’t rust your clippers when used properly. Using these tools together helps your clipper stay sharp and pull-free.
- Small plastic cleaning brush or old toothbrush for hair and dust
- Soft towel or tissue to wipe blades clean and dry
- Clipper-specific oil like Wahl Premium or Andis Clipper Oil
- 70%-90% isopropyl alcohol for disinfecting blades
- Optional: clipper disinfectant spray for extra hygiene
After trimming, turn off your clippers and brush loose hair from the blades. Next, wipe them with the towel to remove oils and dirt.
Apply a few drops of clipper oil on the blades, usually 3 to 5 drops. Running the clipper briefly with it tilted down spreads the oil evenly without flooding inside.
Let the clipper sit for a minute so the oil sinks in. Then wipe off any excess, so it doesn’t attract dirt or cause blade slippage.
If clippers still pull or feel rough, check blade alignment or consider extra cleaning. These tools and steps keep your device smooth and last longer.
How to Maintain Clippers During Long Cutting Sessions
Keep your clippers oiled every 10 to 15 minutes during long cutting sessions. This stops the blades from overheating and keeps the cutting smooth. Regular oiling prevents damage and helps you avoid pulling hair.
Monitoring Clip Performance and Heat
Listen to your clippers often while cutting. A rough or louder noise means they need oil soon. Also, feel the blades for heat; warm blades warn of friction damage.
Check clipper noise and warmth every 10 to 15 minutes during use. This helps catch problems early before the blades get dull or hot. Use these signs as your oiling reminder.
Applying Oil During Use
Pause your cutting every 10 to 15 minutes to add oil. Turn off your clippers before applying a few drops of oil along the blade teeth. Power the clippers on for about 10 seconds afterward to spread the oil evenly.
Hold your clippers with blades facing slightly down to stop oil from running inside. Use just a few drops, too much oil catches hair and debris easily.
- Turn off the clippers and unplug or disconnect power.
- Hold clippers with blade edges pointing downward.
- Put 2, 3 drops of clipper oil in the middle of the blade teeth.
- Turn on the clippers and let them run for 10 seconds.
- Turn off the clippers and wipe off excess oil with a cloth.
- Resume cutting, then repeat every 10 to 15 minutes.
Use only a few drops of oil during sessions to avoid build-up from excess oil.
Maintaining Blade Cleanliness
Brush loose hair off the blades regularly while cutting. Use a small clipper brush to clear debris between oilings. This keeps the blades running smoothly and prevents clogs.
Cleaning and oiling the blades often stops blade rubbing and hair pulling. It also keeps the clipper blades sharp longer. Don’t skip brushing or you risk slower and rougher cuts.
Step-by-Step Action Plan for Oiling Your Clippers
Follow these simple steps to keep your clippers running smoothly and lasting longer.
- Before each use: Clean the blades by brushing off hair and dust. This stops buildup and lets oil reach the parts.
- Right after cutting: Put 2 to 3 drops of clipper oil on the blade teeth. Also, add some on the top edge of the blade. It prevents rust and keeps blades turning easy.
- After oiling: Turn on the clippers for 15 seconds. This spreads the oil evenly and warms up the blades.
- Weekly: Deep clean by removing the blade, brushing hard-to-reach spots, and oiling every surface. Check for rust or dull blades too.
- Every 4 to 6 weeks: Inspect your blades closely. Spot dryness or pulling sounds? Add extra oil or change the blade.
- During long cutting sessions: Stop every 30 minutes to add a drop of oil. Also, clear any hair stuck in the clipper. It keeps performance steady and avoids overheating.
- Store properly: After use and oiling, cover the blades with a guard or cloth. This keeps dust off and oil in place.
Frequently Asked Questions
Do I Need to Oil Clippers Before Use?
Yes, you should oil clippers before first use and after each cleaning. This protects blades and keeps them cutting smoothly right from the start.
What Can I Lubricate My Clippers With?
Use clipper oil made for hair clippers. It’s light and won’t gum up or corrode blades. Avoid household oils or sprays.
Is WD-40 Good for Clipper Blades?
No, WD-40 evaporates quickly and doesn’t lubricate clippers properly. It can cause blade clumping and damage motor parts.
Can I Use Olive Oil to Lubricate My Hair Clippers?
Olive oil isn’t recommended because heat turns it sticky and gums up blades. It can also void warranties or damage parts.
How Long Does Clipper Oil Last Once Applied?
Clipper oil stays effective while you cut but you need to reapply every five minutes. This keeps blades cool and running smoothly.
Can I Skip Oiling If My Clipper Has a Self-Lubricating Blade?
No, even self-lubricating blades benefit from extra oiling. It adds protection and helps clean hair debris during use.
Wrapping Up
Your clippers need oil to cut clean and last longer. Add oil right after each use, and keep an eye on blade condition. Grab a bottle of clipper oil and start fresh with clean, smooth cuts today.