How to Straighten Hair with Curling Wand: Complete Steps & Expert Tips
Figuring out how to straighten hair with a curling wand is easier than it seems. You use a large barrel wand to smooth out curls by wrapping hair around it briefly.
The heat loosens curls and waves, making your hair appear straighter. This method works well to reduce frizz and tame wild curls.
Start with hair that’s completely dry to avoid damage or burning. Choose a barrel size around 1 to 2 inches for better straightening control.
Use lower heat if your hair is fine or color-treated to protect it. Applying a heat protectant spray before styling also keeps your hair healthy.
Wrap small sections of hair loosely around the wand and avoid holding heat too long. Moving the wand slowly down each section helps smooth the cuticle.
This simple trick helps you straighten without a flat iron. The result looks natural and smooth without extra tools.
Key Takeaways
- Use a curling wand with a barrel at least 1 inch wide for straightening.
- Make sure your hair is 100% dry before using the curling wand.
- Set heat between 300°F to 350°F for thick or curly hair.
- Use lower heat (below 200°F) for fine or color-treated hair.
- Work in 1-inch sections for thick hair and 1-2 inch sections for thinner hair.
- Wrap hair around the wand, leaving out the ends for a natural look.
How to Use a Curling Wand to Straighten Hair Step-by-Step

Straightening your hair with a curling wand needs some care and the right moves. The wand’s barrel should be 1 to 2 inches wide.
This size helps make straightening easier. It’s good for thick or curly hair.
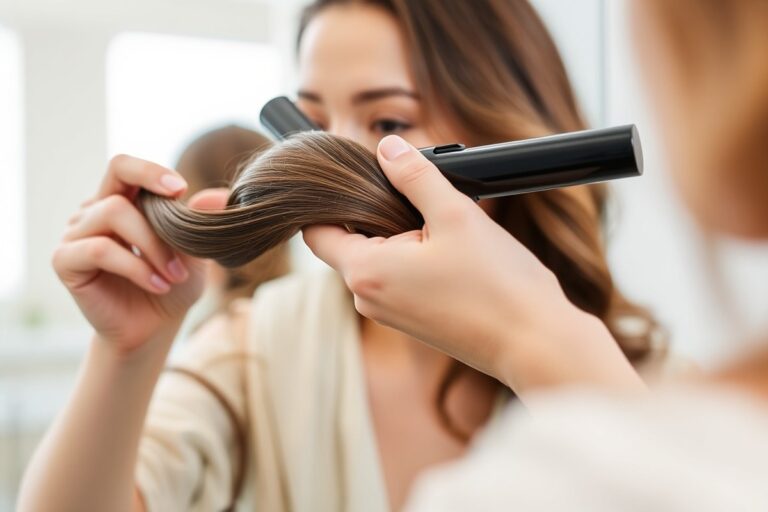
Hold a section of dry hair straight and wrap it lightly around the wand. But don’t twist too tight. Keep the hair taut as you glide the wand down.
Timing is key: 5 to 10 seconds per section usually works well. Too long risks heat damage, too short leaves hair less smooth.
- Plug in the curling wand. Then set the heat to match your hair type.
- Put on a heat-resistant glove to protect your hand from burning.
- Take a 1-inch-wide section of fully dry hair and hold it straight.
- Wrap your hair once around the wand barrel. Start near the roots but don’t touch your scalp. Wrap it loosely.
- Hold the hair taut between your fingers while the wrapped section heats through.
- Keep your hair wrapped for 5 to 10 seconds. The time depends on hair thickness and curliness.
- Slowly slide the wand downward, maintaining tension on the hair to smooth it out.
- Release the hair gently and let the section cool before touching it.
Make sure your hair is totally dry before using the wand. Wet hair won’t straighten right and could get damaged. Using the glove stops your hand from slipping or burning, so don’t skip it.
Hold your hair tight while pulling the wand down. This stops frizz and smooths hair strands. Some sections may need a second wrap and slide.
Do this if the curls are hard to straighten. Thin or fine hair usually takes less time than thick hair.
Choosing the Best Curling Wand and Heat Setting for Straightening

Smaller barrel sizes around 19mm are the best for straightening hair with a curling wand. They give you better control on sections and help smooth hair closer to the roots. Larger barrels from 25mm to 32mm usually work better for curling or waves rather than straightening.
Heat settings depend on your hair’s texture and condition. Fine or color-treated hair needs lower heat under 200°F to avoid damage. Medium hair works well with a moderate range, around 280°F. Coarse or thick hair often requires higher heat, closer to 400°F, to get good straightening results.
| Hair Type/Length | Ideal Barrel Size | Recommended Heat Setting (°F) |
|---|---|---|
| Fine or Color-Treated Hair (Short to Medium) | 19mm / 18-25mm | Under 200°F (Low Heat) |
| Medium Texture Hair (Medium Length) | 18-25mm | 280-320°F (Moderate Heat) |
| Coarse or Thick Hair (Long) | 25-32mm | 350-400°F (High Heat) |
You don’t always need a larger barrel for straightening. Smaller barrels let you wrap tighter hair sections. They hold heat longer.
This helps smooth waves and bends. Larger barrels heat a wider section but can miss some spots or create loose curves instead.
The material of the wand also affects heat distribution and hair protection. Ceramic barrels usually offer gentler, even heat that prevents harsh spots.
That’s helpful if you have fine hair prone to damage. Always use a heat protectant to shield fragile strands.
Hold hair on the barrel for only 3 to 5 seconds. This gives good heat without burning.
Your hair length influences which wand size fits best. Medium length hair works well with 18 to 25mm barrels. Long hair needs bigger barrels of 25 to 32mm for faster coverage.
Short hair or precision areas need the smallest barrels. Adjust heat based on these details to avoid damage or uneven smoothing.
Preparing Hair for Curling Wand Straightening
Always dry your hair fully before using a curling wand to straighten it. Heat on wet hair can cause burns and serious damage. Apply a strong heat protectant spray on dry hair to prevent damage.
Drying Hair Thoroughly Before Styling
Dry hair fully before applying heat with a curling wand. Damp hair stays fragile and risks melting the cuticle layers. Blow-drying helps speed up styling and protects your hair.
Move the blow dryer around constantly to spread heat evenly. Focus on drying hair near the roots, where moisture hides. Thick hair may need parting into sections for faster, complete drying.
Shake the hair dryer back and forth while drying your hair. Keep drying until your hair is almost dry, about 80%. This rough drying helps prepare hair quickly for styling.
Finish drying with a cool air blast to seal the cuticles and reduce frizz. Never skip drying or you might scorch strands when using the wand.
Applying Heat Protection Products Evenly
Always spray heat protectant all over your hair before blow-drying or using a wand. It forms a barrier that prevents heat from burning your strands. Protectants come as sprays, creams, and serums for different hair types.
Look for products with silicone or polymers to coat hair evenly and reduce friction. Spray about 6 to 8 inches away, covering your whole head for best results. Let the product dry before styling; it will burn off otherwise.
- Apply heat protectant before blow-drying and before curling
- Use sprays like Magical Quick Dry Potion or serums with silicone
- Avoid heavy oils that can drag your hair down
- Use 1 to 2 sprays per section for even coverage
- Allow a minute for protectant to set before applying heat
Proper protection keeps your hair shiny and prevents dry, brittle ends. Skipping heat protection can dull the curls or waves you make.
Your hair can get weak after many heat styling sessions. Always protect your hair to keep styles fresh and strong.
Detangling and Choosing Brushes
Start by gently detangling your hair before blow-drying or styling. Use a wide-tooth comb or a detangling brush to prevent breakage. Work from the ends up to avoid pulling knots tighter.
Brushing dry hair helps create smooth, straight strands ready for curling wand use. Section your hair into manageable pieces, about 1-inch wide each. This gives you better control and smoother results.
- Use a wide-tooth comb or detangling brush on damp hair
- Brush dry hair fully before using the curling wand
- Part hair into 1-inch sections for easier styling
- Work slowly and carefully through any knots
- Avoid brushing wet hair harshly to prevent damage
Taking time to detangle prevents snagging your hair on the wand. Well-prepped hair straightens more evenly, making your styling look polished and lasting longer.
Sectioning Hair Correctly for Smoother Straightening
Divide your hair into small, manageable sections before straightening with a curling wand. Sectioning helps ensure even heat distribution and better control. It makes your straightening faster and smoother.
Optimal Section Sizes for Thick vs Fine Hair
Thick hair needs smaller sections to get heat evenly on every strand. Aim for about 1-inch wide sections if your hair is thick. This size helps you work through the hair fully without missing spots.
Fine or thin hair can handle slightly larger sections, around 1.5 inches wide. Larger sections save time but still let heat reach all strands. Avoid pulling big chunks, or the wand won’t straighten the hair well.
Using Clips to Hold Sections Securely
Use strong clips to keep hair sections apart and easy to manage. Croc clips or alligator clips hold the hair firmly without slipping. These clips make it simple to access the bottom layers while working on the top.
Clip back the top layers first, then work on the lower layers. This keeps your hands free and prevents re-tangling. If you have shorter layers near your face, use smaller clips to keep them separate.
Working from Bottom Layers to Top
Start straightening from the bottom layers and work your way up. This order makes sure your top layers don’t fall into the sections below. It also helps you see your progress clearly.
Release one small section at a time right before you straighten it. That way, your clips hold the rest of your hair tightly. It prevents heat overlap and uneven straightening.
Follow these steps to section your hair for smooth straightening:
- Part your hair into two main horizontal sections: top and bottom.
- Clip the top section out of the way using a Croc or alligator clip.
- Divide the bottom section into 1- to 1.5-inch wide subsections depending on hair thickness.
- Release one subsection at a time and clip the rest away.
- Straighten the released subsection fully before moving on.
- Once bottom is done, unclip the top section and divide it similarly.
- Straighten the top section subsection by subsection.
- Use smaller sections around the face to catch shorter hairs.
Protecting Hair from Heat Damage When Using a Curling Wand
Protecting your hair from heat damage when using a curling wand is a must. Apply a heat protectant before you start styling your hair. Use the right temperature for your hair type.
Watch for any signs of heat stress. These steps help keep strands strong and smooth for better results.
Best Heat Protectants for Straightening
Heat protectants act like sunscreen for your hair. They shield your strands from the high heat of styling tools. You can find them in sprays, serums, or creams depending on your hair type and preference.
One popular choice is the Evalectric Hair Serum. It works well before using a curling wand. Another great option is a spray with silicone or dimethicone.
These ingredients form a protective barrier over hair. This helps reduce heat damage.
- Evalectric Hair Serum for smooth, heat-resistant finish
- Silicone-based sprays to shield hair from direct heat
- Lightweight creams ideal for fine or thin hair
- Anti-frizz serums with heat protection for curly hair
- Leave-in conditioners with heat protectant ingredients
Apply your product evenly to dry hair. Avoid using too much, which can weigh hair down or make it greasy.
Safe Temperature Ranges for Hair Types
Choosing the right heat setting reduces risk of damage. Fine or colored hair should be styled at lower temperatures. Keep the heat between 150 and 170 degrees Celsius (300 to 338°F).
This prevents damage. This range preserves color and prevents burning delicate strands.
For thicker, coarse, or curly hair, 175 to 210 degrees Celsius (350, 410°F) is often safe. Always start with the lowest heat and increase slowly if needed. Using a curling wand with adjustable temperature control helps.
You can customize heat based on your hair’s needs. This protects your hair better.
Never use a curling wand on wet or damp hair. Straightening damp hair leads to severe damage, including split ends and frizz. Air dry or blow dry your hair fully before styling with heat tools.
Recognizing and Avoiding Heat Damage
Heat damage shows as dry, brittle, or excessively frizzy hair. You might also notice more breakage and split ends after styling sessions. Hair that loses its shine or feels rough usually indicates heat stress.
To avoid damage, don’t hold the wand on one section too long. Keep the wand moving gently and limit how many times you pass over the same strand. Use a gentle brush like the Cloud Nine Luxury Paddle Brush.
It detangles without pulling your hair. This helps prevent breakage during styling.
Never use heat tools above your hair’s recommended temperature to stop irreversible damage.
Spotting heat damage means you should stop heat styling. Take a break for a week or two to let your hair recover. Use deep conditioning treatments to help restore moisture and strength.
Finishing Techniques to Maintain Straight Hair Longer
After straightening your hair with a curling wand, let it cool. Wait about two minutes for the heat to settle. This helps your style last longer.
This helps the style set properly and locks in the straight shape. Touching or brushing your hair too soon can cause it to revert or frizz.
Use a lightweight smoothing serum or anti-frizz spray to keep your hair sleek. Products with silicone or argan oil work well to seal moisture and cut down on flyaways. Apply a small amount evenly, focusing on the ends and mid-lengths where frizz tends to appear.
A wide-tooth comb is best to gently detangle after straightening. Avoid harsh brushing as it can break the strands or ruin the straight look. Start combing from the bottom up to prevent tugging.
For longer-lasting straight hair, try a light hairspray with humidity resistance. It holds your style without feeling stiff or sticky. Spray from about 10 inches away in a soft mist to avoid buildup.
Using a curling wand made with tourmaline or ceramic can reduce frizz while styling. These materials spread heat evenly and lock moisture inside your hair. This results in shinier, smoother hair that holds the straight style longer.
At night, wrap your hair in a silk scarf or use a silk pillowcase. It reduces friction that causes frizz and helps extend your straightened look. This simple step can keep your hair smooth for an extra day or two.
Try a touch-up technique if your hair starts to curl or wave again. Run the wand quickly over spots needing more smoothness. Keep heat near 330°F to protect your hair.
Avoid going slower or hotter to prevent damage. Remember to finish with your favorite anti-frizz product again afterward.
Troubleshooting Common Mistakes When Straightening with a Wand
Your hair might stay curly if the wand wasn’t hot enough. You might also need to hold the strand longer on the wand. Both affect how well your hair straightens.
Try using a higher heat setting, but stay under 410°F to avoid burning. Also, slide the wand slowly down each section to smooth curls out fully.
Frizz often shows up when you skip using heat protectant. Dry hair also tends to get frizzy more easily. Protect and hydrate your hair before styling.
Apply a leave-in heat protectant spray before styling. After straightening, apply a small amount of lightweight serum or oil.
This tames frizz without making your hair greasy. Use just a little for the best effect.
Hair that feels burnt or fragile means too much heat was used. It can also happen if you leave the wand on one spot too long. Use less heat and keep the wand moving.
Always keep the wand moving gently and don’t overdo the heat. Notice breakage or splits? Stop heat styling for now.
Try a deep conditioning treatment to help your hair recover. For serious damage, a pro stylist can trim split ends and recommend protein treatments.
- Not sectioning hair properly, work in small, even sections for smoother results
- Using low-quality curling wands with uneven heat distribution
- Skipping heat protectant sprays before styling
- Holding hair on the wand too long or too little time
- Going over the same section multiple times quickly
- Styling dirty or overly dry hair
Sectioning hair evenly helps heat reach every strand, preventing uneven straightening. Use a wand with ceramic or tourmaline plates to spread heat evenly. Wait at least 48 hours after washing before using heat tools.
You can style sooner only if you rehydrate your hair first. This helps avoid dryness and frizz.
Your hair feels fragile? Lower your heat setting and style less often. Use cooler settings and fewer sessions each week to protect your hair.
Heat damage builds up, so limit styling to once or twice a week. Experts suggest professional trims every 6-8 weeks to keep ends healthy and stop damage from spreading.
Comparing Curling Wand and Flat Iron for Straightening
Flat irons are built specifically for straightening hair. They use two flat plates to clamp a section of hair and smooth it straight. Curling wands have round rods or cones, which makes straightening much harder and less even.
Flat irons heat evenly on both sides, saving time and giving smooth results. Curling wands only heat on one side.
So you’ll need more passes with the tool to get straight hair. This can take longer and risk more damage.
| Feature | Flat Iron | Curling Wand |
|---|---|---|
| Design | Two flat plates, clamps hair evenly | Rod or cone shape, no clamping |
| Heating method | Both sides heat, smooth glide | One side heats, uneven contact |
| Speed of straightening | Faster, one pass usually enough | Slower, multiple passes needed |
| Ease of use | Easy to hold and glide | Harder to control on flat hair |
| Damage risk | Lower if used properly | Higher with repeated passes |
| Smoothness of result | Very smooth, sleek look | Less smooth, may create waves |
| Price range | $20 to $200+ | $15 to $150+ |
A flat iron gives you more control to create straight hair quickly. Curling wands can struggle since they’re designed for curls, not smoothing. Using a curling wand demands patience and a light touch to avoid heat spots and frizz.
Choose a flat iron for faster, safer, and smoother straightening. Pick one with ceramic plates and adjustable heat, starting around 300°F. Use 1-inch sections, clamp at eyebrow level, and glide slowly to avoid kinks. Avoid older models with uneven heating; they risk damage and poor results.
Only try a curling wand if you want very loose straightening and already know curling techniques. Straightening a wand works well on very wavy hair. Some wave patterns will still remain after straightening with a wand.
Expect to see this even after styling. Use the lowest heat setting that works and keep your sections small to limit damage.
Don’t press too hard or hold heat too long with either tool, damage builds up fast.
Step-by-Step Action Plan for Straightening Hair with a Curling Wand
Follow these simple steps to straighten your hair with a curling wand. You will get smooth results quickly if you do it right. This guide shows you how to do it easily.
- Before you start: Wash and dry your hair completely to avoid damage. Your hair should feel dry and clean.
- Right before styling: Apply heat protectant spray evenly. Hair feels protected and less frizzy after drying.
- Section your hair: Divide your hair into four sections using clips. This helps you style without missing spots.
- Start with the lowest heat setting: Test a small section with the curling wand. Hair looks straighter and smooth.
- Smooth strand by strand: Take small hair strands and wrap them tightly around the barrel. Then slowly slide the wand down the hair to straighten. Repeat this for each strand for best results. Each strand should feel straighter after the pass.
- Repeat cooler touch: Let the hair cool before touching it to set straightness. Hair is less likely to curl back.
- Finishing touch: Use a light serum or spray to lock in shine. Hair looks sleek without sticky residue.
Frequently Asked Questions
Can I Use a Curling Wand to Straighten All Hair Types?
Yes, a curling wand works on most hair types, but technique varies. Thicker or curlier hair may need smaller sections and more passes to straighten fully.
How Do I Avoid Heat Damage When Straightening with a Curling Wand?
Use a heat protectant spray before styling. Keep your wand at medium heat to reduce damage while still smoothing your hair.
Can I Straighten Hair with a Curling Wand If It’s Damp?
No, your hair must be completely dry before using a curling wand. Damp hair can cause breakage and damage from the heat.
Does Barrel Size on Curling Wands Affect Straightening Results?
Larger barrels, around 1.5 to 2 inches, straighten better with fewer passes. Smaller barrels work but can take longer and need smaller sections.
How Do I Handle Short or Baby Hairs Around My Face?
Use smaller sections and lower heat to straighten short facial hairs. Take extra care to avoid missing these strands.
Will Straightening with a Curling Wand Make My Hair Stay Straight All Day?
It may last several hours but generally not as long as a flat iron. Set with a light hairspray for longer hold.
Final Thoughts
Using a curling wand to straighten hair takes some practice. But it works well with the right technique.
Keep your hair protected and take your time with each section. Try these steps today and enjoy smoother, straighter hair with tools you already have.