

How to Put in Hair Extensions: A Complete Guide with Proven Steps
Knowing how to put in hair extensions can quickly add length and volume to your hair. The easiest way is to start with clip-in extensions, which snap on close to your scalp. They’re painless to install and won’t damage your natural hair if you use them right.
Before applying, you need to section your hair cleanly, starting near the nape of your neck. Use clips to hold your own hair up while you attach the extensions below. This neat sectioning helps the extensions blend in naturally and stay put all day.
Choose extensions that match your hair texture and color. Look for 100% Remy human hair, because the cuticles are intact and blend better. This gives your hair a smooth feel and stops tangling over time.
Key Takeaways
- Start with clip-in extensions for an easy, no-damage installation.
- Section hair cleanly and clip it up to attach extensions smoothly.
- Pick 100% Remy human hair for the best natural look and feel.
- Match extension color and texture closely to your real hair.
- Work extension pieces from the nape to the crown for even coverage.
- Use a comb to blend edges so extensions don’t show.
How to Put in Hair Extensions Step by Step
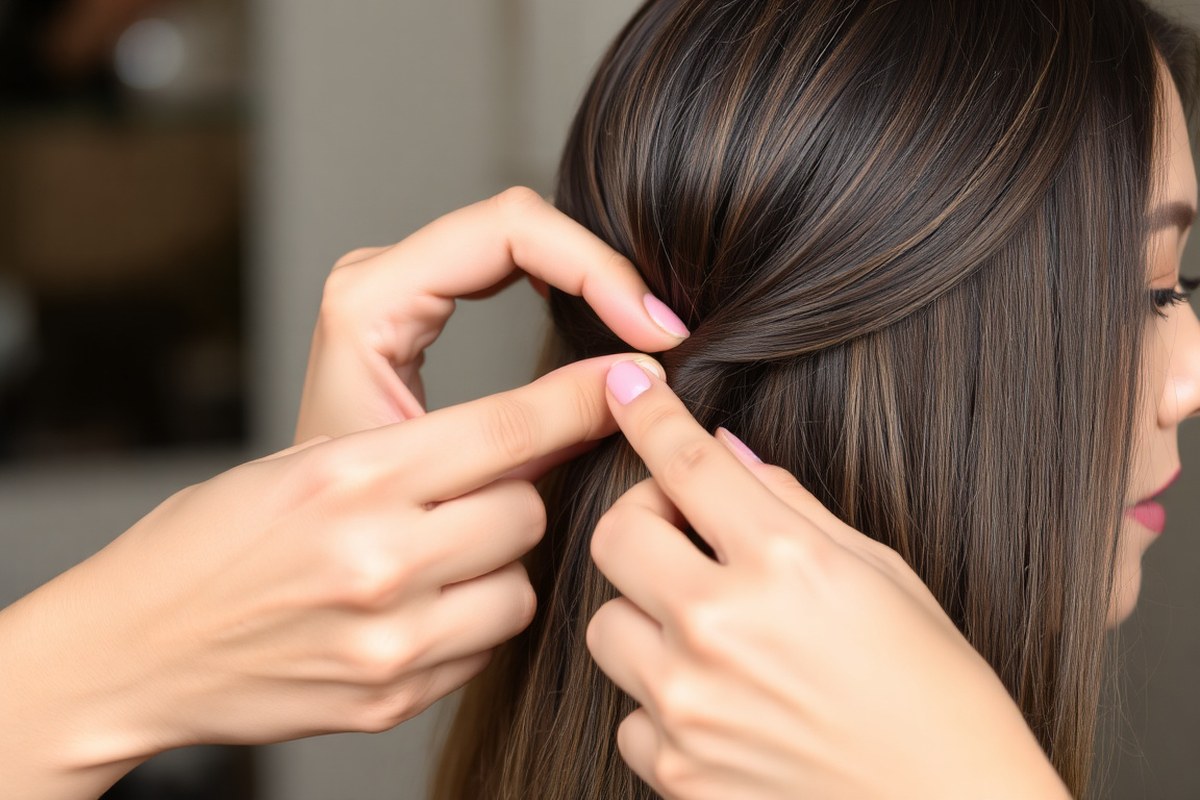
Clip-in hair extensions are a quick way to add length and volume. Getting the sectioning right makes everything blend naturally. Start with clean, dry hair for best hold and appearance.
Follow these steps to install clip-in extensions securely and smoothly:
- Create a horizontal part about an inch above your neck. Use a strong clip to pin the top hair up and out of the way. This shows the lower hair layer clearly for easier attachment.
- Open the clips on the extension weft. Starting with the largest piece, place it close to the roots at the center back. Press the clips closed carefully. Make sure they hold your hair well. Avoid clipping too tightly to prevent damage.
- Release another inch of hair from the clip and create a new horizontal section. Repeat clipping the medium side pieces next, moving outward toward the ears. Secure the clips near the roots for a firmer hold.
- Clip the smallest pieces along the top sides of your head. These are for added volume near the temples. Check that none of the clips show and that hair lays flat over them.
- Gently finger comb your hair to mix in the extensions. Style them with a cool blow dryer or curling iron. This makes your hair look naturally blended.
- Finish by lightly teasing near the roots where clips sit if you want more grip. Be careful not to over-tease and damage your hair. This holds clips in place longer during daily activities.
Good sectioning avoids lumps and keeps extensions hidden. Attach clips close to the scalp but not directly on fragile roots. Blended waves or curls help you avoid a harsh line between your hair and the extensions.
Not washing extensions too often, about every 15 to 20 wears, keeps them looking fresh. Improper clipping or skipping sectioning usually makes extensions slip or look chunky. Take your time to adjust clips for comfort and invisibility before finishing your look.
Which Hair Extension Types Are Best for Beginners?
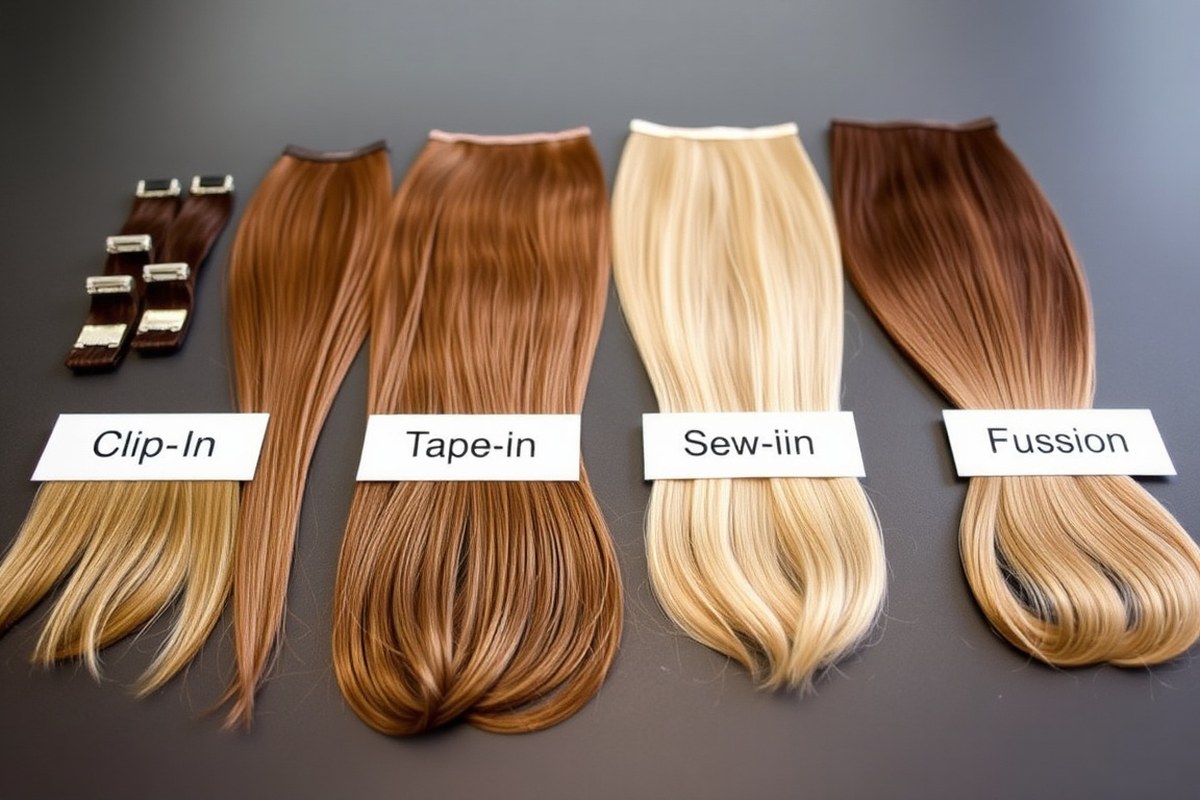
Clip-in extensions are the easiest for beginners, offering quick wear and removal. Tape-in extensions balance ease with longer wear time but need care during application. Sew-in and fusion extensions last longer but require more skill and professional tools.
Clip-In Extensions Overview
Clip-in extensions attach with small clips that snap open and closed. They’re perfect for occasional use, like weekend events or trying new looks. You can put them in and take them out daily without damage.
Since they require no glue or heat, clip-ins avoid hair damage risks. You only need clean, dry hair and basic sectioning. For best results, clip them close to the scalp but avoid tight clipping to prevent discomfort.
Tape-In Extensions Details
Tape-in extensions use two thin wefts with adhesive tape sandwiching a small section of your hair. This method works best on medium to thick hair. The bond is invisible and feels lightweight but needs precise sectioning.
You should apply tape-ins to clean, dry hair to secure the bond firmly. They can last 6 to 8 weeks before needing repositioning. Removing them carefully helps avoid adhesive residue and breakage.
Sew-In and Fusion Extensions Compared
Sew-in extensions need your hair braided into cornrows first. Then, a needle is used to sew wefts onto the braids. This keeps the extensions secure and blends with your hair.
They work well for thick or coarse hair and can last 6 to 8 weeks. Fine hair can use beaded sew-ins for less tension.
Fusion (pre-bonded) extensions use heated keratin bonds wrapped around sections of your hair. They last 2 to 4 months but need careful heat application and removal to avoid damage. This method suits fine hair but calls for professional tools and skills.
| Method | Best For | Lifespan | DIY Kit Cost | Professional Installation Cost |
|---|---|---|---|---|
| Clip-In | Occasional wear, fine to medium hair | Daily removal; single use per session | $100, $250 | $50, $100 (not typically needed) |
| Tape-In | Medium to thick hair, low daily maintenance | 6, 8 weeks before repositioning | $120, $200 | $200, $400 plus set cost |
| Sew-In | Thick hair (cornrows) or fine hair (beaded) | 6, 8 weeks before adjustment | $200, $400 | $150, $300 plus kit cost |
| Pre-Bonded (Fusion) | Fine hair, no adhesive sensitivity | 2, 4 months with care | $80, $180 | $200, $400 |
| I-Tip (Stick Tip) | Fine or thinning hair, no glue tolerance | 6, 8 weeks before micro-ring adjustment | $150, $300 | $250, $500 |
Costs vary if you do extensions at home or see a professional. Clip-ins usually don’t require professional help.
But tape-ins and sew-ins benefit from a stylist’s precision. Fusion and i-tip methods often need a pro to avoid heat damage or thread issues.
Always use clean, dry hair before applying extensions. This helps the bonds last longer and stick better. Starting with wet or dirty hair can cause early slippage.
Essential Tools and Products Needed for Installation
To put in hair extensions successfully, you need the right tools and products. These help you attach extensions securely and protect your natural hair. Using proper brushes, clips, and styling products will keep your extensions looking natural and last longer.
Combs, Brushes, and Sectioning Tools
Sectioning your hair neatly is key for easy extension application. Use a rat-tail comb to create clean partings. This comb has a pointed handle to separate hair precisely.
Pick a wide-toothed comb or a special brush made for extensions. These tools help detangle gently and stop hair from breaking. They keep your extensions looking smooth and neat.
Keep your combs and brushes clean by washing them weekly with mild shampoo and warm water. Dirty tools can transfer oil and dirt that weaken grip and cause buildup.
Extension Clips and Accessories
Clip-in extensions need sturdy clips that snap firmly but won’t damage your hair. Look for clips with silicone lining for gentle hold and less slippage. They usually cost around $5 to $15 for a set.
For tape-in or glue-based extensions, avoid oils or conditioners near the roots. These can prevent adhesion. Use a small mirror to see your clips or tapes.
Make sure they lay flat against your scalp. Check that you don’t have any bumps or bumps showing.
- Rat-tail comb for sectioning
- Wide-tooth comb or extension brush for detangling
- Silicone-lined clips for clip-ins
- Hair ties or clips to hold sections during application
- Small mirror to check placement
- Alcohol or adhesive remover for tape-ins
- Heat protection spray for styling
Keeping clips clean is important. Wipe them with rubbing alcohol after use to remove oils and products. Dirty clips slip more and may pull your hair.
Styling Products and Protective Sprays
Avoid oily or heavy styling products before installing extensions. They make clips slide and can cause buildup at attachment points. Clean, dry hair holds extensions better.
Use a heat protectant spray if you plan on styling your extensions with heat tools. It shields both your natural hair and the extensions from damage. Use heat tools on low to medium settings.
Lightweight leave-in conditioners or detangling sprays are good after installation. They keep extensions soft and prevent knots without weighing them down. Don’t apply conditioner near the roots before attaching tape-ins.
How to Prep and Section Your Hair for Extensions
Clean and dry hair helps extensions attach better and last longer. Make sure your hair is free from oils, sprays, or conditioner. Brush gently to remove any tangles before you begin.
Sectioning your hair evenly creates a neat base for clip-in extensions. Horizontal parts work best, starting at the nape and moving up. Leave 1 to 2 inches of hair at the top.
This covers the clips. It keeps clips invisible.
Following these steps ensures your extensions feel comfortable and look natural. Here’s a simple way to prep and section hair for clip-ins:
- Wash and dry your hair thoroughly. Use shampoo and conditioner, then blow-dry or air-dry until completely dry. Extensions stick best to dry strands.
- Detangle gently with a wide-tooth comb or paddle brush. Start at the ends and work upward to avoid breakage.
- Part your hair horizontally at the nape. Use a rat-tail comb for a clean line. Clip the top hair up.
- Attach extensions to the bottom section. Secure clips close to the scalp for comfort and hold.
- Release a new 1 to 2 inch top section of hair. This covers the extensions so the clips won’t show.
- Repeat the parting and clipping upward. Move up in horizontal sections, adding extensions as you go.
- Blend the extensions with your natural hair by brushing gently. Avoid heavy brushes that might pull on the clips.
Avoid sectioning unevenly or clipping too close to the scalp. This can cause discomfort or visible bumps. Take your time to part cleanly and clip securely without pulling your hair.
You don’t need to straighten your hair before putting in extensions. However, some extension types need smooth hair for better grip. For clip-ins, natural texture or lightly styled hair works well.
Prepping your hair this way helps prevent slippage and keeps extensions in good shape. It also encourages your own hair to stay healthy underneath. Well-prepped hair gives you longer wear and a natural, comfortable fit.
How to Blend Extensions for a Natural Look
Cutting and layering your extensions helps blend them smoothly with your natural hair. Trim the ends a bit to avoid a blunt edge. Add soft layers to match your hair’s natural shape.
This small step makes your hair look more natural. It creates a feathered effect. It hides the line where the extension starts.
Styling tools like curling irons and straighteners are great for blending extensions. Use styling tools on your natural hair and extensions. This creates uniform waves or a sleek finish.
Both should match well. Set your tool temperature to about 350 to 400 degrees F. This is safe for heat-resistant fibers like Futura.
Avoid higher heat to prevent damage. But always test a small strand first.
Curling your extensions together with your hair creates a smooth look. When curling, wrap equal sections of natural hair and extensions. This helps the waves fall naturally and blend well.
Straighten by running your flat iron evenly over hair and extensions. This avoids visible texture differences between the two.
Layering techniques depend on your hair length and thickness. For long hair, add subtle layers around the face to soften the transition. Choose thinner wefts and trim lightly if your hair is fine.
This prevents the extensions from adding too much bulk or looking off. Trimming after installation helps frame your face and keep the extension lines invisible.
Heat tools should be used sparingly on synthetic extensions to prevent damage. Avoid high temperatures and too much repetitive styling.
Heat styling lasts longer on human hair extensions but requires care. Use heat protectant sprays to keep them healthy and shiny.
Curl or straighten your natural hair and extensions at the same time. This ensures a smooth blend without harsh lines.
Common Installation Mistakes and How to Fix Them
Uneven clipping usually shows when some wefts sit higher or lower than others. You might see gaps or lumps where the clips didn’t grab enough hair. To fix this, reclip each weft straight across the section.
Keep the clips flat against your scalp. This gives a smoother fit. Use a mirror to check that the line looks even on both sides.
Slipping extensions happen when clips don’t hold the hair snugly. You can feel the extension sliding or it might fall out. Try teasing the roots a little where you clip in the wefts.
This works best if your hair is fine. It adds extra grip. Teasing adds texture and grip without pulling your hair too hard.
Visible wefts are a common mistake that makes extensions obvious. This usually happens when wefts sit too close to your scalp. It can also mean the hair isn’t blended well.
Both cause uneven looks. Cut your layers to blend the wefts better. Use a loop hair brush to gently brush.
This hides the clips clearly. Avoid harsh pulling to protect your natural hair and the extensions.
- Clip extensions onto small, even sections of hair
- Tease roots gently near clip spots for fine hair
- Use light-weight wefts for thin or fragile hair
- Brush with a nylon looped bristle hairbrush to prevent pulling
- Place wefts just a half inch below the hairline for natural look
- Don’t put clips too close to the scalp to avoid visible wefts
- Check and adjust clips in bright light or using a mirror
Damage from hair extensions comes from heavy wefts or tight clips pulling on your hair. This causes breakage or discomfort after wearing extensions for long hours.
Pick lighter wefts if your hair is fine to reduce weight strain. Keep clip tension medium, enough to hold but not pull repeatedly.
Brushing is a moment where mistakes happen often. A normal brush can tug and pull on extension bases causing slips or breakage.
Use a hair extension brush with looped nylon bristles to glide through your hair gently. This helps blend natural hair and extensions well without causing damage.
How to Remove Hair Extensions Safely at Home
Removing hair extensions carefully helps avoid damage to your natural hair or the extensions. Different extension types need different removal methods. Use the right way to protect your hair and extensions.
This helps keep both in good condition. Removing clip-in and tape-in extensions safely takes the right steps and attention to detail.
Clip-in extensions come out quickly without tools. Just open the clip gently and pull it away from your scalp. Avoid yanking or pulling hard, which can break your hair strands or damage the clips.
Tape-in extensions need a solvent or remover designed for the tape. Don’t try to peel them off dry; this causes breakage and loss.
Remove extensions every 6 to 8 weeks for best care. Do it sooner if you see damage. Also remove if extensions feel uncomfortable.
Leaving tape-in or bonded extensions in too long can strain your hair. You can reuse extensions if you take them off carefully.
Clean off any glue or tape residue before reusing. This keeps the extensions ready to wear again.
Follow these steps to remove clip-in or tape-in extensions safely:
- Untangle your hair by gently combing through the area around the extensions.
- For clip-ins, open each clip slowly by pressing the hinge.
- Pull the clip away from your scalp with a smooth motion, no force.
- For tape-ins, apply an extension tape remover onto the tape area.
- Wait about 5 minutes for the remover to dissolve the adhesive properly.
- Slide the extension gently downward to release it without pulling.
- Remove any leftover tape or glue residues with a soft cloth and remover.
- Wash and dry the extensions before storing to keep them reusable.
After removal, check your hair for any tangles or damage, and moisturize it well. Store your extensions flat or on a hanger to avoid tangling. Extensions in good shape last longer and will be easier to reapply later.
Tips for Maintaining and Caring for Your Extensions
Wash your hair extensions about every 10 to 15 days to avoid drying them out. Use a sulfate-free shampoo and conditioner to keep them soft and healthy. Apply conditioner only on the ends of your hair.
Avoid roots to keep clips or bonds secure. This helps prevent slipping.
Always comb your extensions gently with a wide-tooth comb or a special extension brush. Begin detangling at the tips of your hair. Slowly work your way up.
This avoids pulling on the bonds. Avoid sleeping with wet hair to reduce tangling and make morning brushing easier.
Protective styles help extend your extensions’ life. Wear your hair in loose braids or ponytails. This reduces friction and prevents matting.
It works during the day and night. Avoid tight hairstyles that can pull or stress your natural hair and the extensions.
- Use hydrating haircare products made for extensions.
- Sleep on a satin or silk pillowcase to reduce friction.
- Avoid heat styling tools more than two times a week.
- Apply heat protectant when using curling irons or straighteners.
- Schedule professional maintenance every 6 to 8 weeks for repositioning or replacement.
- Keep hair dry and protected in the pool and during heavy exercise.
Maintenance every 6 to 8 weeks can help prevent matting and hair breakage. That’s when professionals tighten or move your extensions if needed. Doing this yourself can cause damage or loosening, so a licensed stylist is best.
Never rub your extensions with a towel. Instead, gently squeeze out water to prevent tangling.
When to Seek Professional Help for Hair Extensions
Some hair extension types need professional skills and tools to apply safely. Knowing when to book a stylist helps avoid damage and poor results. Watch your hair and scalp for signs that DIY isn’t working.
Extension Types Requiring Professionals
Bonded and glued extensions need a professional to protect your natural hair. They use special adhesives and tools to attach strands without burning or pulling. These methods cost more but last several weeks and look more natural when done right.
Weave and sew-in extensions also require expert hands for neat braiding and stitching. Improper sewing can cause tension, leading to breakage or scalp soreness. Professionals know how tight the braids must be.
They also know where to place wefts. This helps create a natural style.
Ceramic or heat-bonded keratin tips should only be applied by pros. They fuse strands directly to your hair, needing controlled heat tools. Home attempts risk melting your hair or uneven bonds that fall apart quickly.
Hair Conditions Needing Expert Care
Check with a stylist before adding extensions on fine, fragile, or thinning hair. Experts can choose gentle methods and adjust installation to avoid pulling or stress. They also recommend scalp treatments and lighter weight extensions to protect your hair.
A sensitive or irritated scalp needs professional attention too. A stylist can spot allergies, infections, or damage masked by home application. They may advise against extensions until your scalp heals, preventing long-term issues.
People with chemical-treated hair, like bleach or relaxers, should consult professionals. Extensions must match the hair texture and health since damaged hair breaks easily under strain. Experts can suggest safer options tailored to your hair condition.
When to Stop DIY and Book an Appointment
Seek professional help right away for scalp itching, burning, or redness from extensions. These symptoms can mean allergic reactions or damage from poor installation. Continued irritation can lead to hair loss or infection.
Extension slipping, tangling, or early shedding signals poor bonding or improper placement. Visit a stylist if home fixes don’t improve your scalp within a week. They will remove and reinstall properly without harming your natural hair.
Hair breakage or bald patches near the attachment points means too much tension or wrong technique. Stop applying extensions yourself until a professional evaluates and treats your hair. Trying again without help will only worsen damage.
Step-by-Step Action Plan for Putting in Hair Extensions
Follow these clear steps to get your hair extensions installed right. This plan covers prepping, installing, and caring for them so you get the best results.
- Before you start: Gather your chosen hair extensions and tools. Check that your hair is clean and dry for easy handling.
- Day 1: Section your hair carefully in thin layers. This helps place extensions evenly and keeps your look natural.
- Day 1: Attach the extensions following your type’s method (clip-in, tape, etc.). Confirm each piece feels secure, not tight.
- Day 1: Blend the extensions by trimming and styling for a smooth match. Look in good light to check for obvious lines.
- After 1 week: Check the attachment points for any loosening. Tighten or reposition clips or tapes if needed to prevent slipping.
- Weekly: Use recommended haircare products to keep extensions clean and soft. Avoid oily or heavy products that can weigh them down.
- Every 6 to 8 weeks: Remove and reinstall or refresh your extensions if they are semi-permanent. This stops damage to your natural hair.
- Any time you feel discomfort: Remove extensions immediately. Inspect your scalp for irritation or pulling; seek a pro if you’re unsure.
Frequently Asked Questions
What Is the Best Way to Secure Clip-In Hair Extensions?
Use small sections of your natural hair to clip in each extension. This keeps them stable and avoids slipping during the day. Position clips close to your scalp for a tighter hold.
Can I Put in Hair Extensions on Wet Hair?
It’s best to add extensions only to dry hair. Wet hair is weaker and more prone to damage when pulled or clipped. Extensions also won’t secure well if your hair is damp.
How Long Does It Usually Take to Put in Hair Extensions at Home?
Putting in clip-in extensions gently takes about 15 to 30 minutes. Sew-in, tape-in, or fusion types can take an hour or more. Experience and method affect the time needed.
Will Hair Extensions Damage My Natural Hair?
Properly installed extensions don’t damage healthy hair. Avoid heavy or tight extensions that pull too hard. Always follow maintenance steps and don’t leave extensions in too long.
How Do I Prevent My Hair Extensions from Tangling?
Brush your extensions daily with a wide-tooth comb or a soft bristle brush. Start from the ends and work up gently. Store them properly when not in use to avoid tangles.
Can I Style My Hair Extensions with Heat Tools?
Yes, if your extensions are made from 100% human hair. Use heat protectants and avoid high temperatures to prevent damage. Synthetic extensions may melt or warp with heat styling.
Wrapping Up
Putting in hair extensions takes some practice but is doable at home with care. Start with the right type and follow proper steps. Take action today by prepping your hair and tools before your first install.


