How to Do a French Twist Hairstyle: Step-by-Step Guide and Pro Tips
How to do a French twist hairstyle fast is easier than you think. Gather your hair at the nape and twist it upward. Secure with pins and finish with hairspray for hold and shine.
Use texturizing products on clean hair to add grip and reduce slipping. This helps the twist stay tight and smooth all day without falling apart. Prepping your hair with the right tools makes a big difference.
Keep twisting until you’re about two inches from your head’s center. This hides the pins well and makes the twist look intentional. It takes just about a minute but improves the style a lot.
Add a few bobby pins strategically to increase durability and hold stray hairs. Choose pins that match your hair color so they blend in naturally. Mist with hairspray to finish for a polished look.
Key Takeaways
- Apply a texturizing mousse on freshly washed hair for better grip.
- Start twisting your hair from the nape upward to create a clean roll.
- Stop twisting about two inches before the center to tuck in pins neatly.
- Use large French pins for thick hair to secure the style firmly.
- Smooth the top section with a fine-tooth comb for polished volume.
- Finish with a strong hold hairspray to keep your twist all day.
Step-By-Step Guide to Create a Classic French Twist
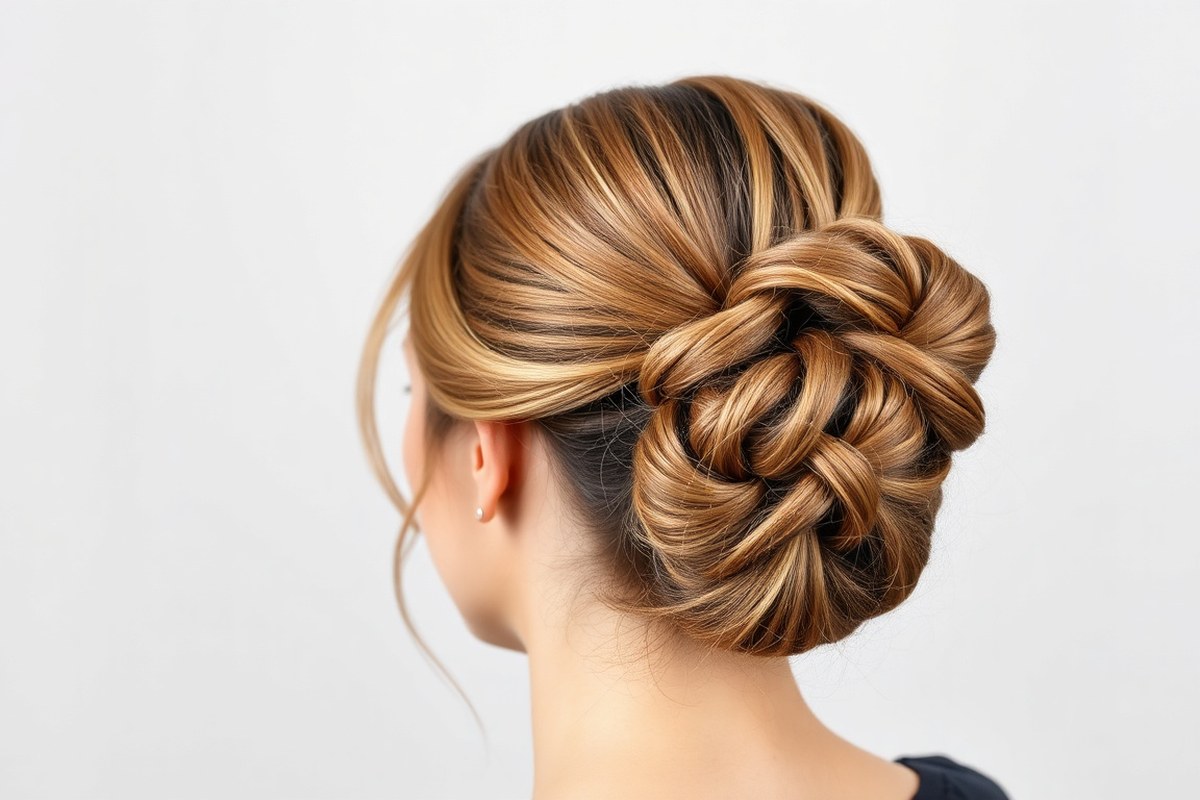
Doing a French twist on yourself is doable with practice. It looks classy and works for weddings, prom, or casual days. Hold your hair firmly and use pins matching your hair color to hide them.
The key to a neat French twist is rolling your hair upward tightly. You can tuck the ends inside or leave them a bit messy for a soft look. Here’s a simple step-by-step to get that classic style:
- Gather your hair. Bring all your hair to the nape of your neck as if making a low ponytail.
- Start twisting. Hold your hair tight with your left hand and begin twisting upward.
- Keep twisting. Roll your hair up against your head, forming a vertical twist.
- Secure the base. Use U-pins at the bottom to hold the twist firmly in place.
- Pin along the twist. Insert more pins vertically inside the roll to keep hair secure. Match the pin color to your hair.
- Tuck or leave the ends. For a sleek twist, tuck your ends inside the roll and pin them. For a textured finish, leave some ends loose.
- Adjust volume. Gently pull at the top for slight lift if you want more volume at the crown.
- Finish with hairspray. Spray light to medium hold hairspray to lock everything in place without stiffness.
You may need two or three clips for thick hair. Short hair can use smaller pins and may not need to tuck ends fully. Avoid pins that show or twist too loosely to prevent slipping.
Doing this in under 3 minutes takes practice. Hold the ends tight while you twist; loosen hair can ruin the shape.
A neat French twist looks smooth on the outside. Pins stay hidden, and the edge by your neck stays clean.
Essential Tools and Products for a Secure French Twist

You’ll need a few key tools to make your French twist stay put and look neat. Bobby pins are essential for this style. U-shaped pins hold hair well.
They keep the twist’s shape without squashing it. For shorter hair, smaller French pins can do the job. But longer or thicker hair will need larger pins for a secure grip.
A brush or comb helps smooth your hair before twisting it up. After pinning, use a light-hold hairspray. It locks the style in place.
It won’t make your hair stiff or heavy. Spritz from about 8 to 10 inches away for even coverage without weighing down your hair.
- U-shaped bobby pins for strong, flexible hold
- Smaller French pins for bob or shoulder-length hair
- Smooth brush or fine-tooth comb for prepping hair
- Light-hold hairspray to set the twist without stiffness
- Optional texturizing spray for fine or slippery hair
To secure the twist, start pinning on one side and keep tension as you roll. Slide pins vertically into the twist, not perpendicular, so they grip hair better. Take your time positioning pins where the hair feels loose or might slip out.
Avoid heavy sprays at the start. Build hold gradually to keep your twist looking smooth and soft throughout the day.
Products like Bunheads pins can hold even thick hair tightly. But budget options work well when you place pins carefully.
Using a texturizing spray before twisting can help fine hair grab pins better and last longer. For second-day hair, the twist naturally holds easier because hair is less slick.
Preparing Your Hair for Lasting Hold and Smoothness
The key to a polished French twist starts with prepping your hair right. Clean but silky hair can be too slippery, making pins slide out. Adding texture gives the twist grip and keeps it from unraveling.
Using texturizing products like dry shampoo or texture spray roughs up the surface. They create light friction, especially helpful for fine or silky hair. Day-old hair naturally holds better than freshly washed hair.
Fine hair lacks the natural friction needed to hold style all day. Try sprinkling a small amount of texturizing powder along the base where you’ll anchor the twist. It creates a sturdy foundation so pins stay put.
- Apply texture spray or dry shampoo to clean or silky hair for grip
- Brush out all knots and tangles for a smooth, sleek look
- For fine hair, add texturizing powder at the base before twisting
- If hair is too long, tuck excess length back into the twist to keep shape
- Let day-old hair or hair with product build-up give added hold
Hair length matters. But French twists suit most lengths from short layers to long hair.
Long hair needs careful folding and pinning to avoid bulk, but it works well. Medium and shorter hair offer an easier grip for a tidy roll.
Use strong hairpins or 3-inch steel pins for thick or heavy hair to avoid pins slipping. Light hairspray helps finish the style by controlling flyaways and adding hold without stiffness. A smooth, shiny twist comes from prepping and setting hair carefully.
Adapting French Twists for Different Hair Lengths and Types
You can do a French twist with fine, thick, short, or long hair. Just tweak the technique a little. The style works on most hair types.
Each hair type needs a small change to hold the style well and look polished. Knowing how to adjust helps you avoid frustration with slipping or bulky twists.
French Twist for Fine or Slippery Hair
Fine or slippery hair can slide out of place if you don’t prep it right. Start with a texturizing spray or dry shampoo to add grip. That creates a rougher surface for pins to hold firmly.
Add some padding inside the twist to make it bulkier. This helps if your hair is very thin. It gives the style more volume and grip.
You can use a small foam insert or create a loose bun and twist around it. This gives a fuller look and makes the style easier to secure.
Adjusting Technique for Short and Medium Lengths
Short hair can be tricky because there’s less length to tuck and pin. Section your hair in two parts: twist the top section first to control shorter layers. Then fold in the bottom layers to hide ends neatly.
For medium length hair, this two-section method also works well. You get better control over pieces that might want to pop out. Use pins placed diagonally to lock shorter strands smoothly.
Managing Thick and Long Hair
Thick and long hair needs to be worked in sections to keep the twist manageable. Start by twisting smaller parts instead of trying the whole crown at once. This prevents bulk from weighing down your twist or causing bumps.
You may need large pins like Logli’s Yael French Pin, especially for long, thick hair. Bigger pins hold more hair securely, which stops the twist from loosening throughout the day. Using strong pins also means less fiddling and a cleaner finish.
Adding Volume, Polish, and Finishing Touches to Your French Twist
A French twist looks best with added volume, a smooth finish, and hidden pins. You can lift the crown, tidy the seam line, and use the right clips. These steps polish the hairstyle and keep it neat all day.
Creating Volume and Lift at the Crown
Start by gently teasing the hair at the crown with a fine-toothed comb before twisting. This creates a soft lift and gives the twist a fuller look. Be careful not to over-tease to avoid frizz and messiness.
Once you pin the twist up, use your fingertips to softly lift the crown area. Pull up just a little hair to maintain the shape and avoid flattening the style. For a softer, undone vibe, gently loosen strands near your face to frame it.
Techniques to Hide Pins and Clips
Hide pins by pushing them flat against your scalp along the twist’s seam. Using small, matte pins helps them blend into the hair texture and color. Ensure you pin tight to prevent pins from slipping or showing.
After pinning, check the seam line carefully. If you spot uneven parts, nudge stray strands with the end of a comb or your nail. This step cleans the look and hides any gaps or pin points.
Wrap hair tightly around your fingers while twisting before securing pins. This creates tension and layers of hair that conceal pins naturally. It also prevents hair from slipping out during wear.
Small matte pins work best to hide your pins and keep the twist secure.
Choosing Complementary Hair Accessories
Add a clip just above or beside the twist to step up the style. Choose sleek metal clips or simple jeweled pins for a polished finish. Clips not only decorate but also help hold the twist in place better.
Classic pearl or gold hairpins upgrade the look without overpowering it. They fit well with both daytime and evening styles. Avoid bulky accessories that can make the twist look heavy or messy.
For a soft, romantic style, add delicate tendrils or loose strands around the face. These soften the hairline and make the French twist appear easy chic. Use a light hairspray to keep these strands in place without stiffness.
Troubleshooting Common French Twist Problems with Quick Fixes
Slipping is one of the most common issues when doing a French twist. It tends to happen if the base is loose or you use too few pins. Adding many pins won’t fix the problem.
It can make the twist messy. Keep it simple for a cleaner look.
Flyaways and loose strands are another problem, especially with shorter hair or lob styles. Ends often escape the twist if your hair isn’t long enough. Use extra pins to keep stray pieces from falling.
A twist comb can help hold hair securely. This stops loose ends from showing.
Here’s a quick reference table with fixes for common French twist problems. It explains the mistakes clearly and what to do to fix them precisely.
| Problem | Why It Happens | Quick Fix |
|---|---|---|
| Slipping Base | Base not tight or few pins used | Make a tighter twist, use bobby pins in crisscross |
| Pins Showing | Pins placed on the surface or in wrong angle | Insert pins vertically and under hair folds to hide |
| Loose Ends on Lob | Hair too short, ends escape twist | Add a twist comb or extra pins at ends |
| Flyaways and Stray Strands | Hair not smooth or very fine texture | Use a light hairspray or smoothing cream to tame |
| Too Few Pins | Not enough hold, twist falls apart | Use 5 to 7 pins, place in X shape for grip |
To hide pins, push them vertically into the twist’s fold. That keeps them invisible and secure. Using 5 to 7 pins usually covers the hold you need without overdoing it.
For loose ends, gather them at the top of the twist and pin them tightly. A twist comb can also trap ends better than pins alone. A quick spray of hairspray or smoothing cream helps tame stray strands and flyaways.
Thick or dense hair may need more pins but spacing is key. Placing them in a crisscross pattern gives a firm base without bulk. Always brush your hair smooth before twisting to cut down flyaways.
French Twist vs. Chignon and Other Similar Hairstyles Explained
The French twist is a sleek, vertical roll of hair pinned at the back. It lifts the hair up, creating a smooth, elegant look. This style works well for most occasions, from casual to semi-formal.
A chignon usually sits low and round at the nape of the neck. It looks softer and is more formal, often chosen for weddings or fancy events. The chignon means twisting or folding hair into a neat knot.
It takes some practice to get it right. Keep trying to perfect your technique.
The bun is a simple round coil of hair, generally centered or high on the head. It’s versatile and quick, perfect for everyday wear or keeping hair out of the face. You can make a bun messy or tight depending on your mood and time.
The French twist feels more lifted and polished than a bun. It takes about 10 minutes once you get the hang of it, using combs and pins. A chignon demands precise pinning and usually more styling products to hold its shape all day.
French twists suit medium to long hair and look best on straight or slightly wavy strands. The chignon stays better on thicker, longer hair. On thinner hair, add volume to help.
These steps make the style work well. Buns adapt to any hair type, length, or texture, making them the easiest choice.
Trying a French twist yourself can be straightforward. But a stylist can make it look flawless. Your hair is very fine or thick.
You want the style for a big event. Getting help from a pro is a smart idea. They know how to secure the twist so it lasts hours without slipping or drooping.
Many people mix up these styles because they all pull hair up and back. The key difference is shape and how tight or loose the hair is wrapped. The French twist stands tall with a sleek look.
The chignon is a low rolled knot. The bun is round and can be messy or neat.
Tips and Tricks for Quick, Secure French Twists Anytime
Creating a French twist in under 5 minutes is doable with the right tricks. Using clips instead of pins speeds up styling and helps hold your twist all day. Quick hacks like sectioning hair properly and finishing with hairspray keep it secure and polished fast.
Using Clips and Pins Efficiently
Claw clips or twist combs can replace pins to save time. They hold hair firmly and make the style easier to remove. For a sleek look, add a row of bobby pins inside.
They help hold the twist firmly in place. Make sure to hide the pins for a neat style.
Here’s a fast step-by-step to secure your twist quickly:
- Gather your hair and twist it upward tightly.
- Slide the twist comb or claw clip into the base, holding it firmly.
- Add bobby pins along the seam, focusing where the hair feels loose.
- Smooth the exterior with your fingers or a comb for a neat finish.
- Tuck in ends or flyaways with extra pins if needed.
Use pins in a crisscross pattern to keep them from slipping out.
Applying Hairspray and Finishing Products
Hairspray is your best tool to keep a French twist lasting all day. Spritz after pinning to lock hair in place without stiffness. For messier styles, add a light mist before twisting to give grip and texture.
Finishing serum or shine spray smooths flyaways and adds polish. Apply a pea-sized amount sparingly so hair stays flexible. Avoid overloading, you want hold without crunchiness.
Practice Strategies to Master the Technique
Practice your French twist 2 to 3 times a week to improve quickly. Each try helps you learn how tight to twist and where to place pins. Start with damp hair for firmer hold, then try dry hair to see differences in control.
Try shortcuts like using a twist comb first. Later, add pins and hair spray as you get comfortable. Watching yourself in the mirror during practice builds timing and confidence.
Step-by-Step Action Plan for Your First French Twist
Follow these steps to create a neat French twist today. Each phase helps you get better and more confident.
- Before you start: Gather your tools: comb, hairpins, hair spray, and smoothing serum. Check your hair is clean and dry for best hold.
- First attempt: Follow the classic French twist steps slowly. Use a mirror to check smoothness and pin security, aiming for no loose strands.
- After the first try: Fix any slippery spots with extra pins or hair spray. Notice if the twist feels tight and secure.
- Next day: Try adding volume by gently backcombing the crown before twisting. You should see a fuller look that still stays in place.
- Within a week: Experiment with adapting the twist to your hair length or texture. Use extra pins for thick hair or smoothing serum for frizz.
- After two weeks: Practice quick French twists using fewer pins and your favorite hairspray. Time yourself and aim to finish in under 10 minutes.
- Ongoing: Keep troubleshooting by checking for slips and adjusting your pin placement. Learn what works best for your hair type.
Frequently Asked Questions
How to Do a French Twist Hairstyle?
Start by gathering your hair at the back, twist it upwards and tuck the ends inside. Secure with bobby pins for a polished look that’s perfect for any occasion. Practicing the twist helps you get a smooth finish faster.
How to Make French Braids?
Divide your hair into three sections. Cross the outer ones over the middle. Add hair to each outer section as you go.
Keep your hands close to your head and braid tightly. It helps to dampen your hair slightly to reduce flyaways.
What Haircut Makes You Look 10 Years Younger?
Layers that frame the face often create a youthful appearance. Adding volume around the cheeks and jawline can soften your look. Avoid very blunt or heavy cuts as they can age your face.
What Is a Waterfall Braid?
This braid lets some hair hang loose. The loose hair isn’t included fully in the braid.
This gives a cascading effect that looks delicate and romantic. It’s great for adding detail to an updo or loose hairstyle.
How to Do Twists in Hair for Beginners?
Grab a small hair section. Split it into two parts. Twist these parts tightly around each other.
Secure the twist with a pin or small elastic. Start with dry, detangled hair for an easier twist and better hold.
Can You Do a French Twist on Second-Day Hair?
Yes, second-day hair actually holds a French twist better than freshly washed hair. Slightly oily hair grips pins more securely. Use dry shampoo if your hair feels too greasy before styling.
Wrapping Up
The French twist is a practical and elegant hairstyle you can master at home. Start with the basic twist and build your skill step-by-step. Grab your comb and pins, and try your first twist now.