How to Cut the Back of Your Hair: Simple Steps for Precise DIY Trims
Figuring out how to cut the back of your hair evenly at home can feel tricky. The best way is to pull your hair into a tight ponytail. Place it at the bottom of your hairline for best results.
Cut the hair just below the ponytail. Leave about 3 to 4 inches. This will create a clean, straight line.
Set up two mirrors so you can see the back clearly from different angles. This helps you avoid uneven spots and gives you full control. Make sure your scissors are sharp and meant for hair.
This helps get a smooth cut. It also prevents split ends.
Cutting on dry hair shows you the natural shape of your hair. That way, you avoid surprises when it dries. Take your time and cut small amounts first.
It’s easier to trim more later. Fixing a cut that’s too short is hard.
Key Takeaways
- Use a clean, tight ponytail at the bottom to measure hair length.
- Leave 3 to 4 inches of hair below the ponytail before cutting.
- Set up two mirrors to clearly see the back from different angles.
- Cut hair when dry to see its natural shape and avoid mistakes.
- Use sharp hairdressing scissors for a neat, smooth cut.
- Take small snips to gradually trim hair and stay in control.
How to Cut the Back of Your Hair Evenly at Home

Cutting the back of your hair evenly at home needs a clear plan. The low ponytail method keeps your hair controlled and helps you cut a straight line. Using sharp hairdressing scissors is important to avoid fraying and uneven edges.
Pulling your hair tight is key. It keeps the hair in place so you don’t accidentally cut too much. You’ll slide the hair tie down to mark the length you want before cutting.
- Pull your hair into a tight, low ponytail centered at the nape of your neck. Make sure the ponytail is as neat and smooth as possible.
- Use a fine-tooth comb to smooth out bumps or stray hairs within the ponytail. Clip back any hair outside the ponytail if needed.
- Slide the hair tie down your ponytail to the spot you want to cut. Leave 3 to 4 inches of hair below the tie. This will mark your cutting length.
- Hold the ponytail tight just above the hair tie. Keep the hair stretched so it stays flat and straight. This helps make an even cut.
- Take sharp hair scissors for the job. Cut straight across at the spot marked by the hair tie. Keep your scissors steady to avoid mistakes. Take your time to keep the line even.
- After the first cut, tip your head forward with the ponytail still held. Use the comb to check for any uneven spots or longer strands and trim carefully.
- Release the ponytail and comb through your hair. Spot small uneven areas? Trim tiny bits at a time. Focus just on those spots for better results.
This method works well if your hair is straight or slightly wavy. Cut your hair when dry for better control. Dry hair shows its natural fall.
This helps avoid surprises as wet hair shrinks when dry. For curly or textured hair, consider cutting when dry to avoid shortening.
Wet hair stretches, so it looks longer than it is. Cutting wet means you should cut less to avoid going too short.
Dry cutting lets you see exactly how much hair you lose. So your style stays right.
Essential Tools for Cutting Hair at Home
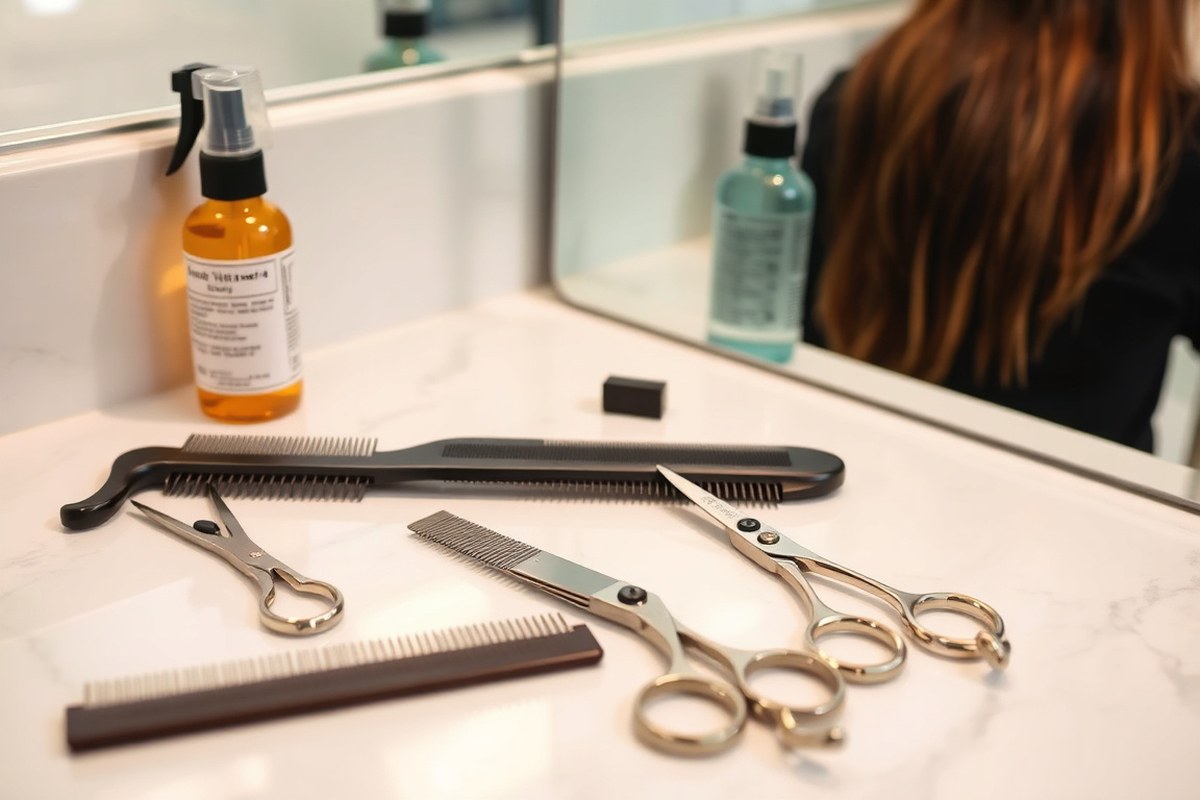
Cutting the back of your hair needs the right tools for clean, safe results. Good scissors are a must. Regular kitchen scissors will damage your hair.
Choose sharp cutting shears made for hair. They make precise cuts and avoid split ends. Thinning scissors help reduce bulk while keeping length.
Clippers can speed up the process for short styles like an undercut. Use them with guards for even length, especially on thick hair.
You need clear visibility to cut the back well. Use two mirrors for the best setup. Place a flat mirror in front.
Hold or mount another mirror behind you. This shows the back from many angles. Check symmetry often by looking at your mirrored reflections.
Use a wide-tooth comb to detangle before cutting. A fine-tooth comb helps smooth sections for careful snipping.
- Sharp hair cutting shears for clean edges
- Thinning scissors for blending and reducing bulk
- Clippers with guards for short cuts or undercuts
- Wide-tooth comb to detangle hair smoothly
- Fine-tooth comb to create straight sections
- Two mirrors (one handheld) to see the back clearly
- Hair clips to section off areas for control
Most professionals recommend cutting clean, dry hair to see split ends well. Wet hair looks flat and hides damage. Clippers handle dry or damp hair and work best on straight or relaxed hair.
Scissors work for all types but take careful, slow motions to avoid jagged edges. To get a very straight line at the back, ask a friend to help. They can trim safely and accurately for you.
Use sharp scissors and slow, steady cuts to avoid jagged edges and mistakes.
Setting Up Mirrors for Clear Visibility of the Back
Arrange mirrors so you can see your hair’s back without holding them. Use a large wall mirror and a hand-held or three-way mirror for hands-free views. This setup reduces neck strain and helps catch blind spots from different angles.
Choosing a Three-Way or Hand-Held Mirror
A three-way mirror works best because it shows multiple angles at once. Its side mirrors let you see your hair’s back and sides clearly. A hand-held mirror helps with close checks but needs one hand to hold it.
You can pair a hand-held mirror with a big wall mirror for a hands-free view. Use this combo to look forward. Then lift the hand mirror to see behind.
This lets you check the back of your hair easily. Wireless clippers also help by letting you move freely while checking.
Optimal Mirror Placement Angles
Place a large mirror at your eye level. Stand about 12 to 18 inches away. This distance works well for a good view.
Then hold or place the second mirror below or behind you at a 45-degree angle. You’ll get a reflected image of your head’s back. No need to twist your neck to see it.
Adjust mirror heights to stay comfortable. Keep your neck relaxed by sitting down if needed. Avoid bending or craning forward because that tires your neck and can cause uneven cuts.
Place mirrors in a well-lit area. Natural light or white bathroom lighting works best. Shadows make it harder to spot uneven cut lines or miss spots in your hair.
Using Additional Devices Like Phones or Apps
A smartphone camera is a great extra tool to check the back of your head. Use the front camera as a mirror or the back camera for close-ups. Place your phone on a stand or lean it against something steady at head height.
Some apps have a mirror mode with zoom and pause features. These help you see details without needing extra hands.
However, avoid relying only on a phone. It’s best combined with physical mirrors for true depth perception.
- Choose a clear, large wall mirror to position at eye level.
- Get a three-way mirror or a hand-held mirror to use with the wall mirror.
- Put the wall mirror about 12 to 18 inches from where you stand or sit.
- Set the second mirror or hold it behind your head at a 45-degree angle.
- Move both mirrors until the back of your head shows up clearly. Adjust until the view is sharp and easy to see.
- Ensure good lighting around your mirrors to avoid shadowy spots.
- Set your phone on a steady surface at head height. This gives you extra angles to check your hair.
- Stay relaxed and keep your neck straight while checking your hair in the mirrors.
Choosing Between Wet and Dry Cutting Methods
Cutting the back of your hair wet or dry changes how your hair looks afterward. Wet hair stretches when damp.
So cutting it wet makes your hair shorter than it will appear when dry. Dry cutting helps curly hair show its natural length due to shrinkage, which wet hair hides.
Many stylists prefer cutting wet hair for blunt cuts like bobs. Wet cutting gives a clean edge and easier control with even sections. Dry cutting works best for curly or textured hair types.
You can see the hair’s natural shape while you cut it. This helps you avoid surprises later on. It also works well for trimming ends on shaped cuts like lobs or layers.
You can copy the technique your regular stylist uses. Watch tutorials that match your hair type and haircut style.
This helps you feel more confident cutting your own hair. Keep hair slightly damp if cutting wet by blotting with a towel, never dripping.
| Aspect | Wet Cutting | Dry Cutting |
|---|---|---|
| Hair Type | Best for straight or wavy hair | Best for curly or textured hair |
| Cut Result | Sharp, clean edges; hair shrinks when dry | True length visible; natural shape maintained |
| Setup | Hair towel-blotted to dampness | No washing needed; hair in natural state |
| Style Work | Suited for blunt bobs, sleek cuts | Best for layered, curly, or natural shapes |
| Cutting Tip | Cut less than you think; hair shrinks | Cut slowly, watch curls spring up |
Wet cutting needs scissors designed for hair and steady hands. You often section hair and cut small parts at a time.
Dry cutting requires more careful checking of length and shape since hair doesn’t stretch. It takes more patience but helps avoid surprises on curls and waves.
For curly hair, cut when dry to see actual curl shape. Or try the DIY Deva Cut method to shape curls. This way, you get a better idea of the final look.
For straight hair and blunt bobs, cut when hair is damp. Start by trimming less than you think you want to lose.
This avoids cutting too much too soon. Stop and check in natural light with a mirror to avoid cutting too much.
Techniques for Different Hair Types and Styles
Different hair types need different cutting techniques to look natural and even. Straight and wavy hair benefit from clean, smooth cuts. Curly and textured hair trims best coil by coil.
Use point-cutting to keep volume and shape. This method helps maintain your natural look.
Cutting Straight and Wavy Hair Cleanly
Straight and wavy hair should be smooth and tangle-free before cutting. Wet hair is easier to control for a clean line. Point cutting softens the ends and avoids a harsh edge.
For an even finish, start by creating a guide using a small section at the back. Then cut in small sections, using the guide as a reference. Slightly angle your scissors and snip into the ends for texture.
- Wash and towel-dry your hair until damp.
- Comb through to detangle and smooth hair out.
- Make a small horizontal section at the nape for your guide.
- Cut straight across this section, keeping scissors parallel.
- Release hair sections above the guide, cutting little by little.
- Use point cutting by angling scissors and snipping the ends.
- Check your work for evenness and make minor adjustments.
Cutting straight across can make the ends look blunt and stiff. Use point cutting to avoid this.
Trimming Curly Hair While Preserving Shape
Curly hair should be cut dry or air-dried to see the natural curl pattern. Cutting coil by coil keeps the curls looking uniform and bouncy. “Dusting” removes split ends without losing volume.
Trim curls individually to ensure they fall and frame your face well. Cut small amounts to avoid removing too much bulk. This helps maintain the natural shape and avoids an uneven look.
- Let hair air dry completely to reveal natural curls.
- Separate curls into manageable sections, working coil by coil.
- Point cut each curl by snipping the tips gently.
- Use the dusting method by trimming only the damaged ends.
- Check each section for balance and tweak sparingly if needed.
Cutting curly hair in straight lines flattens curls and looks unnatural. Cut curls individually.
Layering and Texturizing Techniques for Dimension
Layers add movement and reduce bulk in thick hair. Use point cutting on layers for soft, natural edges. Aim for a slight U or V shape at the back for modern, triangular layers.
For wavy and straight hair, angle your scissors slightly and cut into the ends. Texturizing the layers helps blend harsh lines. Avoid blunt cuts unless you want a sharp, defined edge like a bob.
- Decide how much layering you want for your hair type.
- Create vertical sections and hold the hair between your fingers.
- Point cut at an angle into the ends to add texture.
- Work through sections evenly, checking overall shape constantly.
- Finishing with a soft U or V shape in the back adds style.
Point cutting is your best bet to avoid blunt, unnatural layers. Snip lightly and check often.
Avoiding and Fixing Common Cutting Mistakes
Uneven patches and harsh lines usually happen because of poor visibility or bad tools. Using a single mirror or household scissors can cause jagged edges or uneven lengths.
Tension matters too. If you don’t hold the hair tightly when cutting, strands can end up longer or shorter than others.
Fixing a ‘hole’ or gap in the back means gently trimming the surrounding area. Twist the small section around your finger, then snip the tips lightly with sharp scissors.
Cut just a few millimeters to blend the gap without making it obvious. Avoid cutting deep into the section or removing too much length.
Correcting jagged edges often requires the right tools. Hair-cutting scissors or thinning shears soften hard lines.
Adjust your grip to snip vertically into the ends, not straight across. Doing this blends the cut, giving a smoother finish that looks natural instead of choppy.
- Use proper hair scissors to avoid jagged cuts
- Check your work with two mirrors or a handheld mirror
- Brush hair out and trim stray long strands after cutting
- Cut small amounts at a time to prevent over trimming
- Tighten sections before cutting to keep lengths consistent
- Twist hair sections before trimming to soften rough edges
- Stay patient and cut less; you can always trim more later
After trimming, brush your hair to spot uneven spots or strays easily. Carefully trim these patches and edges again with sharp scissors.
Good results show smooth, even edges without sudden gaps or jagged lines that jump out. Rough finishes often come from rushing or not checking the cut multiple times from different angles.
Blending and Finishing the Back for a Professional Look
Blending layers helps your DIY cut look smooth and neat. Fading the nape softens harsh lines. Cleaning the neckline finishes the polished look.
Use thinning scissors to smooth edges where clipper and scissor cuts meet. Point cutting adds natural texture and softens harsh lines. Carefully trim around the ears for a neat finish.
Clean up the neckline to sharpen the style. These small steps make your cut look professional.
Using Thinning Scissors to Blend Layers
Use thinning scissors to blend short clipper spots and longer layers. They make transitions look natural. This helps avoid harsh edges.
They cut only some hair strands. So they soften lines without taking too much length.
Lift the hair where the scissor cut ends meet the clipper area. Lightly snip through the hair with the thinning scissors, opening and closing them gently. Work gradually to avoid cutting too much.
For best results, hold the scissors at a slight angle and focus on the transition zone. Take your time and check your work often in the mirror to see the blend.
Point Cutting for Soft Edges and Texture
Point cutting shapes hair by snipping the ends at an angle with scissors slightly open. This technique creates soft edges and adds texture. It helps avoid a blunt look, making the hair fall more naturally.
Use point cutting on the longer back sections or layered parts. Hold small hair sections between your fingers. Snip lightly into the ends.
Open and close the scissors slightly for a soft look. This cuts a little length without removing entire chunks.
Point cutting adds texture or layers to your haircut. It avoids a straight, blunt edge.
This makes the hair move better. Apply it to the tips and ends, not the roots or full lengths.
Cleaning Up Around Ears and Neck
Cleaning the neckline and around the ears sharply frames the haircut and makes it look tidy. Use a comb as a guide for a straight line along the natural hairline.
Pin any stray hair you don’t want too short. This is helpful for longer layers near the neckline.
Also pin hair behind the ears. Use clippers or scissors to carefully trim the nape and clean edges.
Start at the middle of the neck and work outwards to both sides. Cut small amounts slowly, checking in three mirrors to see behind your head. This prevents uneven lines and mistakes.
- Comb back any loose hairs and part the hair to expose the neckline.
- Use thinning shears to blend the scissor-cut layers with clipper areas.
- Hold scissors at an angle and point cut the ends for softness and texture.
- Pin up longer layers around ears and the upper neck to protect them.
- Use a comb to find a straight edge on the neckline and clip carefully.
- Trim around the ears with small scissors or clippers, adjusting slowly.
- Unpin the longer top layers and trim them with scissors or longest clipper guard.
- Check all edges in the mirror and make small corrections as needed.
When to Seek a Professional Instead
Cutting your own hair at home is risky when the style needs precision. You should see a professional for much shorter or more layered cuts. Longer or complex styles require careful shaping that’s hard to do with just mirrors and scissors.
Uneven layers or big length changes show you need a pro. Tricky styles like fades or undercuts do too.
Professionals use special tools and techniques to get clean lines and smooth blends. Trying these at home often leads to uneven results and extra trips to fix mistakes.
Corrections of home haircut errors are safe only when handled by trained stylists. Spot jagged edges, choppy layers, or uneven length?
Book a salon fast. Professionals also know how to save damaged or over-cut hair while preserving your style.
Waiting too long to see a stylist after a DIY trim can make problems worse. Hair grows roughly half an inch per month. So small mistakes will grow out slowly.
Don’t cut your own hair if you want it longer than now. Schedule a pro visit to avoid reshaping or regrowth awkwardness.
Cut less than you think at the back. See a pro for big style changes or fixes.
Step-by-Step Action Plan for Cutting the Back of Your Hair
Follow these steps to cut the back of your hair evenly and safely at home. Take your time and check your progress often.
- Before you start: Gather all your tools and set up two mirrors for clear visibility. Make sure your space is well-lit.
- Step 1: Decide if you want to cut your hair wet or dry. Wet hair is easier for straight cuts; dry hair shows natural fall.
- Step 2: Section your hair with clips to control the back area. Sectioning helps you work on even parts.
- Step 3: Start trimming small amounts at the bottom. Use a comb and scissors or clippers steadily. Check evenness in the mirror after each pass.
- Step 4: Blend the layers carefully using point cutting or scissors over comb. Blend until you see a smooth transition.
- Step 5: Fix any uneven spots with small trims and compare both sides in your mirrors. Evenness means matching length and shape on both sides.
- Step 6: Finish by blow-drying your hair to check the final look. Adjust any spots that look off afterward.
- After 2 weeks: Review your haircut in natural light. Trim any new uneven growth as needed to maintain shape.
Frequently Asked Questions
What’s the Safest Way to Get a Straight Cut on the Back?
The ponytail method is the safest for a straight cut. You gather your hair into a tight ponytail.
Cut just below the tie. Leave 3-4 inches to adjust later.
How Tight Should I Pull the Ponytail Before Cutting?
Pull the ponytail as tight as you can without causing pain. Too much tension makes hair bounce back and appear shorter after drying.
Can I Fix a Crooked Cut at the Back on My Own?
Yes, minor unevenness can be fixed by carefully trimming with scissors. Take your time and cut small amounts to avoid making it worse.
Why Is Dry Cutting Better for DIY Back Haircuts?
Dry cutting shows how your hair naturally falls and sits. That way, you can see the real length and texture before cutting.
Can I Use Any Scissors When Trimming the Back of My Hair?
No, use hairdressing scissors. Regular scissors aren’t sharp enough and may push hair, causing uneven cuts.
What Is the Best Way to Avoid Cutting Hair Too Short?
Cut a little at a time since you can always cut more later. Remember, once hair is cut, you can’t add length back.
Before You Go
Cutting the back of your hair at home takes care and patience. Start slow and stay steady to get even results. Try your first small trim today and watch your skills grow.