How to Cut Hair with Clippers: A Complete Guide for Beginners with Pro Tips
Start by washing the hair so it’s fresh and free of oils. Towel dry it until it’s damp, not dripping wet. Damp hair lies flat and cuts more evenly with clippers.
Choose clippers that feel comfortable to hold and run smoothly. Attach a guard comb based on how short you want the hair. Guards range from 1/16 inch to over an inch for different styles.
Select a well-lit area with a large mirror or multiple mirrors for side and back views. This setup helps you see different angles clearly. Standing on a stool or chair gives a better perspective for cutting.
Keep your clippers clean and oiled before you start cutting. This prevents pulling hair and keeps the motor running cool. Take your time cutting slowly for better control and an even cut.
Key Takeaways
- Wash and towel-dry hair to about 60-70% moisture before cutting.
- Choose clippers priced between $35 and $60 for solid home use quality.
- Use a main mirror plus a second angled mirror for better visibility.
- Start cutting with a longer guard, then work down gradually.
- Cordless clippers need at least 90 minutes of battery life.
- Brush and oil blades after every cut to keep clippers sharp and smooth.
How to Cut Hair with Clippers Step by Step

Start cutting by working on the sides and back first. Use a longer guard to avoid taking off too much hair. Hold the clippers with a firm grip, keeping the blades flat against your head.
Cut hair in upward strokes from the base of the head, moving toward the top. Use smooth, even motions, and avoid pressing too hard to keep cuts even. Comb hair frequently to spot uneven areas early on.
For the top, switch to a longer guard to keep length consistent. Comb your hair forward or in the natural style direction. Cut slowly and check often using a mirror.
- Attach the guard for the desired length on the sides and back. Work the clippers from the bottom up in small sections.
- Use gentle upward strokes, flicking the clippers out slightly near the transition areas. This helps avoid harsh lines between lengths.
- Comb hair flat and use your fingers to hold sections steady before turning to the top.
- Switch to a longer guard for the top. Cut hair from front to back. Use point cutting to add texture.
- Frequently check your progress with a mirror, especially the back, using a handheld or angled mirror.
- Trim around the ears with a smaller guard or no guard. Move carefully to avoid nicks. Do the same at the neckline.
- Blend the sides and top by flicking the clippers outward. Work along the join lines. This makes a smooth transition.
Starting long then going shorter prevents removing too much hair accidentally. Holding the clippers flat prevents uneven patches.
Flicking the blades at the edges helps blend lengths naturally. Regular mirror checks catch spots before they get uneven.
Choosing the Right Clippers and Guard Sizes
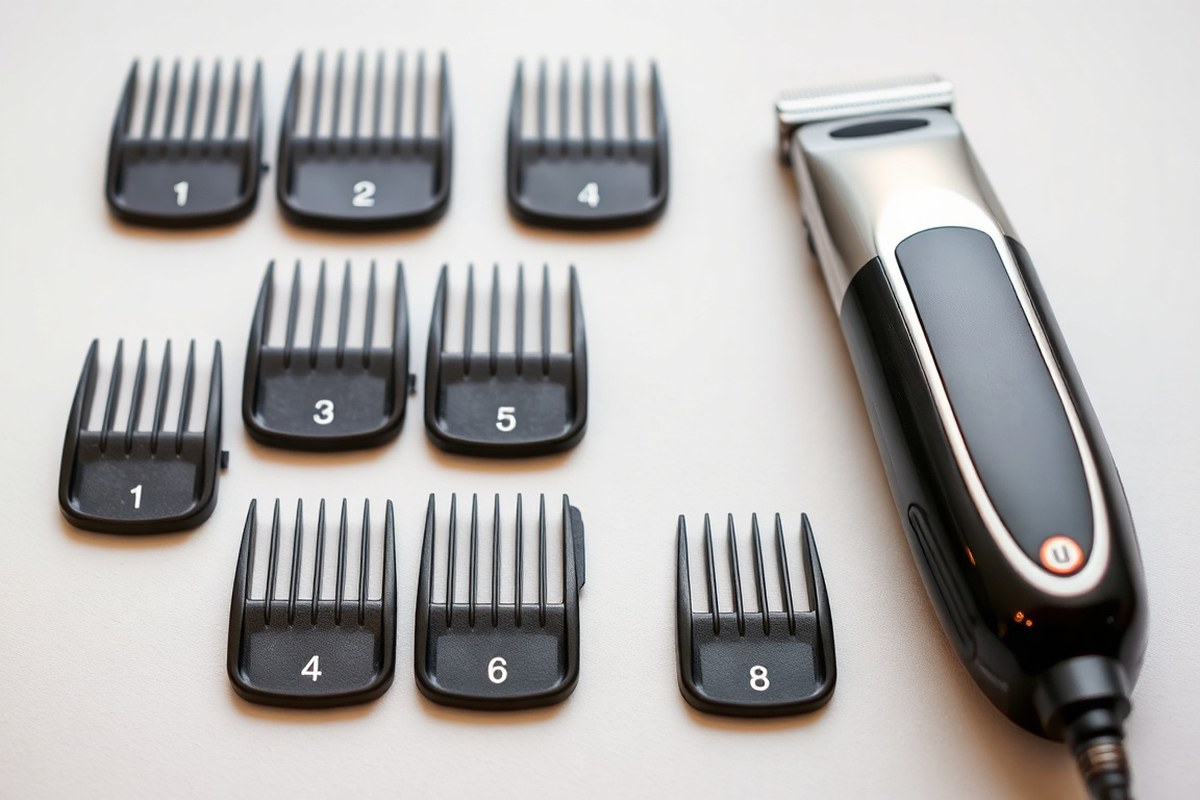
Choose clippers made for fades if you want smooth length transitions. Clippers with sharp blades cut hair cleanly without pulling. They come with various guard sizes you attach to control length.
Guards number 1 to 8 usually come in a set. They control hair length from very short to longer styles.
For buzz cuts, guards #1 or #2 quickly remove most hair. Longer cuts and crew cuts use #3 to #6 guards.
| Guard Number | Length (inches) | Length (mm) | Common Use |
|---|---|---|---|
| #0 (No guard) | ~1/50″ | ~0.5 | Skin-close shave, bald fades |
| #1 | 1/8″ | 3 | Very short buzz, tight fades |
| #2 | 1/4″ | 6 | Short buzz cut, fade sides |
| #3 | 3/8″ | 10 | Standard buzz, classic crew cut sides |
| #4 | 1/2″ | 13 | Medium length, versatile all-over |
| #5 | 5/8″ | 16 | Fuller crew cut top |
| #6 | 3/4″ | 19 | Longer top length |
Pick a guard one size longer than you want to avoid cutting hair too short. For fades, step down through guard sizes gradually to blend well. Use a clipper with guards for bulk hair removal and a trimmer for edges and details.
Never skip guard sizes when fading; this avoids harsh lines in your cut.
Preparing Your Hair and Workspace for Cutting
Getting ready for a haircut with clippers means setting your hair and workspace right. You want your hair dry or a little damp. Clear your tools before you start.
Arrange mirrors to see every angle well. This prep helps you cut evenly and avoid mistakes.
Moisture Level: Dry vs. Damp Hair
Cutting dry hair works best with clippers because the hair stands up and shows natural length. Dry hair prevents sticking to the scalp and lets the clippers glide smoothly.
For thick or hard-to-manage hair, lightly dampen it with a spray bottle to make cutting easier. Don’t cut hair when it’s wet unless your clippers can handle it.
Most home clippers don’t work well on wet hair. Cutting wet hair with dry-only clippers can cause issues.
Ideal Mirror Placement for Self-Cutting
You need two mirrors to see the back of your head well. Place one mirror in front of you and a second behind at head height.
Set up your workspace so the mirrors line up well. This makes it easier to check your haircut’s progress.
You can spot any uneven spots quickly. Avoid cutting with just one mirror, it’s a common cause of uneven cuts.
Essential Tools and Accessories to Prepare
Gather all your tools before starting to avoid interruptions. This saves time and keeps you focused during your haircut.
- Quality hair clippers with various guard sizes
- A spray bottle filled with water for dampening
- Wide-tooth comb and regular comb for detangling and sectioning
- A handheld or wall-mounted mirror to view the back
- Towels or a barber cape for catching loose hair
- Clipper oil for blade maintenance
- Good lighting, ideally natural light or a bright lamp
Having everything ready makes the haircut smoother and reduces errors. Pay attention to blade oiling to prevent pulling or irritation.
Sectioning and Detangling Hair Effectively
Comb your hair thoroughly to remove knots so the clippers move through easily. Detangled hair cuts cleaner and looks smoother.
Divide your hair into manageable sections using clips or hair ties. Work on one section at a time for better control and a more even cut.
Blending and Fading Techniques with Clippers
Blending and fading with clippers means making a smooth transition between different guard lengths. It avoids harsh lines or a choppy look in your haircut. You do this by using the right guards, angles, and careful strokes.
Basic Blending Using Guard Progressions
Start your cut with a higher guard size to leave more hair on top. Then switch to lower guards to cut the lower parts shorter, creating a fade. Using gradual guard sizes helps blend between lengths without sharp lines.
Don’t jump more than one guard size between passes. Switching from a size 4 guard to a size 2 guard right away creates visible steps. Gradually move from 4 to 3, then 3 to 2 for smooth results.
Follow these steps to blend with guards:
- Choose your longest guard to start, usually on top.
- Cut the top and middle sections evenly with that guard.
- Switch to the next lower guard for the lower half.
- Use slow, overlapping strokes to blend where the two lengths meet.
- Repeat with lower guards if you want a closer fade.
- Check for any harsh lines and blend again using the taper lever or flick-out motion.
Using Clipper Angles to Soften Lines
Holding the clipper blade at different angles changes how the cut looks. Use a 90-degree angle for straight cuts. Tilt the clipper 5 to 15 degrees to soften edges and avoid harsh lines.
As you finish a stroke, scoop the clipper away from the scalp. This flick-out motion makes the end of each pass less noticeable. Opening the taper lever on the clipper also helps blend as you cut.
Tilting helps you blend where two guard lengths meet smoothly. It takes practice to control the angle consistently.
Fixing and Smoothing Out Uneven Transitions
If you spot uneven lines or patches, fix them right away. Run the clipper again over the darker or longer patches with the same guard. Use slow, overlapping strokes to even them out.
To soften harsh fade lines, open the taper lever slightly. Then lightly flick the clipper outward on those edges. Avoid cutting too much; gentle blending is better.
Accept some uneven spots at first. Your hands get steadier with practice. Fix mistakes calmly by going over problem areas slowly and carefully.
Common Hair Clipper Mistakes and How to Fix Them
Uneven haircuts often happen when you don’t check your progress enough. Use a hand mirror frequently to see the back and sides clearly.
Stop cutting every few minutes to make sure no hair is stuck in the blades. This avoids patchy or rough spots.
A common problem is cutting too short by mistake. To prevent this, start with a longer guard size and cut less at first. You can always go shorter if needed.
Fixing a cut that’s a little too long is easier. It’s harder to fix a cut that’s too short. Start longer to avoid big mistakes.
Harsh lines or patches usually come from skipping blending steps or using the wrong angle. Lightly go over rough edges with a smaller guard. Use no guard to soften lines too.
This makes the cut look smoother. Use smooth, even strokes without pressing too hard to get a natural look.
Use two mirrors so you can see your entire head from different angles while cutting.
- Stop often to clear hair from clipper blades
- Use a hand mirror to check your hair from all sides
- Start with longer guard sizes and go shorter gradually
- Blend lines with smaller guards using soft strokes
- Brush away loose hair to avoid uneven cutting
- Do not press clippers too hard on the scalp
Spot a mistake after cutting? Trim gently around the patch. This helps even out the hair.
Taking small amounts off at a time helps prevent new mistakes. Notice a line that’s too sharp?
Run clippers over it few times without a guard. Tilt blades slightly outward while doing this.
Fixing uneven fades early saves time and hassle later. After cutting, brush off hair bits trapped between blades to keep your clippers working well. These steps help your haircut look clean and balanced.
They work even if you’re new to clippers. Practice brings better results each time.
Maintaining Clippers for Long-Lasting Performance
Clean your clippers after every haircut by brushing off loose hair. Use the clipper’s included brush or a small stiff-bristle brush. Wipe the blades with a disinfectant or rubbing alcohol to remove oils and bacteria.
Put two drops of clipper oil on the blade teeth before and after use. Hold the clipper tilted down while running to spread oil evenly. Wipe off extra oil to stop buildup and keep blades smooth.
- Brush loose hair off blades after each cut
- Wipe blades with disinfectant to remove residue
- Apply 2 drops of oil before and after use
- Run clipper for a few seconds to spread oil
- Wipe off extra oil to avoid buildup
- Replace blades when they start pulling hair
- Store clippers dry in a protective case or pouch
Blade sharpness fades over time, causing hair pulling and uneven cuts. Replace blades when they fail to cut cleanly or feel dull. Most clippers need new blades after about 6 to 12 months, depending on use.
Storing clippers in a dry place is important. Keep them in a hard case or pouch to avoid dust and damage. Don’t leave clippers in damp or humid places.
Moisture can cause rust on the blades. Rust will make the blades wear out quicker.
Safe Techniques for Cutting Around Ears and Neckline
Cutting hair near ears and neckline needs careful handling for clean edges and safety. Use a handheld mirror to see tricky angles clearly. Use a trimmer or edger for sharp, clear lines around ears.
Clippers can be too bulky for this. Trimmers give you more control near the neck and ears.
Using a Handheld Mirror for Visibility
A handheld mirror lets you see behind your ears. It also helps with the back of your neck. This way, you spot areas clippers can miss.
Hold it at different angles to catch every curve and corner. Using this mirror with a wall mirror gives you a clear two-way view.
Position the handheld mirror so you don’t have to stretch your neck. Make sure you can easily see your neckline. This prevents neck strain when checking.
Keep it steady with one hand while working with the other. This simple tool reduces missed patches and uneven lines.
Trimming Sideburns and Ear Area Safely
Start by combing hair over your ears to expose the edges clearly. Choose a narrow-blade trimmer for trimming around ear curves. Wide clippers can miss small areas or cut too much.
A narrow trimmer handles curves cleanly. Clippers are too broad and risk skin cuts around these sensitive spots.
Trim slowly, following your ear’s natural shape for smooth lines. Only trim the top and sides of your ears for a tidy look. Avoid cutting too close to the ear canal.
This keeps your trim safe and neat. Adjust guard sizes for blending from your sideburns into longer hair on top.
- Comb hair fully off your ears and sideburns.
- Choose a fine-toothed trimmer or edger blade for details.
- Hold the trimmer flat and angle it slightly to follow ear curves.
- Trim with short, light strokes to avoid skin nicks.
- Use a clipper guard to blend sideburns smoothly into longer hair.
- Check in your mirrors frequently while trimming for balance.
- Comb back any loose hair and clean the edges again, if needed.
Defining and Cleaning Up the Neckline
For clean neckline edges, switch from clippers to a T-blade trimmer. Start trimming at the lowest hairline and move upward against hair growth. This method gives a crisp, natural finish without jagged spots.
Keep your neck relaxed and tilt your head slightly forward to stretch the skin. This tightness helps you trim closer without pulling or cutting the skin. Regularly wipe the blade to keep it sharp and snag-free during the cut.
Deciding When to Seek Professional Haircut Help
You’ll know it’s time to see a barber when your haircut feels uneven. It may look patchy after you trim it yourself. Uneven layers, missed spots, or an awkward fade show you might need help.
DIY clipping can only do so much. Complex cuts with detailed blends or sharp lines take skill and special tools professionals have.
When hair thinning or scalp issues appear, a pro can help with safer, gentler cutting methods. Clippers can irritate sensitive scalps or make thinning hair look worse if used the wrong way.
Barbers use scissors to blend hair in ways clippers can’t. This helps keep your hair healthy and looking good.
Book a professional if you want a bold style change. Also, see one for regular trims with exact shaping. Complex fades, undercuts, or taper styles need steady hands and sharp eyes.
Pros handle tricky spots like the back of your head better. This stops gaps and uneven cuts from showing up.
Think about how much time and effort fixing DIY mistakes might take. Cleanup or reshaping taking twice as long as cutting means time to visit a barber. It saves you frustration and improves your look.
If your clippers pull or hurt your hair, consider a pro’s help. A stylist can use gentler, more effective methods.
Here’s a simple rule: after three self-cuts and still unsure, see a professional. It’s better to get expert help sooner.
Pros notice early signs of scalp irritation or hair damage. They know how clipping speed and pressure impact your hair. They adjust tools and styles to your hair type and head shape, improving comfort and style.
The cost varies, but a basic haircut usually runs between $20 and $50. It’s a good investment for a clean, polished result you can’t get alone with clippers.
Your First Steps: A Quick-Start Plan for Cutting Hair with Clippers
Follow these simple steps to start cutting hair with clippers today. Each step helps build your skills and confidence.
- Before you start: Gather your clippers, guards, comb, and mirror. Check that your clippers are clean and charged so they work smoothly.
- Step 1: Wash and dry the hair completely. It should feel dry and tangle-free, making it easier to cut evenly.
- Step 2: Attach the longest guard you plan to use. Cut the top hair first. The hair should look even and feel neat after this step.
- Step 3: Change to a shorter guard to trim the sides and back. Watch for a smooth, gradual blend between lengths.
- Step 4: Use no guard or a very short guard carefully around the neckline and ears. Check for clean, tight edges without nicks.
- Step 5: Comb through the hair and look for uneven spots. Touch up those areas with the correct guard to fix lines or patches.
- After cutting: Clean and oil your clippers to keep blades sharp and running well. Your clippers will last longer and cut better next time.
Frequently Asked Questions
How Do I Choose the Right Guard Size for My Hair Type?
Pick a guard size based on how short you want your hair. Thicker hair usually needs a longer guard to cut evenly.
Start with a longer guard and then switch to a shorter one. This helps you get a smoother, more even finish.
Can I Cut Wet Hair with Clippers?
Clippers should be used on dry hair for best results. Wet hair can block the clipper blades and cut unevenly.
This may wear out your clippers faster. Always dry hair before you start cutting.
How Often Should I Oil My Clippers?
Oil your clippers after every haircut to keep them sharp and smooth. Applying two drops across the blades prevents rust and pulling when you cut hair.
What Guard Size Is Best for Fading?
Use multiple guard sizes, starting with the longest at the top. Blend downward using shorter guards to make natural transitions between lengths during a fade.
How Do I Fix Wonky Lines from Clipping Mistakes?
Use a longer guard to even out rough edges and blend lines. Going slow and trimming a little at a time helps you avoid big mistakes later.
Is a Cordless Clipper Better for Beginners?
Cordless clippers offer easier handling and no cord tangles. They’re great if you move around a lot. But might have less power than corded clippers.
Before You Go
Cutting hair with clippers is all about practice and careful attention. Take your time and check your work often as you go. Start by cutting a simple style and build your skills from there.