How to Clean Makeup Brushes at Home: Simple Steps for Fast, Effective Results
Figuring out how to clean makeup brushes at home makes your routine easier. You want quick, effective cleaning that keeps bristles soft and your skin clear.
Use warm water and a gentle cleanser to wash away makeup and oils right away. This stops bacteria buildup that can cause breakouts or brush damage.
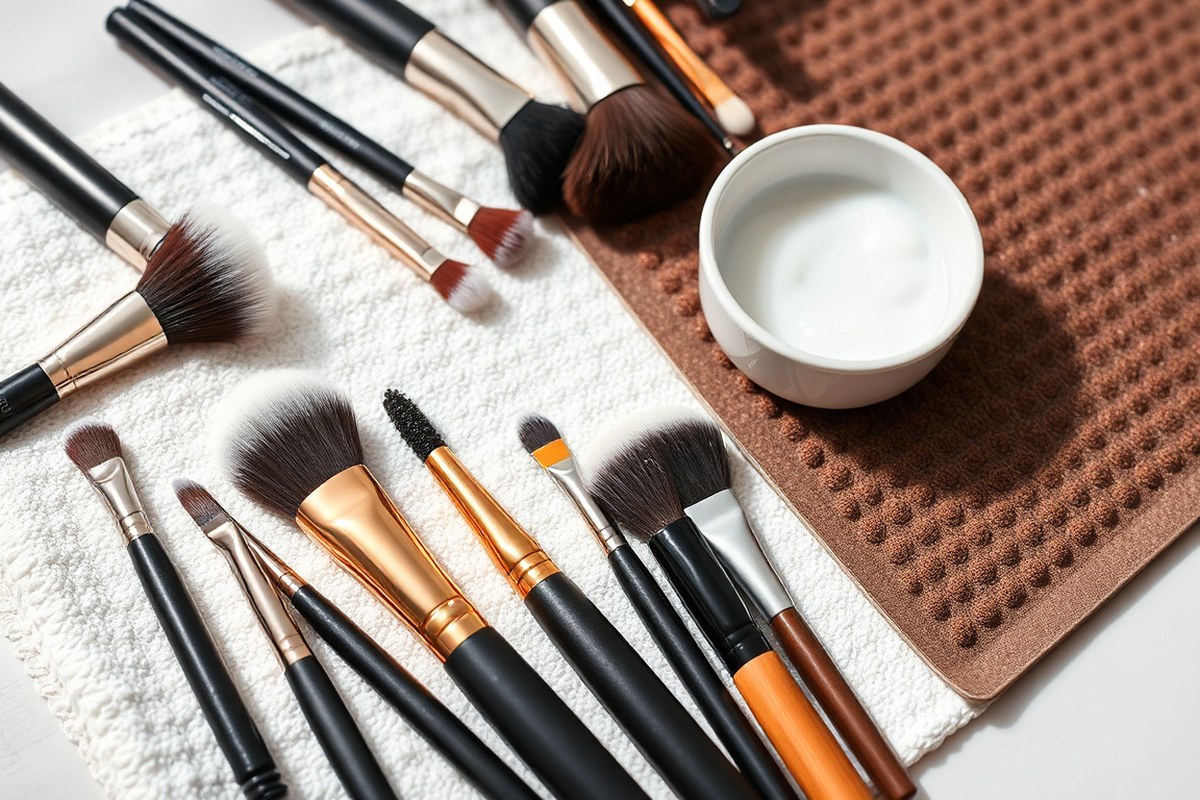
Start by rinsing your brushes under lukewarm water before adding cleanser. Work up a lather gently with your fingers or a silicone cleansing pad. Rinse your brush until the water runs clear.
Then squeeze out extra water gently. This helps keep the bristles’ shape.
Dry your brushes flat on a clean towel, preferably overnight. This prevents water from seeping into the ferrule and loosening glue. Taking these steps regularly helps brushes last longer and keeps your skin healthier.
Key Takeaways
- Clean your makeup brushes every 7 to 10 days to protect your skin.
- Use lukewarm water and a gentle cleanser made for brushes.
- Work cleanser into the bristles with fingers or a silicone pad.
- Rinse brushes thoroughly until the water runs clear.
- Dry brushes laying flat on a towel to keep their shape.
- Avoid soaking brushes to stop glue from breaking down.
Step-By-Step Guide to Cleaning Makeup Brushes at Home

Cleaning your makeup brushes right protects your skin and keeps brushes lasting longer. Use lukewarm water to avoid damage and wet only the bristles. Avoid soaking handles because water can loosen the glue holding bristles.
Here’s a step-by-step method that works for most brush types. Grab a gentle cleanser and a bowl or your hand to swirl the brush in. Take your time to rinse the brush well.
Keep rinsing until the water is clear. Avoid splashing water on the brush handle or ferrule.
- Run the bristles under lukewarm water with the brush head facing downwards.
- Put a small drop of gentle soap on your palm. You can also use a cleaning mat. This helps clean the brush better.
- Gently massage the bristles in circular motions to release makeup and dirt.
- Rinse again under lukewarm water until no soap or makeup residue remains.
- Squeeze out excess water softly with a clean towel or paper towel.
- Reshape the brush head to keep its form and prevent bristle damage.
- Place the brush flat on the counter. Let the bristles hang off the edge. This helps them air dry properly.
- Keep brushes angled downward or flat to avoid water pooling inside the handle.
Some brushes clean faster with a silicone mat to help break up product buildup. Avoid running brushes through the washing machine.
The agitation can bend bristles and ruin handles. Plan about 5 to 10 minutes for a full clean and drying.
Drying takes the longest. Don’t store brushes upright while wet. That traps moisture and weakens glue.
Using a drying rack angled at 45 degrees helps water drip away from the ferrule. Your brush is clean when the water runs clear.
The bristles should feel soft and fluffy again. This means they are ready to use.
Choosing the Right Cleanser for Different Brush Types

Choosing the right cleanser depends on your brush type and how often you clean. Liquid shampoos or gentle soaps work well for deep cleaning most brushes.
Solid bars and mats add convenience. Sprays and alcohol suit quick cleans or tough stains.
Liquid Shampoo and Gentle Soaps
Liquid shampoos and gentle soaps like baby shampoo work best for regular deep cleaning. They clean well without drying out natural hair bristles. You can use a small amount on your palm or a bowl with water.
Clarifying shampoos also remove buildup but use them sparingly to avoid damage. Dish soaps such as Trader Joe’s Grapefruit or Dawn work well. They clean dense brushes with makeup buildup.
These soaps also work great for sponges. Rinse thoroughly to remove suds.
Solid Cleansing Bars and Mats
Solid cleansing bars are made specifically for brushes and sponges, offering a gentle yet effective clean. These soaps include ingredients made for makeup residue.
They clean gently and protect brush fibers better than regular soaps. Bars cost about $20 and can last a long time.
Silicone mats with texture help break down makeup while you swirl brushes on them. You can hold these pads steady with suction cups in the sink. They speed up cleaning and reduce the need for harsh scrubbing.
Rinse-Free Sprays and Alcohol Disinfectants
Rinse-free sprays are great for quick cleanups between uses or at work. You spray the bristles, wipe on a paper towel, and the brush is ready again fast. These don’t replace deep cleaning, but keep bacteria at bay temporarily.
Use 70% isopropyl alcohol sprays when brushes show stubborn stains or heavy buildup. Alcohol disinfects and removes tough grime.
Spray lightly, then follow with a full wash. Avoid frequent use on natural hair, as it can dry the bristles.
Here’s a quick comparison table of common cleansers for makeup brushes:
| Cleanser Type | Best For | Pros | Cons |
|---|---|---|---|
| Liquid shampoo / gentle soap | Regular deep cleaning, all brush types | Gentle on natural hair, widely available | May require thorough rinsing of suds |
| Dish soap (e.g., Dawn, Trader Joe’s) | Dense, oily brushes and sponges | Removes heavy oil and foundation quickly | Can be too harsh if overused |
| Solid cleansing bars | Makeup brushes and sponges | Designed for makeup residue, long-lasting | Initial cost around $20 |
| Silicone cleaning mats | All brush types for faster cleaning | Speeds up cleaning, gentle scrubbing aid | Needs space and cleaning after use |
| Rinse-free sprays | Quick cleanup between uses | Fast, convenient, kills some bacteria | Not a substitute for deep cleaning |
| 70% isopropyl alcohol spray | Stubborn stains, disinfecting brushes | Effective disinfection and stain removal | Dries natural hair bristles, use sparingly |
Choosing the right cleanser helps keep your brushes clean without causing damage. Experiment a little to see what works best for your brush types and makeup routine.
Always rinse brushes thoroughly after using soaps or cleansers to avoid residue buildup.
How Often You Should Clean Different Makeup Brushes
How often you clean makeup brushes depends on the brush type. It also depends on the makeup product used. Different brushes and products need different cleaning schedules.
Powder brushes can be cleaned less often. Brushes used with liquid or cream products need more frequent care. Eye and lip brushes also require careful attention to avoid irritation.
Daily or Quick Cleaning for Powders
Powder brushes don’t need washing after every use unless you switch colors during application. Keeping them clean between uses helps you avoid muddy makeup looks and buildup. Use a quick spray or wipe on brush bristles daily.
This refreshes them between uses. It’s important when applying different colors or shades.
Light cleaning keeps the powder brushes smooth and prevents product clumps. You should deeply wash brushes at least once every one to two weeks.
This removes built-up oils and dirt. A full wash keeps your brushes clean and safe.
- Quick spray or wipe after daily use
- Full wash every one to two weeks
- Avoid soaking brushes daily to preserve bristle integrity
- Refresh between different powder colors and shades
Weekly Deep Cleaning for Liquids and Creams
Brushes that apply foundation, concealer, or cream-based products need cleaning once a week. These can trap oils, bacteria, and product residues more easily. Frequent washing prevents clogged bristles and skin breakouts.
Cleaning weekly keeps your brushes soft and working well for flawless makeup. When you clean, focus on removing all product without over-soaking, which can loosen bristle glue.
- Wash brushes weekly with gentle cleanser
- Rinse thoroughly to remove all liquid or cream product
- Dry brushes flat or angled downward to prevent damage
- Use lukewarm water to avoid loosening glue
Special Care for Eye and Lip Brushes
Eye and lip brushes touch sensitive skin that can react to germs. Cleaning is recommended after every use or at least every two to three weeks. Use more frequent cleaning for brushes with liquid or cream products.
Keeping these brushes clean lowers the risk of eye infections and lip irritation. Regular cleaning removes product buildup and bacteria that could cause redness or pain.
- Clean eye and lip brushes after every use with wet products
- Deep clean at least every two to three weeks for powders
- Be gentle to avoid damaging delicate bristles
- Discard brushes showing excess wear or shedding
Effective Drying Techniques to Protect Brushes
After washing, dry your makeup brushes flat on a clean towel. Position the brushes so the bristles hang over the edge of a counter or table. This stops water from seeping into the handle, which can loosen the glue and cause shedding.
Set your brushes bristles-down if you use a brush drying rack. This helps water drain away from the base and keeps the shape intact. Always reshape the brush head gently before drying to avoid deforming the bristles.
Drying usually takes 6 to 12 hours, depending on brush size and material. Large brushes with thick bristles or natural hair take longer to dry than small synthetic brushes. Plan to wash your brushes overnight or early in the day for full drying before reuse.
Avoid drying brushes under direct heat or sunlight. High heat can dry out and weaken bristles while fading handle paint. Direct sun may cause warped handles or dried-out glue joints, which shorten brush life.
Need brushes dry fast? Use a makeup brush cleaner spray. It leaves brushes nearly dry right away.
These sprays dissolve makeup without water but work best for quick touch-ups, not deep cleaning. Spray and let air dry for a few minutes before use.
Counter space can be tight. Use a silicone brush holder. Attach it to the sink edge.
It holds brushes bristle-down, allowing airflow and quick drying. Just wipe the holder regularly to avoid dust buildup.
Check your brushes after drying. Bristles should feel soft and springy without stiffness or stickiness. Bristles clump or handles feel loose?
Let the brush dry longer. Replace it once damage appears.
Common Mistakes to Avoid When Cleaning Makeup Brushes
Washing your makeup brushes too often can wear out the bristles faster. Clean your brushes once a week for most types. Use twice a week if you apply liquid products every day.
This keeps brushes fresh and working well. Over-washing strips natural oils and loosens glue holding the brush together.
Keep water away from the brush handle to protect the glue inside. Tilt the brush downward when rinsing to stop water from pooling at the base. Water soaking the handle can loosen the ferrule.
This makes bristles fall out faster. Take care to keep the handle dry.
Avoid hot water and harsh soaps; both can damage your brushes. Hot water softens the glue, causing bristles to shed.
Harsh soaps dry out the bristles and may irritate your skin. So choose gentle or makeup brush-specific cleansers instead.
- Don’t submerge the entire brush, just the bristles
- Use lukewarm water, not hot
- Wash brushes weekly, not daily
- Keep handles dry and angle brushes downward
- Use a gentle cleanser designed for makeup brushes
- Repeat rinsing if water doesn’t run clear
Angle your brush downward when rinsing to avoid loosening the ferrule glue.
Rinsing under warm, not hot, water helps keep glue intact longer. Rinse the brush once. If water is still dirty, wash again.
Avoid soaking the handle while washing. This keeps your brushes in good shape and helps them last for months or even years.
Harsh soaps can cause bristles to lose their softness and break down faster. Stick with gentle cleansers or specialized brush soaps that keep bristles smooth. Cleaning this way protects your skin and makes sure your makeup goes on smoothly every time.
How to Deal with Stubborn Stains and Buildup
To clean tough stains on your makeup brushes, first soak them. Let the hardened makeup loosen up. Then, scrub gently to remove buildup.
Specialized sprays or alcohol can help disinfect and break down tough residue safely. Rinse the brushes thoroughly under lukewarm water until all residue disappears before drying.
Pre-Soaking and Gentle Scrubbing
Soaking your brushes softens dried makeup and oils stuck deep in the bristles. Use a mild cleanser or dish soap to cut through buildup without damaging the brush hairs. Gently rub the bristles on a silicone scrub mat or your palm to lift away grime.
This method avoids harsh scrubbing that can bend or shed bristles. It’s especially helpful for foundation and cream product residues. After soaking five to ten minutes, massaging the bristles releases leftover makeup.
- Fill a small bowl with lukewarm water and add a few drops of liquid dish soap.
- Swish the brush tips in the water for about five minutes to soften the buildup.
- Press the bristles gently on a textured silicone scrub mat or your palm to loosen residue.
- Repeat soaking and scrubbing if makeup remains caked.
- Rinse briefly with lukewarm water before moving to a deeper clean.
Using Alcohol or Specialized Sprays
Alcohol sprays work well to disinfect and lighten tough stains caught inside brushes. These sprays evaporate quickly and kill bacteria that make brushes smell or irritate skin. Use is best after cleaning with soap to target leftover grime.
Specialized brush cleaning sprays often combine cleansing and sanitizing agents. Apply the spray to the brush and let it sit one to two minutes before rinsing. Avoid soaking whole brushes in alcohol; it can dry out natural bristles.
- After washing, spray the bristles lightly with 70% isopropyl alcohol or a brush sanitizer spray.
- Wait one to two minutes for the alcohol to kill bacteria and break down stains.
- Rinse briefly with lukewarm water to remove loosened residue.
- Pat brushes dry with a clean towel and reshape the bristles.
Rinsing Until Water Runs Clear
Finished brushing cleaning calls for careful rinsing under lukewarm running water. Keeping the brush tips downward prevents water from soaking into the handle, which can loosen glue. Rinse until water runs clear and no soap lathers remain.
Clear water means no leftover makeup or cleanser that can irritate skin or damage your brushes. Rinsing can take up to two minutes if the buildup was strong. Removing all suds and color is key before drying.
Some people wipe brush bristles with a clean cloth after rinsing. This helps lift out leftover residue.
It keeps brushes cleaner and fresher. Don’t skip this step if the water still looks cloudy or colored.
- Hold the brush tips downward under lukewarm running water.
- Gently squeeze the bristles with your fingers to push water through and remove residue.
- Continue rinsing until the water runs completely clear without soap bubbles or makeup tint.
- Wipe the brush gently on a clean cloth to catch leftover makeup if needed.
- Shake off excess water and reshape the bristles before drying.
When to Replace Your Makeup Brushes for Best Results
Makeup brushes wear out even if you clean them often. One clear sign is frayed bristles. They may also fall out during use.
Check your brushes often. Another clue is the brush losing its original shape, making it harder to apply makeup evenly.
Cleaning does help your brushes last longer by removing makeup, oils, and dirt. Still, makeup artist Yadav suggests replacing all your brushes at least every three months. Brushes soak up product and oils.
These can build up deep inside. This damages the natural bristles over time.
Synthetic and natural brushes last different lengths of time because of their materials. Natural brushes, made from animal hairs, are more porous and harder to clean fully. Synthetic brushes are usually more durable and easier to wash.
Synthetic brushes don’t last forever either. They wear down with heavy use. You might see them lose shape.
Here’s an easy way to decide when to replace brushes. Look for frayed or shedding bristles. Also check for misshapen heads or bad smells.
If your brush feels scratchy or stiff after washing, it’s a problem. These signs mean the bristles are damaged. That impacts how the brush works.
Check your brushes every few weeks, especially if you use them daily. Don’t wait for visible damage alone. Some brushes collect bacteria, especially when shared with others.
Humid storage spots also encourage bacteria growth. Keep your brushes clean and dry. Replace brushes faster in those cases.
Wash your brushes right to care for them. Using brush guards also helps protect bristles. These steps slow down wear and tear.
But don’t hesitate to buy replacements when your older brushes stop working well. Good-quality brushes cost $10 to $30.
That price is fair compared to using bad brushes. Poor brushes can cause makeup mistakes.
Maintaining Brush Hygiene for Skin Health and Safety
Using dirty makeup brushes can cause acne, irritation, and infections. Your brushes collect oil, dirt, dead skin, and bacteria every time you use them. These things build up and breed germs that clog pores and inflame skin.
Cleaning brushes regularly lowers the chance of breakouts and skin reactions. For example, eye-area brushes pose extra risk because that skin is delicate and prone to infection. You should clean those brushes more often to keep your eyes safe.
Sharing makeup brushes even after cleaning is risky. Some bacteria can survive light cleaning or move quickly between users. You have to share brushes?
Clean them well with a quality cleanser first. Let them dry completely before giving them to someone else.
Cleansing your brushes also cuts allergy risks and reduces irritation from leftover product or residue. Avoid cleansers with sulfates since they can leave a residue that clogs pores or causes irritation. Instead, go for gentle brush cleansers made specifically for makeup tools.
Brushes with heavy buildup need stronger cleansers to get completely clean. Dense brushes for cream or liquid makeup need strong cleaning. Use a cleanser like Cinema Secrets.
It breaks down oils and dirt quickly. Follow with gentle rinsing to remove all residues.
Cleaning your makeup tools in lukewarm water helps protect their bristles. Hot water can loosen glue and damage brushes over time. Spot-clean with quick brush cleansers or use more thorough washes weekly for best skin health results.
Never rush drying your brushes; wet brushes can harbor microbes that irritate skin.
Step-by-Step Action Plan for Cleaning Your Makeup Brushes
Follow these simple steps to clean your makeup brushes effectively at home. This plan helps you keep your brushes clean and skin clear.
- Before you start: Gather a gentle cleanser and lukewarm water. Use a product made for your brush type or a mild shampoo.
- Every week: Wash brushes you use daily, like foundation and concealer brushes. Check for a clean rinse and no leftover makeup.
- After each use: Use a dry microfiber cloth to gently wipe powder brushes. This helps reduce buildup between deep cleanings.
- During cleaning: Swirl brushes softly in cleanser with your fingers or a cleaning mat. Avoid pressing hard to protect bristles.
- Post-clean: Rinse thoroughly until the water runs clear. No suds or residue means your brush is clean.
- Drying time: Lay brushes flat on a towel with bristles hanging off the edge. Let dry fully overnight to keep their shape.
- Monthly review: Inspect brushes for loose hairs or cracks. Replace any brush that sheds or looks worn.
- Ongoing care: Store brushes upright in a clean container. Keep them away from dust and moisture to stay fresh.
Frequently Asked Questions
Can I Use Regular Shampoo to Clean My Makeup Brushes?
Yes, you can use a mild shampoo. It gently cleanses without damaging the bristles or leaving residue. Avoid shampoos with heavy fragrances or conditioners as those can clog the brush fibers.
Is It Okay to Soak Makeup Brushes Overnight?
No, soaking brushes overnight can loosen the glue holding the bristles in place. This causes shedding and damages the brush. Only dip the bristles briefly to avoid water reaching the handle.
Can I Clean Makeup Brushes with Household Vinegar?
Vinegar isn’t recommended for regular cleaning. It can dry out natural bristles and weaken glue. Stick to gentle soaps or brush-specific cleansers made for delicate fibers.
How Can I Prevent Mold Growth on Makeup Brushes?
Dry your brushes completely after washing. Lay them flat with bristles hanging off a counter edge to air dry. Avoid keeping brushes in damp, enclosed spaces before they’re fully dry.
Is It Better to Clean Synthetic and Natural Brushes Differently?
Yes, synthetic brushes handle soap and water better, so clean more often. Natural hair brushes need gentle cleansers and less frequent washing to protect their softer fibers.
Can Makeup Brush Cleaning Frequency Impact Skin Condition?
Yes, dirty brushes harbor bacteria and oils causing breakouts and irritation. Clean brushes every 7 to 10 days to keep skin healthy, according to dermatologists.
Final Thoughts
Cleaning your makeup brushes regularly helps your skin stay healthier and your makeup look better. Start with a small batch of brushes to get comfortable.
Keep that habit going. Your brushes will last longer and feel softer every time you use them.