How to Clean Hair Dryer Filter Quickly and Safely Plus Pro Tips
How to clean hair dryer filter is easier than it sounds and takes minutes. Start by unplugging your hair dryer to keep things safe.
Then, remove the filter cover or grill carefully. Many pop off or pry open with a screwdriver.
Use a small brush to clear lint and hair from your dryer. A vacuum with a hose works well, too. This helps keep your dryer running smoothly.
Do not use water on the filter directly. The filter needs to be completely dry before you put it back.
Wet filters can cause damage or block airflow. This simple step stops your dryer from overheating and helps it last years longer.
Clean your hair dryer filter every 3 to 4 weeks to keep it working well. Don’t switch the dryer back on until you are sure the filter is completely dry. This prevents electrical problems and keeps drying fast and efficient.
Key Takeaways
- Unplug your dryer before removing the filter for safety.
- Clean the filter at least every 3 to 4 weeks to avoid clogs.
- Use a small brush or vacuum hose to remove lint and hair.
- Never put the dryer back together until the filter is fully dry.
- Regular cleaning prevents overheating and extends your dryer’s lifespan.
- Check the filter more often if you use your dryer daily.
How to Clean Your Hair Dryer Filter Safely and Effectively
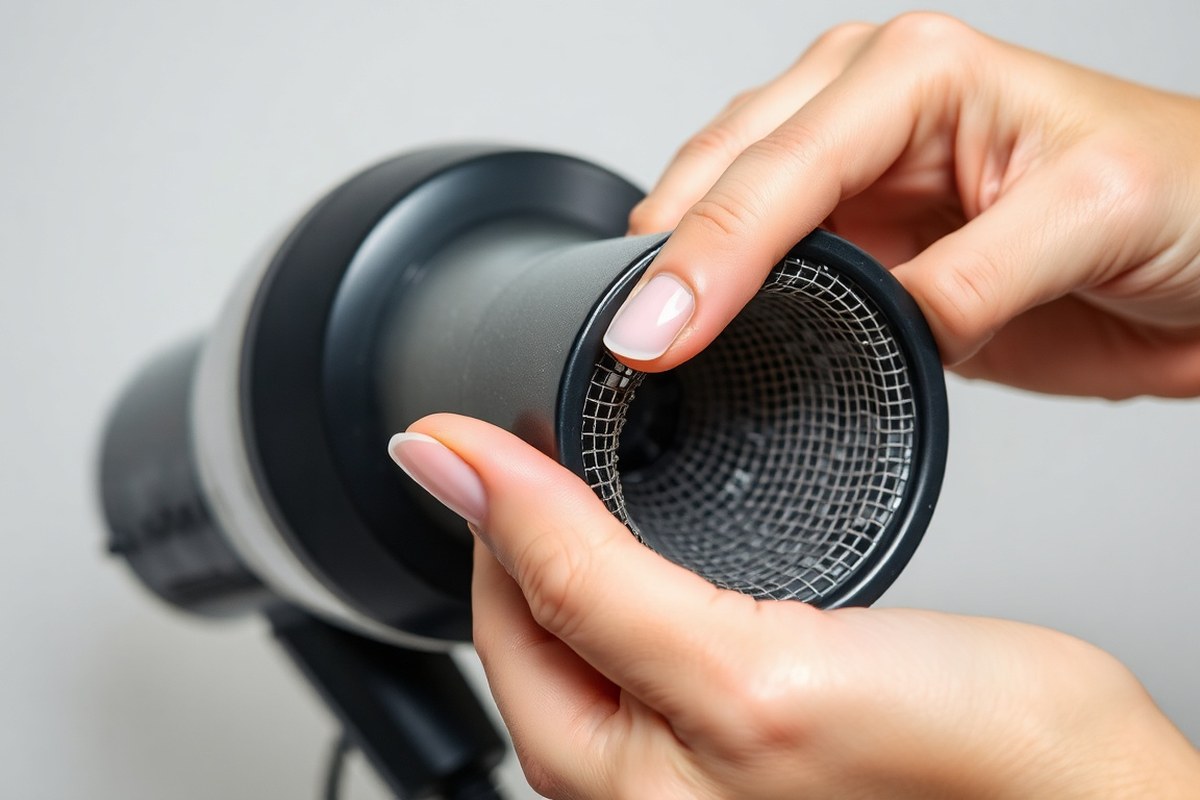
Start by unplugging your hair dryer and letting it cool completely. Then, carefully remove the filter following your model’s instructions. Clean the filter dry or wet, depending on the dirt build-up.
Let it dry fully for 8 to 24 hours. Only reassemble once the filter is totally dry.
Safety Precautions Before Cleaning
Always unplug your hair dryer before cleaning to avoid electric shock. Let the device cool down completely because the filter and dryer get hot during use. Check the user manual for any specific safety advice for your model.
Removing the Filter Without Damage
Locate the filter or grill, usually at the back of your dryer. Avoid forcing or twisting it too hard to prevent breaking clips or grills. For some models, use a small screwdriver gently to pry off removable grills.
Dry vs. Wet Cleaning: Which to Use
Use dry cleaning if you see light dust or lint buildup. A small brush or a soft cloth works best for this. You can rinse the filter under warm water to remove stuck dirt or hair.
Proper Drying Techniques
After rinsing, shake off excess water and pat dry with a towel. Let the filter air dry completely for 8 to 24 hours.
Place it somewhere warm and dry during this time. Never reassemble or use the dryer until the filter is completely dry to avoid damage.
Reassembling and Testing
Once fully dry, carefully fit the filter back into place, ensuring it clicks or locks securely. Replace any grill or cover you removed.
Plug the dryer in and test the airflow on the cool setting. This confirms the dryer is assembled properly.
- Unplug the hair dryer and let it cool for at least 10 minutes.
- Locate and carefully remove the filter or rear grill following your manual.
- Use a soft brush or cloth to remove dry dust and lint.
- Rinse the filter under warm water only if necessary, avoiding harsh scrubbing.
- Shake off excess water gently, then pat dry with a towel.
- Allow the filter to air dry completely for 8 to 24 hours in a warm spot.
- Once dry, reassemble the filter and secure any grill or cover.
- Plug in and test your hair dryer using the cool setting to ensure airflow.
How Often Should You Clean Your Hair Dryer Filter?

Most home users should clean their hair dryer filter every two to four weeks. Frequent daily use or long hair pushes that to once a week.
Professionals and salon stylists clean the filter more often. They usually do it every few days to keep it working well.
Frequency Based on Usage
Use your hair dryer once or twice weekly. Clean the filter once a month.
You can stretch it to every six weeks if you use it less. Hair dryers running daily, especially for styling clients, need filter cleaning weekly or more.
Skipping regular cleaning blocks airflow and can cause the motor to overheat. That slows drying and might shrink your hair dryer’s life to just two or three years. Proper care can stretch it past seven years.
How Hair Type and Length Affect Cleaning
Longer hair sheds more strands, which can clog the filter quickly. Thick, curly, or coarse hair tends to leave more lint and debris than fine hair. Clean filters more often if your hair is prone to shedding or tangles.
Users with short, fine hair might get by with monthly cleaning. Those with heavy shedding or lots of hair products will want to clean the filter weekly. Watch for visible dust, lint, or sticky buildup that slows airflow.
Special Schedules for Salon and Professional Use
Salons require filters to be cleaned every day or every other day. Those dryers work nonstop and face lots of dust, hair, and styling products. Professionals often swap filter cages or keep an extra to avoid downtime.
Dyson and some other premium brands supply a cleaning brush and an extra filter cage. This setup lets you continue styling while cleaning one filter. Follow the manufacturer’s instructions for recommended cleaning intervals.
Quick Cleaning Frequency Guidelines
- Light home use (1 to 2 times weekly): every 4 to 6 weeks
- Regular home use (daily or almost every day): every 2 to 4 weeks
- Long or thick hair: every 1 to 2 weeks
- Professional use: every 1 to 3 days
- Using heavy styling products: clean weekly regardless of hair type
- Dyson or premium dryers with extra filters: swap and clean filters as recommended
Establishing a cleaning routine helps avoid performance drops. A slow airflow or a hotter than usual dryer signals clogged filters.
Consequences of Ignoring Filter Cleaning
Clogged filters reduce performance, raise heat, and risk motor damage. They shorten your dryer’s lifespan and waste electricity by working harder. Your hair might take longer to dry, or you may find the dryer abruptly shuts off.
Dirty filters may also spread buildup inside the hair dryer, causing odor or even hygiene issues. Skipping cleaning wastes money on repairs or early replacement. Investing five minutes monthly saves hundreds of dollars over time.
Set a calendar reminder for cleaning, especially if you use your dryer frequently. Staying on schedule avoids damage and keeps drying times short.
Identifying When Your Hair Dryer Filter Needs Cleaning or Replacement
Look for visible lint or hair caught in your hair dryer filter. When airflow feels weak or the dryer gets very hot, the filter needs cleaning.
A burnt smell during use can also mean buildup inside the filter. These signs show the filter is clogged and blocking air.
Check the filter mesh closely for any tears or holes. Damage to the filter lets dust through. This can harm the dryer’s motor.
The mesh is worn or bent beyond fix with cleaning. You need a new one. In that case, you should replace the filter mesh to protect your hair dryer.
| Symptom | Action | When to Replace Instead |
|---|---|---|
| Visible lint or hair buildup | Clean filter thoroughly | No replacement needed |
| Weak airflow or longer drying time | Clean filter weekly | No improvement after cleaning means more serious issues might be present. |
| Dryer overheats during use | Clean filter immediately | Overheating after cleaning shows the dryer needs professional check or parts replaced. |
| Burnt smell during operation | Clean filter and check for debris | Keep the mesh intact. A bad smell or damage means replace the filter. |
| Torn or damaged filter mesh | Replace filter mesh | Always replace damaged mesh |
| Dryer takes twice as long to dry hair | Clean filter monthly | Replace filter if no change |
Performance drops like weak airflow often signal a dirty filter. The dryer may feel hotter than usual because the motor works harder to push air.
This extra strain can shorten your appliance’s life. Cleaning the filter regularly prevents these issues and keeps the dryer working well.
Replacement is necessary when cleaning doesn’t help. It also matters if your dryer has been used for years without filter upkeep. New OEM filter mesh usually costs $10 to $30.
It varies by brand and model. Always use the right size and mesh aperture to keep airflow steady and protect the motor.
Tools and Materials Needed for Cleaning Your Hair Dryer Filter
You need just a few tools to clean your hair dryer filter well. For dry cleaning, a small soft brush is best.
It helps get rid of lint and hair gently without damaging the filter. A clean, dry cloth also works well to wipe off loose dust.
Using a household vacuum cleaner can help. But use the hose attachment on low power.
Avoid strong suction, which might pull apart delicate filter parts. The vacuum works great for vents and grills if you can remove them.
Wet cleaning needs a bit more stuff if your filter is removable and washable. Lukewarm water with mild dish soap or clarifying shampoo breaks down oils and stubborn dirt. Never use bleach or harsh cleaners, they can ruin the filter fabric or catch fire later.
- Soft-bristled brush or old toothbrush for lint and hair
- Household vacuum cleaner with hose attachment on low power
- Lukewarm water and mild dish soap or clarifying shampoo for washable filters
- Clean, dry cloth for wiping and drying
- Flat drying rack or a clean towel to air dry the filter
Avoid rough brushes or steel wool, they can tear the filter mesh. Soft brushes cost about $5 to $10 and last a long time. Towels should be lint-free to prevent more debris from sticking.
Air drying is best. Avoid direct sunlight or heat sources that might warp the filter frame.
Dry cleaning every 2 to 4 weeks reduces the need for washing. Wet cleaning only happens when the filter gets greasy or visibly dirty. You’ll see better airflow and faster drying after a good clean.
Skipping these tools can cause build-up inside your hair dryer. This build-up shortens the dryer’s life and may cause overheating.
Step-by-Step Guide to Remove and Clean the Filter
Cleaning your hair dryer filter takes about 5 to 10 minutes. You first remove the filter cover safely.
Then clean the filter using dry or wet methods. After drying, reattach the parts correctly for proper dryer function.
Removing the Filter Cover
Locate the filter cover on the back of your hair dryer. Some covers twist off. Others need to be gently pried open with a fingernail or a flat tool.
Doing this carefully prevents damage to the plastic or mesh behind it. You should never force the cover off, it should come away with little resistance.
Dry Cleaning with Brushes and Vacuum
Use a soft brush, like a clean toothbrush or the brush provided with your hair dryer. Gently sweep the filter’s mesh to remove visible hair, lint, and dust.
Use a vacuum’s hose attachment to clean the filter after brushing. This pulls out smaller particles stuck in the mesh.
- Hold the filter securely in one hand.
- Brush the mesh gently with a soft toothbrush for 1, 2 minutes.
- Run the vacuum hose over the mesh to suck out loosened debris.
- Repeat brushing and vacuuming if needed until the mesh looks clear.
Never use a stiff brush or sharp tool, it can tear the filter mesh.
Wet Cleaning with Soapy Water and Rinsing
Wash the filter carefully when it still looks dirty or sticky. Use lukewarm water with a mild soap or dish detergent to avoid damaging the mesh.
Dip the filter in the soapy water and use a soft toothbrush to scrub lightly. Then rinse under cool running water to remove all soap.
- Fill a bowl with room temperature water and a few drops of mild soap.
- Let the filter soak for 3, 5 minutes to loosen dirt.
- Brush gently with a soft toothbrush to clear remaining build-up.
- Rinse thoroughly under cool water to remove soap residue.
Avoid hot water, as this can warp or weaken the filter material.
Complete Drying and Alternative Methods
Shake excess water off the filter right after rinsing. Set it on a dry towel in a warm, dry spot to air dry fully. This usually takes 2, 4 hours.
Use a low heat fan or hair dryer from 6 to 8 inches away to dry it faster. Never use high heat on the filter itself.
- Gently shake off water and place the filter flat on a dry towel.
- Leave it uncovered in a warm room for 2, 4 hours to air dry.
- Optionally, use a fan on low or a blow dryer on cool to speed drying.
- Ensure the filter feels completely dry before reinstalling it.
Putting a wet filter back risks motor damage and poor dryer performance.
Reassembly and Functional Testing
Fit the dry filter back onto its base carefully, making sure it sits flush. Replace the cover by snapping it or twisting it into place securely.
Test your hair dryer on low heat for 1 minute to check airflow. You should feel strong, even airflow without noise changes or blockage.
- Align the filter correctly with the hair dryer opening.
- Press or twist the filter cover gently until it clicks or locks in place.
- Turn your dryer on low heat to monitor airflow and noise.
- Stop and check if airflow feels weak or unusual; adjust parts if necessary.
Loose filter covers may fall off or let debris inside. So ensure a tight fit.
Preventing Lint and Hair Buildup in Your Hair Dryer Filter
Hair and lint buildup slows airflow and makes your hair dryer run hotter. You can stop most of this by trapping stray hairs before they reach the filter.
Using a fine mesh pre-filter attachment helps catch loose strands and lint. These add little cost and fit easily on your dryer’s intake vent.
Different hair types shed differently. Thicker or curlier hair, like types 3 and 4, sheds more. This raises the chance of buildup on your dryer.
It happens because more hair falls during drying. Avoid drying your hair too close to the filter. Hold the dryer about 6 inches away to reduce hair and lint catching in the vents.
For daily upkeep, wipe down your dryer’s outer vents and casing with a dry cloth. This stops dust and hair from gathering around the air inlet.
Also, clean your brush or comb regularly. When your tools are clean, less hair falls into your dryer while styling.
- Use a mesh pre-filter attachment during every drying session
- Hold dryer at least 6 inches from your scalp and hair ends
- Wipe dryer vents and casing with a dry cloth each day
- Brush or comb hair before drying to remove loose strands
- Limit use of heat settings that cause your hair to shed more
- Every 3 months, deep clean filter, vents, and casing
Some dryers come with features to minimize buildup. For example, styles with smart heat settings keep your hair from drying too hot and shedding.
Others blast negative ions to reduce static and hair breakage. These help keep the filter cleaner longer, but you still need to clean regularly.
Maintaining a routine schedule and good habits saves time on heavy cleaning later. Keeping surrounding vents clean prevents clogging and keeps airflow strong. Your dryer dries hair faster and stays cooler because of this.
It helps the dryer last longer. It also keeps your hair healthier.
Troubleshooting Common Issues After Cleaning Your Hair Dryer Filter
Weak airflow after cleaning your hair dryer filter can mean deeper clogs or damage. Check for blockages in the motor or vents by shining a flashlight inside. Use a thin brush or compressed air to clear debris gently from these areas.
After cleaning, overheating can still happen if airflow isn’t steady. Make sure no hair styling products or sticky residue remain inside the dryer. Residues can gum up the motor and cause it to run too hot, risking permanent damage.
Unusual noises often come from loose parts or debris stuck inside. Remove the filter again and inspect the internal components visually. Tighten any screws you find loose and clear dust or lint from moving parts carefully.
The table below helps match symptoms with causes and fixes. It shows what to check and how to act if problems continue after cleaning your filter.
| Symptom | Possible Cause | Step-by-Step Fix |
|---|---|---|
| Weak airflow | Clogged motor, damaged filter, vent blockage | Check motor and vents for clogs, replace damaged filter |
| Overheating | Sticky residue, poor airflow, motor strain | Clean inside with a soft cloth, clear residue, ensure airflow |
| Unusual noise | Loose screws, debris on moving parts | Inspect filter area, tighten screws, remove lint or debris |
| Persistent issues | Internal motor damage, electrical fault | Stop use, seek professional repair service |
Gently cleaning inside your dryer takes about 10 to 15 minutes using common tools. If problems last after you clear every part, avoid using your dryer. Continuing can make motor damage worse or cause electrical hazards.
A qualified repair technician can confirm if you need a new motor or replacement parts. Professional service can cost from $50 to over $100 depending on the issue. Sometimes replacing the whole dryer is cheaper if costs rise.
When to Seek Professional Help or Replace Your Hair Dryer
Your hair dryer needs professional help if cleaning the filter doesn’t fix the problems. The motor may be damaged if the dryer still gets hot or smells burning.
If it makes grinding or rattling noises, stop using it. Call a professional for help.
Damage beyond simple cleaning includes cracks in the filter screen or melted plastic around it. These issues block airflow and can cause internal damage.
Spotting these signs means a professional should inspect your dryer. They can check if repair is possible or replacement is safer.
Filters clogged with thick hair or dust need more than gentle brushing. This may mean deeper problems inside. Professionals can open your dryer safely to clean the inside.
They avoid motor damage from water or soap. Avoid DIY attempts that involve water inside the dryer, as it can ruin the motor.
Dryers older than 5 years with repeated overheating might be cheaper to replace. Repair could cost more in this case. Professional filter cleaning usually costs $20 to $40.
Motor repairs can run $50 to $100 or more. Buying a new hair dryer can range from $30 to $150, depending on brand and features.
Look for a professional service that offers filter cleaning plus motor inspection. They should use dry cleaning methods only and test the dryer’s airflow and heat after service.
Ask if they guarantee their work and if parts are covered. Quality service takes 30 to 60 minutes and helps extend your dryer’s life.
Never wash the hair dryer filter with water or soap to avoid motor damage inside.
Step-by-Step Action Plan for Cleaning Your Hair Dryer Filter
Follow this simple timeline to keep your hair dryer working well and safe to use. Clean and check the filter regularly to avoid damage.
- Before you start: Unplug your hair dryer and let it cool completely. This keeps you safe while cleaning.
- Week 1: Remove the filter cover and clean it using a soft brush or cloth. You’ll know it’s done when no dust or hair is visible.
- After 1 month: Soak the filter briefly in warm, soapy water. Let it dry fully before replacing it. Check airflow is strong when you use the dryer again.
- Every 2 months: Inspect the filter carefully for damage or wear. Replace it if you see tears or holes.
- Every 3 months: Wipe the outside vents of your hair dryer to prevent buildup. Feels cleaner and airflow should improve.
- After 6 months: Weak airflow or overheating means clean again. If that doesn’t help, try professional repair. This keeps your dryer safe to use.
- When noticing unusual sounds: Check the filter for blockages immediately. Clear it to avoid motor strain and noises.
Frequently Asked Questions
Can I Clean My Hair Dryer Filter with Water?
Yes, you can clean it with water. Make sure to fully dry the filter before reassembling your hair dryer to avoid damage.
Does Cleaning the Filter Improve Drying Speed?
Cleaning the filter usually restores normal airflow. This helps your hair dryer dry hair faster and prevents overheating.
What Tools Can I Use Besides a Brush to Clean the Filter?
A toothbrush or a soft cloth works well to remove lint. Avoid anything too rough that could damage the mesh.
Can I Use Compressed Air to Clean the Hair Dryer Filter?
Yes, gentle bursts of compressed air can loosen dust. Be careful not to damage the filter or push debris deeper inside.
How Do I Know If My Hair Dryer Filter Needs Replacement?
Replace the filter if the mesh tears or shows permanent clogging. A damaged filter can reduce airflow and damage the dryer.
Is It Safe to Keep Cleaning the Filter by Myself?
Yes, cleaning the filter is safe if you unplug the dryer first. Avoid opening electrical parts unless you’re experienced or using a professional.
Wrapping Up
Keeping your hair dryer filter clean protects your appliance and hair health. You can make this part of your routine easily. Start by cleaning your filter today, and watch your dryer last longer.